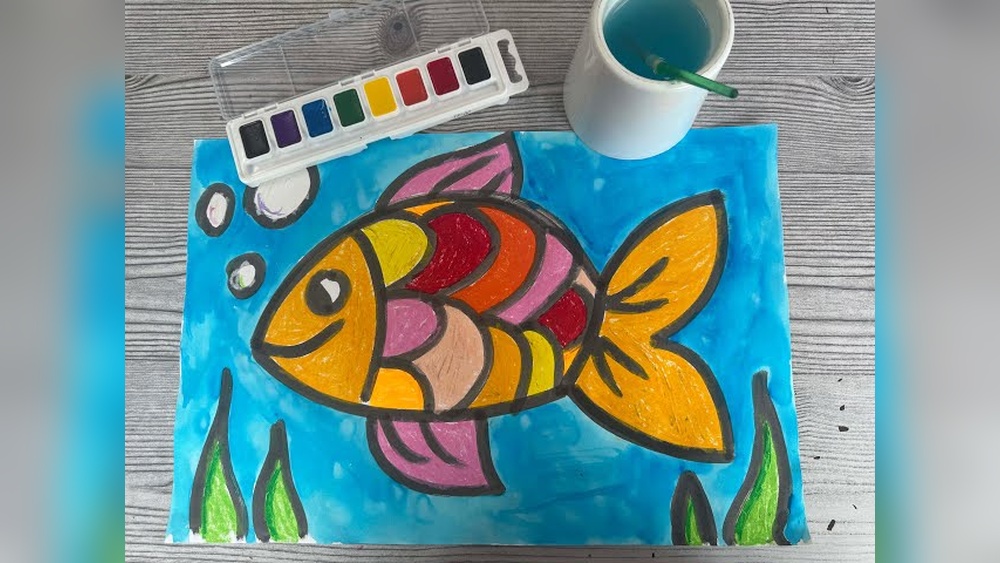
Quick answer: Here is how to paint a fish for kids: paint a sideways oval or lemon shape for the body and a triangle tail touching one end, then let it dry for about 10 minutes. Add a curved line for the gills, a big dot eye with a white highlight, a small fin on top and bottom, and decorate the body with scales made by stamping curved “c” shapes or dabbing dots. Paint a blue water background first, and finish with bubbles made from white circles. Most kids aged 3 and up can complete a fish in 30 to 40 minutes.
A fish might be the simplest animal a child can paint. The body is one shape, the tail is another, and that is a recognizable fish before a single detail goes on. What makes it fun is everything after that: rainbow scales, stripes, polka dots, googly eyes, seaweed and bubbles.
Below you will find how to paint a fish for kids easy enough for a 3-year-old and flexible enough for a 10-year-old who wants a full underwater scene. The guide covers a basic fish, five fish styles, scale techniques using household items and an ocean background method that does not turn muddy.
The Two-Shape Fish: Why It Is So Easy
Every beginner fish starts with two shapes:
- Body: an oval, a lemon (oval with pointed ends) or a rounded diamond.
- Tail: a triangle with one point touching the end of the body, or a “v” shape like a heart cut in half.
Because there are no legs, ears or tricky proportions, kids can focus on brush control and color. It is one of the best first projects for practicing how to fill a shape without going outside the lines. If you are building a series of beginner sessions, the overview of easy painting techniques and ideas for kids suggests what to try next as skills grow.
Supplies
| Supply | Suggested choice | Notes |
|---|---|---|
| Surface | Heavy paper or a canvas panel, 8×10 to 9×12 inches | Landscape (wide) orientation suits a swimming fish |
| Paint | Washable tempera or student acrylic | Blue for water; 2 to 4 bright colors for the fish; black and white |
| Brushes | One wide flat, one medium round, one small round | A foam brush works for water |
| Stamping tools | Bubble wrap, a cork, a bottle cap, a fork, cotton swabs | For scales and bubbles |
| Extras | Pencil, water cup, paper towels, plate palette, smock | Optional: glitter glue or googly eyes |
How to Paint a Fish for Kids Easy: Step-by-Step
Step 1: Sketch the fish
Draw a large sideways oval in the middle of the paper, filling about half the width. Draw a triangle tail at one end with its point touching the oval. Add a small curved triangle on top of the body for the dorsal fin and a smaller one underneath. Keep pencil lines light.
Step 2: Paint the water
Paint the background around the fish with blue. For a deeper look, start with light blue near the top of the paper and gradually add a little darker blue as you move down, brushing side to side. This gradient suggests sunlight coming from the surface. Kids can paint right over the edges of the fish sketch; the fish paint will cover it later.
Let the water dry for about 10 minutes. Painting the fish on a wet blue background will turn yellow or orange fish green, which is a common surprise.
Step 3: Paint the body and tail
Fill the body with a bright color like orange, yellow, pink or lime green. Paint the tail and fins in the same color or a contrasting one. A two-color fish, such as a yellow body with an orange tail, looks lively and clear.
If the blue shows through, wait a few minutes and add a second coat. Light colors like yellow often need two coats over a darker background.
Step 4: Dry break
Give it 10 to 15 minutes. While waiting, decide what pattern the fish will have: scales, stripes, spots or zigzags.
Step 5: Gills and eye
Paint a curved line near the head end of the body, like a backward parenthesis, to show the gill. In front of it, paint a large white circle for the eye. When dry, add a black dot inside and a tiny white highlight dot on the black. A big eye makes the fish look friendly and cartoon-like.
Add a small curved line or “o” shape at the very front for the mouth. An “o” looks like the fish is blowing bubbles.
Step 6: Scales or pattern
Choose one of the scale techniques below. Work from the tail toward the head so the scales overlap naturally, just like on a real fish.
Step 7: Fin lines and finishing
Paint thin lines fanning out across the tail and fins with a small brush in a darker shade. These lines make the fins look like they have structure. Finish with bubbles: white circles of different sizes rising from the mouth toward the top of the paper.
Five Ways to Paint Fish Scales
Scales are where kids can experiment most. Each method below works over a dry body color.
- Brush “c” strokes: Load a small round brush with a darker or lighter color and paint rows of small curved “c” shapes, overlapping each row slightly. Classic and easy for ages 6 and up.
- Bubble wrap print: Paint a scrap of bubble wrap with a contrasting color and press it gently onto the fish body. It leaves a grid of dots that looks like scales instantly. Great for preschoolers.
- Fork stamp: Dip the back of a fork’s curved tines in paint and press. The arc pattern looks like layered scales.
- Bottle cap or cork circles: Stamp overlapping circles in two or three colors for a bright, bold fish.
- Cotton swab dots: Dab rows of dots in rainbow order. This doubles as a fine motor exercise for little hands.
Five Fish Styles to Try
| Fish style | Shape changes | Colors | Best for |
|---|---|---|---|
| Goldfish | Round body, flowing double tail | Orange with lighter belly | Ages 3 to 6 |
| Clownfish | Oval body, rounded fins | Orange with three white stripes outlined in black | Ages 5 to 9 |
| Angelfish | Tall triangle body, long fins up and down | Yellow and black vertical stripes | Ages 6 to 10 |
| Pufferfish | Big circle body, tiny tail, spikes | Tan or yellow with brown spots | Ages 4 to 8 |
| Rainbow fish | Classic oval | Every scale a different color, plus silver or glitter | All ages |
Clownfish tips
Paint the whole fish orange first. When dry, paint three white bands: one behind the eye, one across the middle and one near the tail. After those dry, outline each white band with a thin black line. The outline is optional for younger kids but makes the stripes pop for older ones.
Pufferfish tips
Kids love the silly look of a puffed-up fish. Paint a big circle, add short triangle spikes around the edge and give it surprised round eyes and a tiny “o” mouth.
Easy Ocean Painting for Kids: Building the Underwater Scene
A background turns a single fish into a whole story. Add these elements after the water dries and before or after the fish, depending on whether they sit behind or in front.
- Sandy floor: A strip of tan or light brown along the bottom. Dab darker dots for pebbles.
- Seaweed: Wavy vertical lines in two greens rising from the sand. Paint them with a flick of the wrist from bottom to top.
- Coral: Branching shapes in pink, orange or purple, like little trees.
- Light rays: Thin diagonal streaks of very pale blue or white from the top corner, painted with a dry brush and very little paint.
- Friends: A starfish, a snail or a jellyfish with wavy tentacles.
Paint background elements before the fish if the fish swims in front of them. Paint the seaweed after the fish if you want the fish peeking from behind.
Easy Animal Painting for Kids: Age Adjustments
Toddlers and preschoolers
Cut a large fish shape from paper and let them paint it freely with sponges and bubble wrap. Glue it onto a blue page afterward. They get the sensory fun and a recognizable result. Expect 10 to 20 minutes of focus.
Ages 5 to 7
Follow the full method with an adult helping sketch if needed. Encourage one pattern technique and simple bubbles. They will likely want to name the fish, which is a great time to talk about colors and feelings.
Ages 8 and up
Introduce shading: paint the belly lighter and the back darker. Try an angelfish or a school of small fish all swimming the same direction, which teaches repetition and composition. They might also try a fish facing the viewer at an angle.
Common Mistakes and Fixes
- Fish turned green. The yellow or orange was painted over wet blue. Let it dry, then repaint the fish with an opaque coat.
- Tail looks disconnected. Make sure the triangle’s point overlaps the body. A small stroke of body color across the join fixes a gap.
- Scales look messy. Too much paint on the stamp. Blot stamps on a paper towel first, and press straight down without sliding.
- Background looks streaky. Thin paint on absorbent paper dries in streaks. A second coat of blue, brushed in one direction, evens it out.
- Bubbles look like eyes. Vary their sizes and float them in a loose line up toward the surface, away from the fish’s head.
Easy Canvas Painting Ideas for Kids Step by Step: A School of Fish
A group of fish swimming together makes a striking canvas and teaches kids about repetition and direction. Here is a simple plan:
- Paint the canvas with a blue gradient and let it dry completely, ideally 20 minutes on canvas since it absorbs more paint.
- Pick one direction for the whole school, such as left to right, and lightly sketch five to nine small lemon-shaped bodies in a loose diagonal band.
- Paint every fish the same color, or use two alternating colors, so they read as one group.
- Add one “odd fish out” swimming the opposite direction in a contrasting color. Kids love this little story inside the painting.
- After drying, give each fish a dot eye and two or three scale strokes. Small fish need fewer details than one big fish.
Overlapping a few fish so one sits partly behind another adds depth. Paint the back fish first, let it dry, then paint the front fish over its edge.
Easy Things to Paint for Kids After a Fish
Fish naturally lead to other ocean projects. A turtle uses the same oval body plus a patterned shell, a jellyfish practices wavy lines and an octopus is a circle with eight bendy legs. For a non-ocean break, try blowing paint with a straw to make seaweed or coral. The straw painting tips for kids explain how much water to add so the paint actually moves.
FAQs
How do you paint a fish for kids step by step?
Sketch an oval body and a triangle tail, paint a blue water background and let it dry. Paint the fish in a bright color, let that dry, then add a gill line, a big eye, scales and fin lines. Finish with white bubbles rising from the mouth.
What is an easy ocean painting for kids?
A gradient blue background with a sandy strip, wavy green seaweed and one or two simple fish is an easy ocean scene. Add bubbles and a starfish for detail. It can be finished in under an hour.
How do kids make fish scales with paint?
Bubble wrap prints, fork stamps, bottle-cap circles, cotton swab dots or small curved brush strokes all create scales. Apply them once the body color is dry so the colors stay clean.
What paint works best for a kids’ fish painting?
Washable tempera is easy, bright and simple to clean. Student acrylic is better for canvas or for keeping the painting long-term. Watercolor works for the water background but is usually too transparent for bright fish over blue.
Is a fish a good easy animal painting for kids under 5?
Yes. A fish needs only two shapes and no tricky features, so very young kids can succeed. Pre-cut or pre-drawn outlines and stamping tools make it even easier for toddlers.
How do I stop the blue background from mixing into the fish?
Wait until the blue is dry to the touch, usually 10 to 15 minutes, before painting the fish. Alternatively, paint the fish first, let it dry, and paint the water carefully around it.
Final Thoughts
A two-shape fish is a quiet confidence builder: easy to start, endlessly customizable and satisfying to finish. Once kids have painted one, they can create a whole aquarium of different species and patterns.
For fresh ideas that build on the same skills, including printing, stamping and seasonal projects, head to the complete painting for kids resource and choose your next adventure.