
Painting a night sky wall art can transform any room into a peaceful and dreamy space. Many people want to create this kind of art, but they worry it’s too hard or they need special skills. The truth is, you can paint a beautiful night sky on your wall, even if you’re a beginner.
With the right materials, some patience, and a little creativity, you can bring the magic of the stars right into your home.
In this guide, you’ll learn every step needed to create your own night sky wall art. You’ll discover what materials work best, how to prepare your wall, easy painting techniques, and clever tips to make your stars and galaxies look realistic.
You’ll also find answers to common questions, so you feel confident to start your project.
Why Paint A Night Sky Wall?
A night sky wall art brings more than just color to a room. It creates a feeling of calm and wonder. Children love to fall asleep under stars, and adults find it relaxing too. This kind of art is perfect for bedrooms, playrooms, meditation spaces, or even cozy reading corners.
Unlike posters or stickers, a painted night sky is permanent and unique. You can choose your favorite constellation, add a glowing moon, or create a galaxy full of colors. Your wall becomes a piece of art that’s truly yours.
Materials You’ll Need
Before you start, gather the right materials. This makes your painting process smoother and more enjoyable. Here’s a complete list:
- Acrylic wall paint (dark blue, black, purple, white, and accent colors like teal or pink)
- Paint brushes (one large roller, several medium brushes, and small detail brushes)
- Paint sponges (for blending colors)
- Painter’s tape (to protect edges and ceilings)
- Drop cloths (to keep floors clean)
- Pencil and eraser (for sketching outlines)
- Palette or paper plates (for mixing colors)
- Spray bottle with water (for blending)
- Step ladder (if painting a tall wall)
- Fine-tipped toothbrush (for star splatter effect)
- Glow-in-the-dark paint (optional for extra magic)
- Protective gloves and old clothes
If you want to add planets or the moon, gather round objects to trace circles, or print templates.

Credit: www.youtube.com
Preparing Your Wall
Proper preparation is key to a beautiful finish and long-lasting art. Follow these steps:
Clean And Repair
Wipe your wall with a damp cloth to remove dust and grease. Fill any holes or cracks with wall filler and sand smooth once dry.
Protect Surroundings
Lay down drop cloths and use painter’s tape to cover baseboards, outlets, and adjacent walls. This prevents unwanted paint marks.
Prime (if Needed)
If your wall is very dark, stained, or has a glossy finish, apply a layer of white or light primer. This helps your night sky colors look bright and even.
Plan Your Design
Use a pencil to lightly sketch major features. Decide where the horizon, moon, and main stars will go. This step saves time and prevents mistakes.
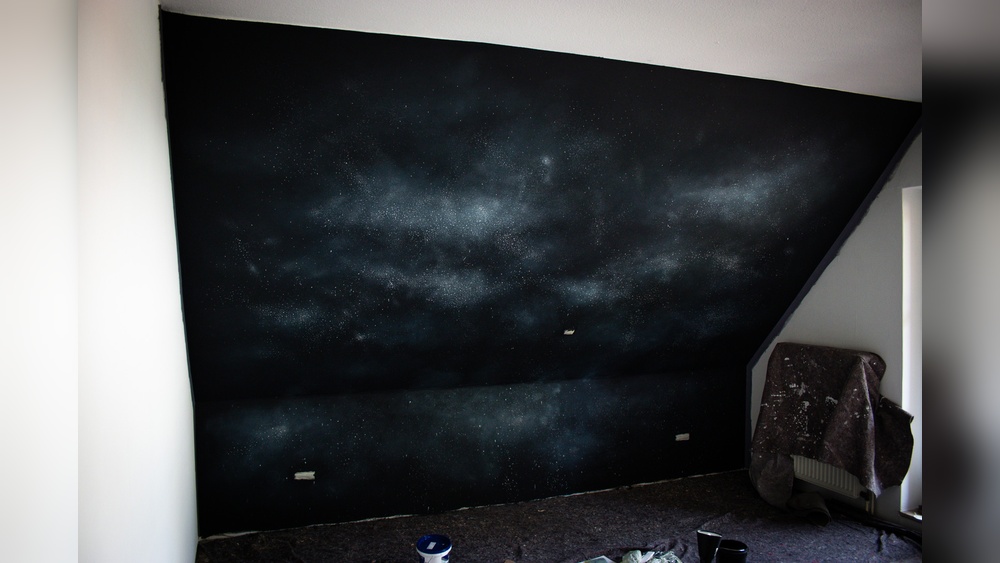
Choosing Your Night Sky Style
There are many ways to paint a night sky. Here are three popular styles:
| Style | Description | Best For |
|---|---|---|
| Classic Starry Night | Deep blue with scattered white stars and maybe a soft moon | Bedrooms, calming spaces |
| Galaxy | Mix of blues, purples, pinks, and swirling colors with bright star bursts | Creative rooms, kids’ playrooms |
| Minimalist Night | Simple black or navy with a few bold stars or a crescent moon | Modern decor, small rooms |
Think about the mood you want and the size of your wall. Darker, richer colors make rooms feel cozy, while lighter shades give a more open feeling.

Credit: www.youtube.com
Step-by-step Painting Guide
Let’s get started with the painting. Take your time—good art can’t be rushed.
1. Create The Background
Start with your largest brush or roller. Mix navy blue and black to get a deep night color. For a galaxy, add a little purple or teal. Use a sponge to gently blend the colors while they’re still wet, creating soft clouds or waves.
Spray a little water and dab with a sponge for a misty effect. This blending is what gives your sky depth and makes it look real.
Pro tip: Don’t worry about perfection. The sky is always changing, and soft, uneven blending looks more natural.
2. Add Color Layers
Let your first layer dry. Then, add lighter shades in some areas—like a bit of purple, turquoise, or even pink for a galaxy look. Use a sponge or soft brush to gently blend the edges so there are no harsh lines.
If you want a moon or Milky Way, sketch it lightly with pencil first, then fill in with white or pale gray. Blend the edges for a glowing look.
3. Paint The Stars
Dip a small brush in white paint, then tap or flick it gently over the wall to create random stars. For extra small stars, use a toothbrush: dip the bristles in white paint and run your thumb over the bristles to spatter tiny dots.
Add a few larger stars by painting small dots with a fine brush. Place them in clusters or create simple constellations. Avoid making all stars the same size—variety looks more natural.
Non-obvious tip: Less is more! Too many stars can make the wall look busy. Focus on a few bright points and let the dark space add drama.
4. Add Special Features
Now you can add extra details like a glowing moon, shooting stars, or even planets.
- For a moon, use a round object as a template. Paint with white, then add gray shadows for craters.
- For planets, use small plates or bowls to trace circles, and fill with bold colors. Add rings or highlights for a 3D effect.
- For shooting stars, lightly drag a thin brush dipped in white for a quick, curved line.
If you want, use glow-in-the-dark paint over some stars or the moon for a magical nighttime glow.
5. Finishing Touches
Step back and look at your wall. Add more stars or color if some areas look empty. Remove the painter’s tape carefully. Let your wall dry for at least 24 hours before touching or decorating.
Non-obvious insight: Take photos of your wall during the process. It helps spot areas that need more blending or stars, and you’ll love seeing your progress.
Helpful Painting Techniques
Painting a night sky involves blending and layering. Here are some techniques to make your work easier and better:
- Wet blending: Blend two colors while both are wet using a sponge or soft brush.
- Dry brushing: Use a dry brush with a little paint to soften edges or add clouds.
- Spattering: For stars, use a stiff brush or toothbrush for random dots.
- Layering: Wait for paint to dry before adding another color on top. This prevents muddy colors.
| Technique | Best Use | Common Mistake |
|---|---|---|
| Wet blending | Background gradients | Applying too much water, causing drips |
| Dry brushing | Soft clouds, glowing halos | Using too much paint, leaving streaks |
| Spattering | Natural, random stars | Flicking too hard, making large splotches |
| Layering | Adding depth and details | Not letting paint dry between layers |
Common Beginner Mistakes (and How To Avoid Them)
Painting your first wall mural can be tricky. Here are mistakes to watch out for:
- Skipping wall prep: Not cleaning or priming the wall can lead to peeling or uneven color.
- Overloading the brush: Too much paint causes drips and mess.
- Trying to make every star perfect: Real skies are random. Embrace some chaos.
- Not stepping back: View your wall from a distance often. It helps see the big picture.
- Using cheap paint: Low-quality paint may look patchy or fade quickly.
Tip: Test your paint colors on a small wall section first. Colors often look different on the wall than in the can.
Making Your Night Sky Art Unique
Personal touches make your mural special. Here are ideas:
- Add your favorite constellation or zodiac sign.
- Paint a shooting star for luck.
- Include a hidden message with tiny stars (like initials).
- Blend in mountains or tree silhouettes at the bottom for a landscape effect.
- Use metallic or glow-in-the-dark paints for stars that shine at night.
You can also paint with friends or family. Each person can add a star or detail, making the wall art a shared memory.
Cleaning Up And Maintaining Your Wall Art
After painting, clean your brushes with warm water and soap. Remove tape slowly to prevent peeling. Let the wall dry completely before moving furniture back.
To keep your mural looking fresh:
- Dust gently with a dry cloth.
- Avoid harsh cleaners or scrubbing.
- Touch up stars or color if they fade over time.
Acrylic paint is durable, but direct sunlight may cause some fading. Close curtains during the hottest part of the day if possible.
When To Call A Professional
Most people can paint a night sky wall art by themselves. But if your wall is very large, has tricky angles, or you want a super-detailed galaxy, you might consider hiring a mural artist. They have special tools and experience.
You can also find inspiration or online tutorials from professionals, like those on WikiHow, to see different styles and techniques.

Credit: www.amazon.com
Frequently Asked Questions
How Long Does It Take To Paint A Night Sky Wall?
Most night sky murals take about one or two days. One day is for painting and drying, and the second for details or touch-ups. If you add many layers or use glow-in-the-dark paint, allow extra drying time.
What Kind Of Paint Works Best For Night Sky Wall Art?
Acrylic wall paint is the best choice. It dries fast, is easy to blend, and comes in many colors. For stars and details, use artist acrylics or even simple craft paints.
Can I Paint Over Wallpaper Or Textured Walls?
It’s possible, but results vary. On smooth walls, the sky looks soft and blended. On textured walls, stars may look rough. If you have wallpaper, it’s better to remove it or paint a layer of primer first.
How Do I Make The Stars Glow At Night?
Use glow-in-the-dark paint on top of your white stars or moon. Charge it with a lamp or sunlight during the day. The effect is soft but magical, especially in children’s rooms.
Is It Easy To Fix Mistakes?
Yes! Acrylic paint is forgiving. If you make a mistake, let it dry, then paint over with your background color. Blend gently and add new stars or details as needed.
Painting a night sky wall art is a rewarding way to add beauty and personality to your space. With the right steps and a little practice, anyone can create a wall that looks stunning day and night. Let your creativity shine, and soon you’ll have a night sky you can enjoy every day.


