
Painting old stone walls in oil is more than just a creative project—it’s a journey into history, texture, and light. Many people feel nervous about capturing the unique character of aged stone, but with the right approach, you can turn these rough surfaces into beautiful works of art.
Whether you want to paint an outdoor garden wall, a historic building, or an atmospheric interior, this guide will help you master every step.
You’ll discover practical techniques, understand essential materials, and learn how to solve common challenges. By the end, you’ll have both the confidence and the know-how to create oil paintings that show the beauty of old stone walls.
Understanding Old Stone Walls
Old stone walls are not just flat gray surfaces. They have texture, color variation, and often tell a story through cracks, moss, and weathering. To paint them well, you must first learn to see these details.
Look at the wall closely. Notice how some stones are smoother, others rough. Some parts may have warm or cool tones due to sunlight, shadows, or age. Old mortar between stones might crumble or be stained by water. These characteristics are what make stone walls such interesting subjects.
Why Oil Paints?
Oil paints are perfect for stone walls because they offer depth, rich color, and blending ability. Unlike acrylics or watercolors, oils dry slowly, giving you time to adjust tones and work with subtle transitions. They also allow for impasto—a technique where paint is applied thickly to mimic the stone’s texture.
Gathering Your Supplies
To start painting old stone walls in oil, you’ll need the right materials. Using quality supplies makes a big difference in your results.
| Item | Purpose | Tips |
|---|---|---|
| Oil Paints | Color and texture | Choose artist-grade for better pigment |
| Brushes | Application and detail | Have a mix of flat, round, and fan brushes |
| Canvas or Panel | Painting surface | Stretched canvas or primed wood panels both work |
| Palette Knife | Texture effects | Great for thick paint and stone texture |
| Mediums | Thinning, drying control | Linseed oil, Gamsol, or other painting mediums |
| Rags/Paper Towels | Cleaning and blending | Keep plenty nearby |
| Palette | Mixing colors | Glass or wood palettes are best |
Also, make sure to have good lighting. Natural light or a neutral white lamp helps you see true colors.

Credit: canvasandstone.art
Planning Your Composition
Before you touch your brush to the canvas, spend time planning. Strong composition makes your painting more interesting and believable.
- Choose Your View: Decide if you want a close-up of the stones, a wide view of a wall, or a scene with the wall as a background.
- Sketch Lightly: Use a pencil or diluted paint to outline the main shapes. Place large stones, cracks, and shadows.
- Think About Focus: Where should the viewer look first? Add more detail to this area and simplify the rest.
Many beginners overlook the importance of negative space—the empty areas around the stones. These spaces help the eye rest and make the wall feel more solid.
Mixing Colors For Stone Walls
Painting stone isn’t just about using gray. Old walls have a surprising range of colors. To make your painting realistic, learn to mix complex, natural colors.
Start with these basic oil paints:
- Titanium White
- Ivory Black
- Yellow Ochre
- Burnt Sienna
- Ultramarine Blue
- Raw Umber
- Cadmium Red Light
- Viridian Green
Mixing tips:
- For warm stones, use yellow ochre and burnt sienna with a touch of blue.
- For cool, shadowed stones, add ultramarine blue and a bit of raw umber.
- Moss and lichen can be created with viridian and yellow ochre mixed with white.
- Avoid using pure black or white for highlights and shadows. Mix in a little color for richness.
A common mistake is making all stones the same color. In real life, each stone is a bit different. Vary your mixes and brushstrokes.
| Stone Type | Color Mix | Effect |
|---|---|---|
| Warm Sandstone | Yellow ochre + burnt sienna + white | Sunny, aged look |
| Cool Granite | Ultramarine blue + raw umber + white | Shadowy, cold feel |
| Mossy Stone | Viridian + yellow ochre + white | Natural growth and age |
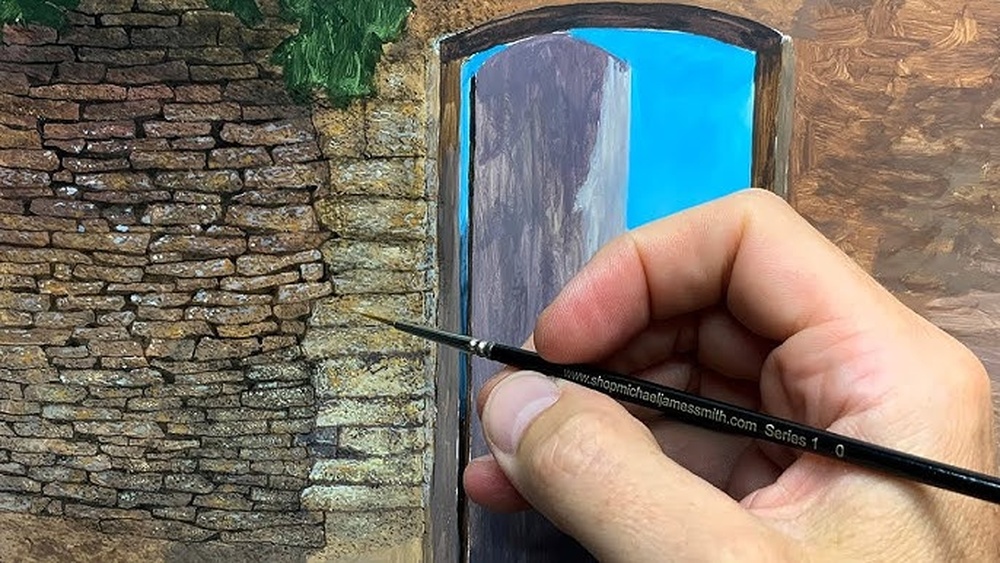
Step-by-step Painting Process
Painting a stone wall in oil is best done in stages. Each phase builds on the previous one, adding depth and detail.
1. Block In The Main Shapes
Use a large brush and thinned paint to lay down the big shapes and colors. Don’t worry about detail yet. Focus on getting the light and dark areas right. This step sets the foundation.
2. Add Texture And Color Variation
Once the first layer is dry or tacky, start building up the stone texture. Use a palette knife to apply thicker paint for raised stones. Try dabbing and twisting your brush for rough surfaces. Mix different shades and let them overlap slightly, just like real stones.
3. Refine The Mortar And Cracks
Switch to a small brush. Paint the mortar lines with a slightly darker or lighter tone than the stones. Don’t outline every stone the same way—nature is random. Add chips, cracks, or even a bit of moss.
4. Work On Light And Shadow
Use a soft brush to blend edges where sunlight meets shadow. Add highlights with a mix of white, yellow ochre, and a touch of your stone color. For deep shadows, mix ultramarine blue and burnt sienna. This gives a natural, not muddy, darkness.
5. Add Final Details
Pick out a few stones to sharpen with high contrast or extra detail. Add tiny touches of color where water has stained the wall or plants are growing. Stand back often to check if the wall looks real from a distance.
6. Let It Dry And Finish
Oil paint takes time to dry. Wait at least a week before varnishing or framing. If you see areas that need more work, you can paint over them once dry.
Tips For Creating Realistic Texture
Texture is the soul of an old stone wall. Here are some advanced tips that even some experienced painters forget:
- Dry Brush: Use a nearly dry brush with thick paint to drag across the canvas, picking up only the raised parts. This mimics rough stone.
- Sgraffito: Scratch into wet paint with the end of your brush to show cracks or roots.
- Glazing: Once dry, apply thin transparent layers of color to change the warmth or coolness of the wall.
A non-obvious tip: Look for patterns of moisture, lichen, or even graffiti. These features tell a story and add interest to your painting.

Credit: www.youtube.com
Common Mistakes And How To Avoid Them
Even skilled artists make mistakes with stone walls. Here’s how to avoid the most common ones:
- Making All Stones the Same: Stones are unique. Vary your shapes, colors, and edges.
- Ignoring Perspective: Walls recede in space. Use converging lines and size changes to show depth.
- Overusing Black and White: Pure black and white look unnatural. Always mix with other colors.
- Painting Too Evenly: Real stone has rough and smooth areas. Let some paint be thick and some thin.
- Forgetting the Environment: Add shadows from nearby trees or warm light from the sun to make the wall feel part of a scene.
Advanced Techniques For Depth And Atmosphere
If you want your painting to stand out, try these advanced ideas:
- Atmospheric Perspective: Make stones further away lighter and less detailed. This adds depth.
- Reflected Color: Stones reflect colors from the sky, ground, or nearby objects. Add hints of blue in shadow or green near grass.
- Edge Control: Use soft edges for distant parts of the wall and hard edges for the focus area.
You can find excellent examples of these effects in the works of old masters like John Constable and modern plein air artists.
Caring For Your Finished Painting
Oil paintings last for centuries if cared for properly. Here’s how to protect your work:
- Let the painting dry in a dust-free room for at least six months before final varnishing.
- Use a removable varnish to protect from dust and UV light.
- Frame the painting with a gap between canvas and glass to avoid moisture build-up.
Comparing Oil Painting To Other Mediums
Some artists wonder if oil is the best medium for old stone walls. Here’s a quick comparison:
| Medium | Pros | Cons |
|---|---|---|
| Oil | Rich color, texture, slow drying for blending | Long drying time, needs ventilation |
| Acrylic | Fast drying, easy clean-up | Harder to blend, less luminous color |
| Watercolor | Translucency, quick results | Hard to correct mistakes, less texture |
For old stone walls, oil is usually the top choice because of its flexibility and texture.
Credit: www.jessicabrigham.com
Where To Find Inspiration
If you’re stuck for ideas, visit old buildings, ruins, or countryside walls. Take your own photos at different times of day. Notice how the wall changes in different weather. The more you look, the more you’ll see. For more about the history and types of stone walls, you can also visit Wikipedia.
Frequently Asked Questions
What Is The Best Surface To Paint Old Stone Walls In Oil?
A primed canvas or wood panel works best. Panels offer more support for heavy texture, while canvas is lighter and easier to hang.
How Do I Keep My Colors From Getting Muddy?
Use a clean brush for each color family. Avoid over-mixing on the palette or canvas. Wipe your brush often.
Can I Paint Stone Walls Outdoors (plein Air) With Oils?
Yes! Use fast-drying mediums and bring a portable easel. Outdoor light helps you see true color, but be ready for changes in weather.
How Do I Show Age And Weathering On The Wall?
Add moss, cracks, and stains with small brushes and glazing. Study real walls to see where these details appear.
How Long Should I Wait Before Varnishing My Oil Painting?
Wait at least six months for full drying. Early varnishing can trap moisture and damage the paint.
Painting old stone walls in oil is a rewarding experience that blends technique, observation, and creativity. With these tips and a bit of patience, you can create paintings that capture the timeless beauty and history hidden in every stone.


