Have you ever wanted to capture the stunning beauty of a waterfall in your acrylic paintings? You’re in the right place.
Painting a waterfall might seem tricky at first, but with the right techniques, you can create a dynamic, flowing scene that looks alive on your canvas. This guide will show you how to build layers, use brush strokes, and blend colors to bring your waterfall to life.
Whether you’re a beginner or looking to improve your skills, you’ll find step-by-step tips that make the process simple and enjoyable. Ready to turn your blank canvas into a breathtaking waterfall? Let’s dive in!
Materials Needed
Gathering the right materials makes painting a waterfall with acrylics easier and more enjoyable. Each tool and supply has a purpose in building the scene. Prepare all items before starting to avoid interruptions.
Using quality materials helps create smooth layers and realistic water effects. Paints, brushes, and surfaces all affect the final look. Keep your workspace clean and organized for better focus.
Canvas Or Acrylic Paper
Choose a canvas or thick acrylic paper to hold the paint well. A smooth or slightly textured surface works best for water effects. Size depends on your preference but a medium size is easier to manage.
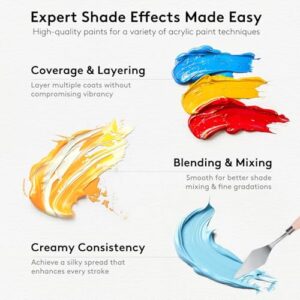
Acrylic Paints
Select a set of acrylic paints with essential colors like white, blue, black, and purple. These colors help create shadows, mid-tones, and highlights in the waterfall. Use artist-quality paints for better coverage and blending.
Brushes
Use a fan brush for vertical strokes and water texture. A flat brush helps with background and base layers. Smaller round brushes add details and highlights. Keep brushes clean for smooth strokes.
Palette And Water Container
A palette is needed to mix your paint colors. Use a flat palette or plate for easy blending. Keep a container of clean water handy to rinse brushes between colors.
Paper Towels Or Cloth
Paper towels or a cloth help wipe excess paint from brushes. They also clean spills and keep your work area tidy. Use them gently to avoid damaging brushes.
Easel (optional)
An easel holds your canvas upright and makes painting comfortable. It helps you see your work clearly and maintain good posture. Use one if you prefer working standing up or at an angle.

Credit: theartsherpa.com
Preparing Your Canvas
Starting with a well-prepared canvas makes painting easier and more enjoyable. Acrylic paint works best on a smooth, primed surface. This helps the paint stick and shows colors vividly. Taking time to prepare your canvas sets a strong base for your waterfall painting.
Proper preparation also prevents paint from soaking in unevenly. It allows you to build layers smoothly. Each layer of acrylic paint stays bright and fresh on a good canvas. Let’s explore the steps to ready your canvas for painting a waterfall.
Choosing The Right Canvas
Select a canvas size that fits your space and project. Smaller canvases are easy to handle and quick to finish. Larger ones give more room for details and movement. Use a canvas made for acrylic paint. Cotton or linen canvases with a tight weave work well.
Applying Gesso Primer
Gesso prepares the canvas by sealing and smoothing its surface. Use a brush or roller to apply a thin, even layer. Let it dry completely. A second coat improves texture and coverage. This step stops the paint from soaking into the fabric and makes colors pop.
Sketching The Waterfall Outline
Lightly sketch your waterfall design on the primed canvas. Use a pencil or charcoal for easy corrections. Mark the main shapes like rocks, water flow, and background elements. Keep lines soft and simple. This guide helps place colors and shapes correctly while painting.
Setting Up Your Workspace
Arrange your paints, brushes, and water nearby. Good lighting helps see true colors and details. Cover your work area to avoid stains. Prepare paper towels or rags for quick cleanups. A clean, organized space makes painting calm and focused.
Layering Dark Base Colors
Layering dark base colors sets the foundation for a realistic acrylic waterfall painting. These dark tones mimic the shadows behind and beneath the falling water. They create depth and contrast, making the waterfall appear more vibrant and alive. Without a solid dark base, the lighter water colors may look flat and lack dimension.
Start by choosing deep blues, purples, or blacks to paint the initial layer. This layer should cover the waterfall area completely. It acts as a shadow base for the layers that follow. Let the dark paint dry fully before adding lighter colors. This step ensures the highlights will stand out sharply.
Choosing The Right Dark Colors
Select colors that naturally occur in water shadows. Dark blue and purple work well. Black can be too harsh but useful for the deepest shadow areas. Mix these colors to avoid flatness. A varied dark base gives your waterfall richness and realism.
Applying The Dark Base Layer
Use a large flat or filbert brush to cover the waterfall area evenly. Paint in vertical strokes that mimic water flow. Keep the edges soft to blend with the background. Avoid sharp lines at this stage. Smooth transitions help later layers blend better.
Building Depth With Layering
After the base dries, add thin layers of mid-tone colors. This layering technique gradually builds the waterfall’s texture. Each layer should be lighter and narrower than the one below. This creates the illusion of water moving over rocks and falling through space.

Credit: www.youtube.com
Adding Mid-tones With Fan Brush
Adding mid-tones with a fan brush gives the waterfall depth and realism. Mid-tones are the colors between dark shadows and bright highlights. They help create smooth transitions in the water flow. Using a fan brush makes it easy to apply these tones with natural, soft strokes.
The fan brush spreads paint thinly and evenly, perfect for water textures. It allows vertical, downward strokes that mimic flowing water. Blending mid-tones while the paint is still wet creates a smooth look. This step adds volume and movement to the waterfall.
Choosing The Right Mid-tone Colors
Pick blues and purples for mid-tones to match water shadows. Mix a bit of white to soften the colors. Avoid pure black or bright white here. These tones fill the space between dark and light areas.
Using Vertical Strokes With The Fan Brush
Load the fan brush lightly with paint. Drag it down the canvas in straight or slightly curved lines. Keep strokes soft, not harsh. This simulates water flowing over rocks and ledges.
Blending Mid-tones While Wet
Work quickly to blend mid-tones into the dark base layer. Use gentle strokes without pressing hard. This keeps the edges soft and natural. Blending creates a smooth flow of colors in the waterfall.
Adding Texture And Movement
Tap the fan brush lightly for small splashes. Use quick, short strokes to add subtle water details. This gives life and motion to the waterfall. The texture makes the painting more dynamic and interesting.
Creating Water Flow With Vertical Strokes
Vertical strokes are essential to show the movement of water in a waterfall. They mimic the natural fall of water from top to bottom. Using acrylic paint, these strokes add a sense of motion and depth. The technique requires patience and control over the brush. Each stroke should flow smoothly to capture the water’s energy.
Properly applied vertical strokes bring life to your waterfall painting. They help separate the water from rocks and background. This section covers key methods to use vertical strokes effectively with acrylics.
Choosing The Right Brush For Vertical Strokes
A fan brush works best for vertical strokes in waterfall painting. Its wide spread helps create natural flowing lines. A flat or round brush can also work but needs more control. Select a brush that allows smooth, elongated strokes. This choice affects the final texture of your waterfall.
Techniques For Smooth Downward Strokes
Hold your brush lightly for gentle, vertical movements. Start from the top of the waterfall and drag the brush down. Keep the strokes even and continuous. Avoid pressing too hard to prevent harsh lines. Blend colors while the paint is wet to show water flow.
Layering Colors With Vertical Strokes
Begin with dark tones at the base of the waterfall. Add mid-tone blues and purples using vertical strokes. Finish with white highlights to show water foam and splashes. Layering creates depth and realism. Each vertical stroke builds on the last, enhancing the water’s motion.
Adding Texture With Vertical Strokes
Use quick, short vertical strokes to suggest spray and mist. Lightly tap the brush to create texture in foam areas. Vary the pressure and speed to imitate natural water patterns. These textured strokes add life and energy to the waterfall.
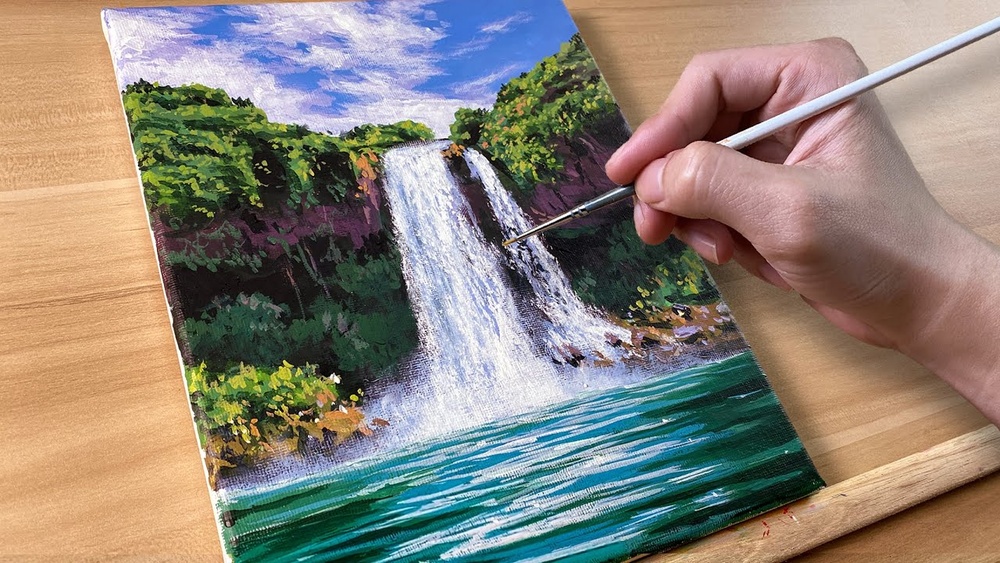
Applying Highlights And Foam
Applying highlights and foam is crucial for a realistic waterfall painting. These elements bring life and movement to your work. Highlights show where light hits the water. Foam captures the water’s energy as it crashes and flows. Both add depth and texture to the scene.
Use a small fan brush or a fine detail brush for this step. The paint should be thick and bright white. Dab gently to mimic water splashes and soft foam patches. Focus on the waterfall edges and areas where water hits rocks.
Creating Bright Highlights On Waterfalls
Choose pure white or slightly tinted white paint for highlights. Apply it in thin, vertical strokes following water flow. Use a fan brush to drag paint down softly. Blend edges while the paint is wet for smooth light reflections. Avoid harsh lines to keep water looking natural.
Painting Foam With Dabbing Techniques
Foam appears where water hits surfaces or pools. Use a dry brush or sponge for dabbing white paint lightly. Tap gently to form irregular foam shapes. Layer dabs to build foam thickness and texture. Vary foam size to create a natural look.
Adding Mist And Splash Effects
Use a thin brush to add tiny white dots and short strokes around the waterfall base. These imitate mist and water spray. Apply softly to blend with background colors. Mist softens edges and enhances depth. Use less paint for distant mist and more for close splashes.
Using Scumbling For Mist Effects
Using scumbling is a smart way to create mist effects in waterfall paintings. This technique adds softness and a sense of moisture in the air. It helps make the waterfall look more realistic and lively.
Scumbling involves lightly dragging a dry brush over the paint surface. This creates a thin, broken layer of color. The result looks like a fine mist or fog around the waterfall’s base.
Preparing Your Brush For Scumbling
Choose a stiff, dry brush with stiff bristles. Dip it lightly in white or light gray acrylic paint. Remove most paint on a paper towel. The brush should hold very little paint for this effect.
Too much paint will cover the layers below. The goal is to create a soft, broken texture. This mimics the look of mist in the air.
Applying Scumbling To Create Mist
Use small, circular or side-to-side strokes with the dry brush. Gently touch the canvas without pressing hard. Work around the base of the waterfall where mist naturally forms.
Build up layers slowly. Add more scumbling until the mist looks natural. Leave some areas more transparent. This creates depth and movement in your painting.
Blending Scumbled Mist With Waterfall Highlights
After scumbling, add soft white highlights to water edges. Use a clean brush to blend edges slightly. This connects mist to flowing water smoothly.
Blend just enough to keep the mist effect visible. The highlights should look soft and glowing. Avoid harsh lines that break the illusion of mist.
Detailing Surrounding Elements
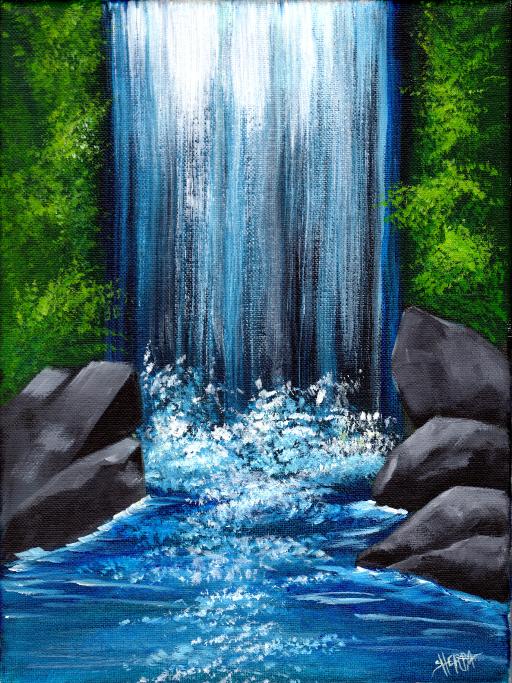
Detailing the elements around your waterfall brings the scene to life. These details add realism and context. They create a natural environment that complements the water flow. Focus on textures and colors that match nature. Pay attention to light and shadow for depth. This section covers painting rocks, moss, and trees near your waterfall.
Painting Rocks
Begin with a dark base for the rocks. Use shades of gray, brown, or dark blue. Add lighter tones on edges to show light hits. Use a small, stiff brush for texture. Dab paint to create rough, uneven surfaces. Blend softly where rocks meet water for wet effects. Add cracks or shadows to increase realism.
Adding Moss And Trees
Use green shades to paint moss on rocks. Mix yellow and blue for natural moss colors. Apply moss in patches, not solid areas, for variety. Paint tree trunks with browns and grays. Use a thin brush for fine branches. Leaves can be painted with quick dabs of green. Vary shades for light and shadow. Make sure trees frame the waterfall naturally.
Finishing The Water Pool
Finishing the water pool is a crucial step in painting a waterfall with acrylics. The pool reflects the water’s movement and adds realism to your artwork. Capturing light, color, and texture in the pool brings the scene to life.
Focus on blending colors smoothly to show water depth. Use darker shades near the edges and lighter tones in the center. This contrast creates a sense of space and clarity.
Creating Depth With Dark And Light Colors
Start by painting the base of the pool with dark blues and greens. These colors represent the deeper parts of the water. Then, gradually add lighter blues and whites toward the surface. This layering shows transparency and depth.
Adding Reflections And Ripples
Use thin, horizontal strokes to paint reflections of rocks and trees. Soft reflections add realism to the water surface. Next, add small ripples with short, curved strokes using white or light blue paint. This shows water movement and disturbance.
Highlighting Foam And Splash Effects
Use a small brush to dab white paint around the pool edges. These white spots represent foam where water hits the surface. Blend some of the foam into the water softly. This technique creates a natural splash effect.
Blending Techniques For Smooth Water
Work quickly while the paint is still wet. Use a clean, damp brush to gently blend colors together. This blending softens harsh lines and mimics the smooth flow of water. Avoid over-blending to keep texture visible.
Tips For Brushwork And Paint Consistency
Brushwork and paint consistency play a key role in painting a waterfall with acrylics. The right brush strokes bring water to life. Proper paint thickness helps create smooth flow and texture. These tips focus on making your waterfall look natural and vibrant.
Using different brushes and controlling paint thickness adds depth and movement. A balanced approach keeps your painting fresh and dynamic. Small changes in brush pressure or paint mix can change the whole effect.
Choosing The Right Brush For Waterfall Details
Use a fan brush for flowing water strokes. It creates soft, natural lines. A flat brush helps with broad areas and background. Small round brushes add fine details like splashes and foam. Switch brushes as the painting progresses for variety.
Controlling Brush Pressure And Direction
Light pressure creates thin, delicate water lines. Press harder for thicker streams. Move the brush downward to mimic falling water. Slight curves add natural flow. Avoid stiff, straight strokes that look artificial. Blend strokes gently while paint is wet.
Mixing Paint For Ideal Consistency
Thin paint flows easily and blends well. Use water or acrylic medium to thin paint. Thick paint creates texture and highlights. Adjust thickness depending on the area painted. Test consistency on a scrap paper before applying.
Layering Paint To Build Depth
Start with darker tones as the base layer. Let it dry before adding mid-tones and highlights. Use thin layers for smooth transitions. Thicker paint works well for foam and splash effects. Layering helps create a sense of motion and depth.
Blending Techniques For Smooth Water Effects
Work quickly to blend while paint is wet. Use soft brushes or sponges for smooth gradients. Avoid over-blending to keep texture. Use scumbling for misty, soft edges. Blending adds realism to the waterfall’s flow.
Credit: theartsherpa.com
Frequently Asked Questions
What Brushes Are Best For Painting Acrylic Waterfalls?
Fan brushes are ideal for acrylic waterfalls. They create vertical strokes and splashes. Their shape helps blend colors smoothly. Use them for foam, mist, and flowing water effects.
How Do You Create Realistic Waterfall Motion In Acrylics?
Use vertical downward strokes with a fan brush. Blend wet layers softly for natural flow. Add white highlights for foam and splashes. Layer dark to light tones to build depth.
What Colors Work Best For Painting Waterfalls In Acrylics?
Start with dark blues or purples for shadows. Use lighter blues for mid-tones. Finish with white for highlights and foam. This color layering creates realistic water depth and movement.
How Do You Add Mist And Foam In Acrylic Waterfall Paintings?
Apply white paint with a dry fan brush. Tap or scumble to create broken, hazy strokes. This mimics mist and foam at the waterfall’s base. Use light, thin layers for subtle effects.
Conclusion
Painting a waterfall with acrylics can be simple and fun. Start with dark colors and build layers up to bright highlights. Use vertical strokes to show water movement and add white dabs for foam and mist. Take your time blending while the paint is wet to create a smooth flow.
Remember, practice helps improve your technique and results. Enjoy the process and watch your waterfall come alive on the canvas. Keep experimenting with colors and brush strokes for unique effects. Your painting skills will grow with each new piece you create.