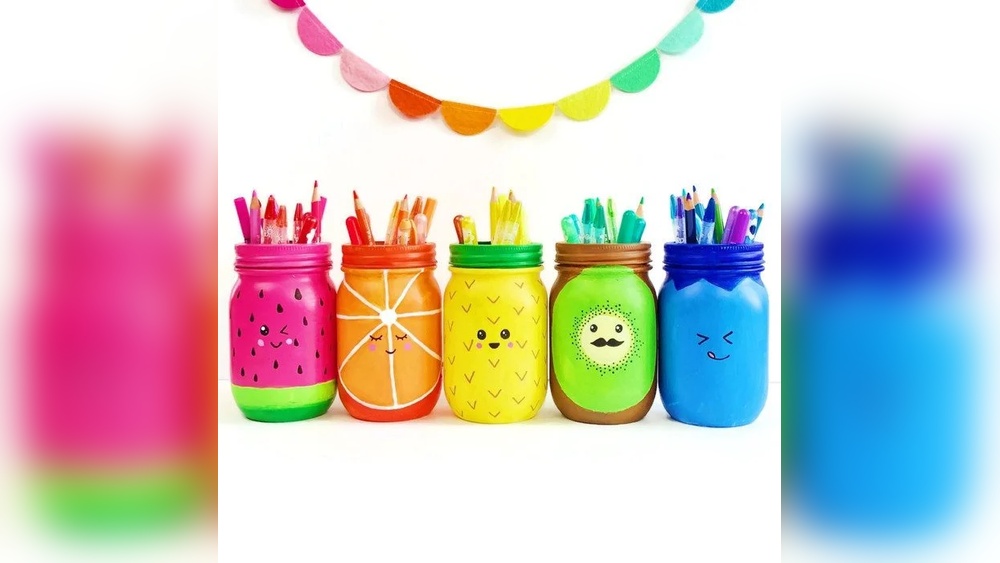
Are you ready to transform plain mason jars into charming pieces of art? Painting DIY mason jar crafts is a simple and fun way to add a personal touch to your home decor, gifts, or party decorations. Whether you want to paint DIY mason jar crafts for a special occasion or just to spruce up your space, this guide will help you achieve stunning results.
Whether you’re a beginner or looking for fresh ideas, this guide will show you exactly how to paint your mason jars so the colors stay vibrant and chip-free. Get your brushes ready, because by the end of this article, you’ll have all the tips and tricks you need to create stunning, long-lasting painted jars that everyone will admire.
Let’s dive in and make your mason jars shine!

Credit: masonjarcraftslove.com
Choosing Paint
Choosing the right paint for your DIY mason jar crafts is essential. The paint affects the look, durability, and ease of your project. Different paints offer unique finishes and require various preparation steps. Understanding your options helps you achieve the best results.
Acrylic Vs Chalk Paint
Acrylic paint is versatile and widely used. It dries quickly and comes in many colors. Acrylic paint works well on glass but may need a sealant to prevent chipping.
Chalk paint has a matte finish and sticks well to glass without priming. It gives a vintage or rustic look. Chalk paint is easy to distress for a shabby chic style.
Using Spray Paint
Spray paint covers large areas evenly and quickly. It creates a smooth finish without brush marks. Use spray paint in a well-ventilated space and protect surfaces from overspray.
Choose spray paint made for glass or multi-surface use. Several colors and finishes are available, including metallic and frosted looks.
Mod Podge And Food Coloring
Mod Podge mixed with food coloring creates a stained glass effect. This method is great for adding color inside the jar. Stir the mixture and apply it with a brush or sponge.
This technique lets light shine through the jar, making it ideal for candle holders or lanterns. It also seals the color for a lasting finish.
Preparing Mason Jars
Preparing mason jars properly is crucial before painting your DIY crafts. Clean jars help paint stick better and last longer. Taking time to prepare jars avoids peeling and uneven finishes. Follow simple steps to get your jars ready for painting.
Cleaning And Degreasing
Start by washing the mason jars with warm soapy water. Use a sponge to remove dirt and dust. Rinse jars well and dry with a clean cloth. Next, wipe jars with rubbing alcohol or vinegar. This removes oils and grease that block paint. Let the jars air dry completely before painting.
Removing Labels And Residue
Soak jars in warm soapy water for 15 to 30 minutes. This softens the labels for easy removal. Peel off the paper labels carefully. If sticky glue remains, scrub with a paste of baking soda and oil. Use a plastic scraper to avoid scratching the glass. Rinse jars to remove residue and dry fully before starting to paint.
Painting Techniques
Painting DIY mason jar crafts is a fun way to add color and style to simple glass jars. Using the right painting techniques helps the paint stick and look smooth. It also makes your jars last longer. This section explains key painting methods to improve your mason jar projects.
Applying Thin Coats
Start with a clean jar free of dust and oil. Use a small brush or sponge for better control. Apply a thin layer of paint instead of a thick one. Thin coats dry faster and reduce dripping. Let each coat dry fully before adding the next. Multiple thin layers create a smooth, even finish.
Painting The Rim
The jar rim needs special attention. Paint it carefully to avoid clumps or peeling. Use a fine brush to reach tight spots. A neat rim gives your jar a polished look. Paint the rim after the main body dries. This step prevents smudging and keeps lines sharp.
Creating Tinted Effects
For a tinted or frosted look, d