Are you ready to take your digital art in Procreate to a whole new level? Understanding how to use adjustment layers can transform your workflow, giving you the power to tweak colors, tones, and effects without damaging your original artwork.
Imagine having full control over every detail, making edits that you can easily change or remove later. In this guide, you’ll discover simple steps to master adjustment layers in Procreate, helping you create stunning art with confidence and flexibility. Keep reading to unlock these game-changing techniques and elevate your creative process!
Adjustment Options
Adjustment options in Procreate let you change your artwork without altering the original image. These tools help you edit colors, brightness, and tones easily. Using adjustment layers keeps your work flexible and editable at any time.
Each adjustment option targets a specific aspect of your artwork. You can control the mood, style, and feel by tweaking these settings. Understanding each adjustment helps create better results.
Hue And Saturation
Hue changes the colors in your image by shifting their position on the color wheel. Saturation controls the intensity of the colors. Increase saturation for vivid colors or lower it for a softer look. This adjustment is perfect for correcting or enhancing colors quickly.
Brightness And Contrast
Brightness adjusts how light or dark your image appears. Contrast changes the difference between light and dark areas. Increasing contrast makes details pop, while lowering it creates a flat look. These tools improve overall visibility and depth in your artwork.
Color Balance
Color balance shifts the colors toward red, green, or blue. You can adjust shadows, midtones, and highlights separately. This option helps fix color casts or create specific color moods. It is useful for fine-tuning the color harmony in your piece.
Other Effects
Procreate offers more adjustments like Gaussian Blur, Sharpen, and Noise. Gaussian Blur softens edges for a smooth effect. Sharpen enhances details and makes the image crisper. Noise adds texture or grain for a vintage feel. These effects add creative touches to your artwork.
Creating Adjustment Layers
Creating adjustment layers in Procreate allows you to edit your artwork flexibly. These layers help modify colors, brightness, and contrast without changing the original image. This way, you can try different effects and undo changes easily. Understanding how to set up and use adjustment layers improves your workflow and creativity.
Layer Setup
Start by opening your artwork in Procreate. Tap the Layers icon to see all your layers. Create a new layer by pressing the “+” button. Name this layer clearly, like “Brightness” or “Color.” This helps keep your work organized. Place the adjustment layer above the layer you want to edit. This setup isolates your adjustments from the original image.
Applying Adjustments Non-destructively
Use Procreate’s adjustment tools on the adjustment layer. Select the adjustment you want, such as hue, saturation, or brightness. Apply the change on the adjustment layer only. This method keeps your original layer safe. You can turn off or delete the adjustment layer anytime. It lets you experiment without damaging your artwork.
Working With Multiple Layers
Working with multiple layers in Procreate gives you more control over your artwork. It helps keep your work organized and flexible. You can adjust different parts of your drawing without affecting others. This section explains how to handle multiple layers effectively.
Grouping Layers
Grouping layers keeps related elements together. Select the layers you want to group by swiping right on each. Tap “Group” to combine them. This makes moving and adjusting easier. You can also rename the group for better organization. Groups help manage complex projects smoothly.
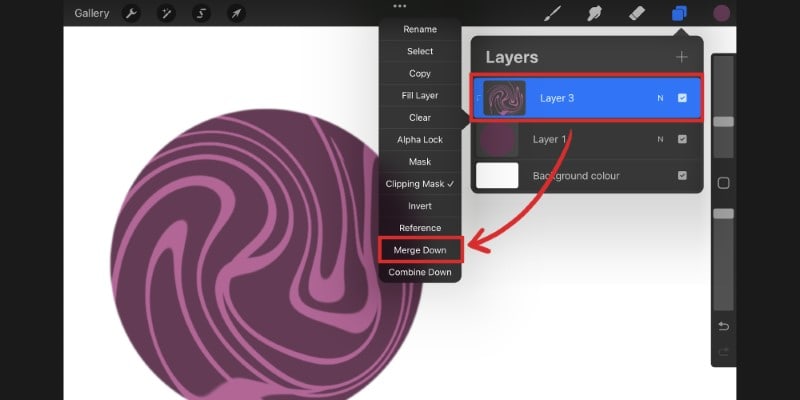
Merging For Adjustments
Merging layers lets you apply changes to several layers at once. Select the layers and tap “Merge Down” or “Merge Selected.” This combines them into one layer. Use merging carefully because it is permanent. It is useful for finalizing parts of your artwork before applying adjustments.
Resizing And Moving Layers
Resize or move multiple layers together to keep their positions aligned. Select the layers and tap the transform tool. Drag the handles to resize or move the group. Hold the aspect ratio lock to avoid distortion. This method saves time and keeps your composition balanced.
Credit: doncorgi.com
Tips For Faster Editing
Editing with adjustment layers in Procreate can save time and enhance creativity. Speed matters when you want to see results fast. These tips help you work quicker and stay organized. Use these tricks to make your editing smooth and efficient.
Using Shortcuts
Shortcuts reduce the steps to apply adjustments. Tap two fingers to undo an action quickly. Use three fingers to redo changes without menus. Hold down the adjustment tool icon to access options faster. Learn common gestures to save time during editing.
Duplicating Adjustment Layers
Duplicating layers helps keep your edits consistent. Swipe left on an adjustment layer and tap Duplicate. Apply the same effect to different parts without starting over. This trick speeds up complex edits and keeps your workflow tidy. Avoid repeating work by reusing layers smartly.
Fine-tuning With Opacity
Adjust opacity to control the strength of adjustments. Slide the opacity bar left or right to reduce or increase effect. This method gives you subtle control without deleting or redoing layers. Use opacity to blend adjustments naturally into your artwork.
Common Challenges
Adjustment layers in Procreate offer great flexibility but come with some challenges. These challenges can slow down your workflow or limit creative options. Understanding common obstacles helps you use adjustment layers more effectively.
Limitations In Procreate
Procreate does not have true adjustment layers like other software. Each adjustment applies directly to the layer, making edits permanent unless you undo. You cannot stack or edit adjustments separately after applying them.
Working with multiple layers requires applying adjustments one by one. This can be time-consuming and less flexible. Procreate also lacks masks linked to adjustments, limiting non-destructive editing options.
Workarounds For Multi-layer Edits
Group layers together before applying adjustments to affect multiple layers at once. This helps simulate adjustment layers but still alters the layers permanently. Another option is to duplicate layers and apply adjustments on copies, preserving originals.
Using layer blend modes with duplicate layers can mimic adjustment effects. You can also save adjustments as Actions to quickly repeat them on different layers. These workarounds keep your workflow smoother despite Procreate’s limitations.
Credit: doncorgi.com
Creative Uses
Adjustment layers in Procreate offer many creative possibilities. They let you change colors and effects without changing the original artwork. Using these layers, you can explore new styles and refine your art easily. Here are some creative ways to use adjustment layers in your projects.
Color Grading
Color grading helps change the overall color tone of your artwork. Use adjustment layers to shift colors smoothly. This creates a consistent look across your image. You can make colors warmer or cooler with ease. It also helps to match colors between different elements. Color grading adds a professional touch to your digital art.
Creating Mood And Atmosphere
Adjustment layers let you set the mood of your piece. Darken or brighten areas to create depth and feeling. Soft glows and tints can add mystery or calmness. You can make a scene feel sunny, gloomy, or dreamy. Changing color balance and saturation affects the atmosphere too. These subtle changes make your art more engaging.
Enhancing Details
Use adjustment layers to sharpen or soften details. Increase contrast to make lines and textures stand out. You can highlight important parts of your drawing this way. Blurring some areas helps focus attention elsewhere. This technique improves clarity and guides the viewer’s eye. It makes your artwork more dynamic and clear.

Credit: www.youtube.com
Frequently Asked Questions
Are There Adjustment Layers In Procreate?
Procreate does not have traditional adjustment layers like Photoshop. Instead, it offers non-destructive adjustments via its Adjustment menu applied directly to layers. Use layer duplication and masks to simulate adjustment layers for flexible editing and color corrections.
How Do I Resize A Part Of A Drawing In Procreate?
Select the part using the Selection tool, tap the Transform icon, then drag the bounding box handles to resize it.
How Do I Resize All Layers?
Select all layers you want to resize, group them, then use the transform tool. Hold Shift to keep proportions while resizing.
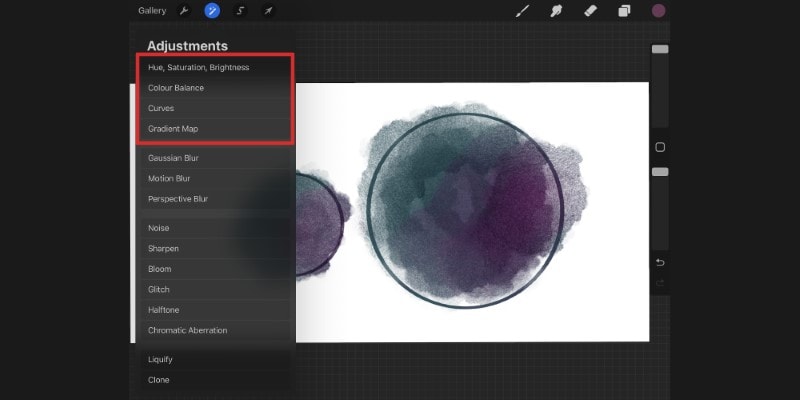
How Do I Adjust Things In Procreate?
Tap the Adjustments icon in Procreate, then choose tools like Hue, Saturation, or Brightness. Drag sliders to customize effects. Use the selection tool to move or resize parts precisely.
Conclusion
Using adjustment layers in Procreate helps keep your edits flexible and easy to change. You can experiment with colors, brightness, and effects without altering the original artwork. This technique saves time and improves your workflow. Practice adding, modifying, and deleting adjustment layers to see what works best.
Soon, you will feel more confident editing your digital art. Keep exploring these tools to make your creations stand out. Adjustment layers are simple but powerful helpers for every Procreate artist.