
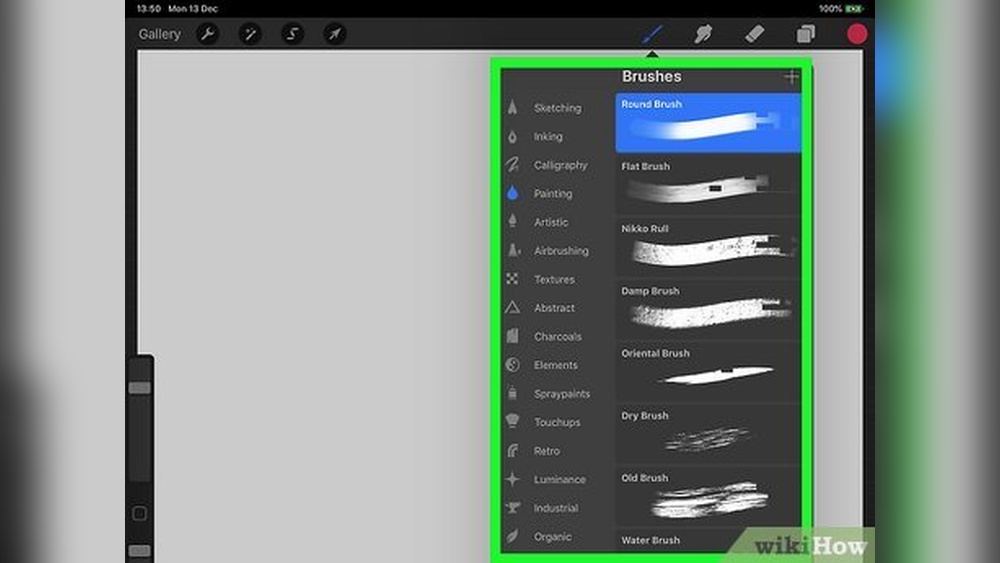
Quick answer: Tap the finger icon in Procreate’s top-right toolbar to activate the Smudge tool, tap it again to choose a brush shape, then drag across existing paint to blend it. The sidebar’s top slider sets smudge size and the bottom slider sets strength. For smooth gradients use a soft airbrush at low strength; for painterly blends use a textured brush and short, overlapping strokes along the form.
The Smudge tool is the closest thing Procreate has to dragging a dry brush through wet paint. Used well, it produces soft skin, misty skies and seamless color transitions. Used carelessly, it turns a painting into a blurry smear. Knowing how to use the smudge tool in Procreate is mostly about choosing the right brush, the right strength and the right direction of stroke.
This guide covers setup, the settings that matter, techniques for different subjects, and the mistakes that make smudged work look muddy or plastic.
What the Smudge Tool Actually Does
Smudge picks up the color under your stroke and drags it along, mixing it with whatever it passes over. It does not add new color. That matters: if you smudge between two colors that are far apart, the result can only be built from those two colors and what lies between them.
It also only affects the active layer. If your shadow sits on a separate layer from the base color, smudging the shadow will not blend it into the base. Either merge the layers or paint shadows directly on the base layer when you plan to blend.
Because smudging only moves existing paint, the quality of a blend is decided before you pick up the tool. If the colors and values you laid down are well chosen and close enough to each other, smudging finishes the job in a few strokes. If they are far apart, no amount of smudging will produce a convincing transition. Painters often say “blend with color first, smudge second,” and it is good advice in Procreate.
Different programs approach blending in different ways; some offer color-mixing brushes that make a dedicated smudge tool nearly unnecessary. If you use a Windows computer too, our guide to Procreate alternatives with strong blending brushes can help you compare.
Smudge Tool Anatomy at a Glance
- Finger icon: switches between Smudge and other tools.
- Brush Library: opens when you tap the active Smudge icon, letting you pick any brush shape.
- Top sidebar slider: smudge size.
- Bottom sidebar slider: smudge strength.
- Pressure: varies how much paint is dragged, depending on the brush.
- Layer: smudge only works on the selected layer.
How to Use the Smudge Tool in Procreate: Setup
- Tap the finger icon to switch to Smudge. It turns blue when active.
- Tap it again to open the Brush Library. Smudge uses the same brushes as painting, so any brush shape can become a blending tool.
- Pick a starting brush. A soft airbrush is the easiest place to begin.
- Set size with the top sidebar slider. Bigger than the area you are blending usually works better than smaller.
- Set strength with the bottom sidebar slider. Start around 30 to 50 percent.
- Drag gently across the transition you want to blend.
Tap and hold the Smudge icon to load the brush you are currently painting with. This keeps your blending texture consistent with your strokes, which helps the painting look unified.
The Settings That Change Everything
Strength (the opacity slider)
With Smudge active, the lower sidebar slider controls how much color is dragged. Low strength makes subtle, controllable blends; high strength drags color far and can create streaks. Many artists keep it under 50 percent and build blends with several light passes.
Pressure
With an Apple Pencil, pressure usually affects how strongly a smudge brush pushes color, depending on the brush’s settings. Light pressure gives a gentle blend at the edge; firmer pressure pulls more paint. If smudging feels unpredictable, check the pressure curve under Actions, then Prefs, then Pressure and Smoothing.
Brush shape and grain
The brush’s shape and grain decide the texture of the blend. A soft round leaves a smooth, airbrushed look. A bristle or textured brush leaves visible marks, which reads as traditional paint. Neither is better; they suit different styles.
StreamLine
In Brush Studio, StreamLine smooths stroke paths. A little helps long, even strokes in skies and backgrounds. Too much makes short, careful blending feel laggy.
Choosing a Smudge Brush
| Brush type | Result | Good for |
|---|---|---|
| Soft airbrush | Very smooth, no texture | Skin, glows, gradients, soft shadows |
| Hard airbrush | Smooth with a firmer edge | Controlled transitions near edges |
| Bristle or oil brush | Painterly streaks | Traditional-looking work, hair, grass |
| Textured or grainy brush | Speckled, broken blend | Clouds, stone, rough surfaces |
| Same brush you paint with | Unified texture | Keeping a consistent style |
Experiment with the Painting and Artistic sets. A brush that looks rough as a painting tool can be a beautiful blender at low strength.
Techniques by Subject
Smooth gradients for skies and backgrounds
- Block in bands of color from top to bottom.
- Switch to Smudge with a large soft airbrush at about 40 percent.
- Use long horizontal strokes along each boundary.
- Reduce size and strength for final passes.
Horizontal strokes keep sky gradients level. For clouds, switch to a textured brush and follow the shape of each cloud, which our tutorial on painting realistic clouds in Procreate walks through in detail.
Soft skin and portraits
Paint at least three values (light, mid, shadow) side by side. Smudge with a soft brush along the form, curving around the cheek or jaw rather than straight across. Leave some edges firmer, such as under the nose or along the jawline in strong light, so the face does not lose structure.
Painterly blending
Choose a bristle brush, set strength around 30 percent and use short, overlapping strokes in the direction a real brush would travel. Allow some texture to remain. This keeps the painting lively instead of over-polished.
Hair and fur
Use a thin textured brush and drag in the direction of growth. Pull light into dark at the tips and dark into light at the roots. A few stray strands drawn with the paintbrush afterward sell the effect.
Soft edges and lost edges
Not every edge needs a full blend. Run a single light smudge pass along an edge you want to soften, such as a background object, while leaving focal edges crisp. Varying edge quality is one of the most effective ways to guide the viewer’s eye.
Keeping Smudges Inside the Lines
Smudge can drag color past a shape’s boundary. Three ways to prevent it:
- Alpha Lock: tap the layer and turn on Alpha Lock. Smudging then stays within existing pixels, so the silhouette cannot grow.
- Selection: select the region first. Smudging stays inside the selection.
- Separate layers: keep shapes on their own layers so smudging one cannot affect its neighbor.
Selections pair well with this. If you need help isolating areas, our guide to the adjustments and layer masks workflow in Procreate shows how to protect regions while editing.
Smudge vs Other Blending Methods
Smudge is not the only way to blend in Procreate, and sometimes it is not the best.
- Color-pick layering: pick a color midway between two areas, paint it at low opacity over the boundary and repeat. This keeps strokes visible and avoids smearing.
- Gaussian Blur in Pencil mode: brush blur onto specific areas for perfectly smooth transitions. Good for backgrounds, but it can look artificial on focal areas.
- Soft brush glazing: airbrush thin layers of color over each other.
- Eraser with a soft brush: on separate layers, softening an edge by erasing can mimic a blend.
Many artists combine these: block in, color-pick layer to build the main transition, then use a light smudge only where a softer finish is needed.
Common Smudge Mistakes
- Over-smudging. Blending everything removes form and texture, leaving a plastic look. Stop before it is perfectly smooth.
- Blending complementary colors directly. Smudging orange into blue produces dull gray in the middle. Place a bridge color (for example, a desaturated purple or warm gray) between them first.
- Using a tiny brush. Small sizes create streaks and take longer. Size up and lower strength instead.
- Random stroke direction. Strokes that ignore form flatten volume. Follow the surface of the object.
- Smudging across layers. Smudge only affects the active layer, so blending appears to do nothing when colors sit on separate layers.
- Smudging edges outward. Without Alpha Lock, smudging near a silhouette widens it and creates halos.
A Short Practice Drill
Ten minutes of this builds a feel for strength and pressure faster than painting full pieces.
- Paint three rectangles side by side in light, mid and dark values of one color.
- Blend the first pair with a soft airbrush at 30 percent, the second at 70 percent. Compare.
- Repeat with a bristle brush.
- Paint a sphere with three values and blend it using curved strokes that follow its shape.
- Paint a second sphere and blend with straight strokes. Note how much flatter it looks.
How Canvas Size Affects Smudging
Brush size in Procreate is relative to the canvas, so the same size setting covers a smaller area on a large, high-resolution canvas. On big canvases you will often need to push the size slider higher for broad blends, and smudging very large areas can feel slower on older iPads.
A practical approach is to block in and blend large areas at a zoomed-out view with a big brush, then zoom in only for edges and details. If performance lags, merging finished layers or working on a slightly smaller canvas usually helps. Planning canvas size around your final use (screen versus print) avoids needless strain.
Customizing a Smudge Brush
Once you find a brush you like, duplicate it in the Brush Library (swipe left, Duplicate) and tweak the copy in Brush Studio. Small changes to StreamLine, Grain and Shape behavior can make a dedicated blender. Keeping it in a “Blenders” set makes it quick to access.
Avoid editing default brushes directly. Working on duplicates means you can always return to the original.
Will Other Apps Smudge Differently?
Every painting program handles blending its own way. Some offer color-mixing brushes that pick up and blend paint while painting, so you rarely need a separate smudge tool. Whatever software you use, the underlying skills here (laying down good intermediate colors, following form and controlling edges) transfer directly.
Quick Settings Cheat Sheet
- Smooth skin: soft airbrush, 20 to 40 percent strength, curved strokes along the form.
- Sky gradient: large soft airbrush, about 40 percent, long horizontal strokes.
- Painterly blend: bristle brush, about 30 percent, short overlapping strokes.
- Clouds: textured brush, low strength, following each cloud’s shape.
FAQs
Where is the smudge tool in Procreate?
It is the finger icon in the top-right toolbar, between the paintbrush and the eraser. Tap it to activate, and tap again to choose a brush.
What is the best brush for smudging in Procreate?
A soft airbrush is easiest for smooth blends. For painterly work, use a bristle or textured brush, or hold the Smudge icon to borrow your current painting brush.
Why isn’t the smudge tool working?
Common reasons are blending on an empty or wrong layer, strength set very low, or colors sitting on separate layers. Also check that no selection is restricting the area.
How do I make smudging smoother in Procreate?
Use a larger soft brush, lower the strength, and blend with several gentle passes rather than one strong one. Placing a mid-tone between colors before blending also helps.
How do I stop smudge from going outside the lines?
Turn on Alpha Lock for the layer, make a selection before blending, or keep separate elements on separate layers.
Does smudge blend across layers in Procreate?
No. It only affects the selected layer. Merge layers or paint the colors you want to blend on the same layer.
Final Thoughts
Good smudging is mostly restraint. Choose a brush that matches your style, keep strength moderate, follow the form and stop while some texture remains. Combine smudge with color-pick layering, and your blends will look intentional rather than smeared.
If you are curious how blending tools compare in desktop software, especially if you also paint on Windows, our list of the top Procreate-style apps for PC is a good next read.



One Comment