
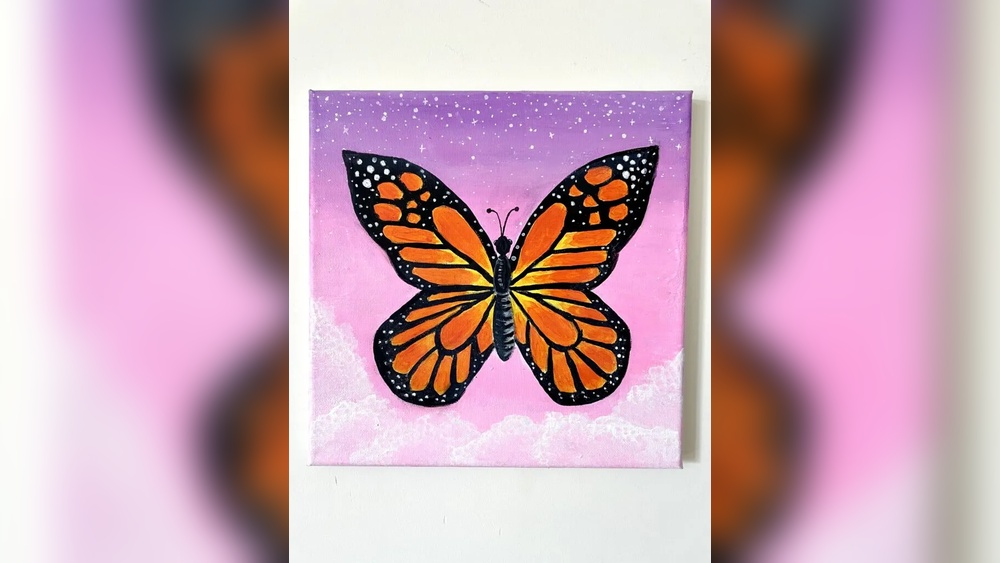
Quick answer: To paint a butterfly with acrylic paint, draw a slim three-part body (head, thorax, abdomen), then sketch the forewings as rounded triangles and the hindwings as smaller, rounded shapes, mirrored on each side. Base coat the wings in their main color, paint the dark veins and wing borders, add spots and patterns, and finish with a thin highlight along the leading edge of each wing. Fold a sheet of tracing paper along the body line to keep both sides symmetrical.
Butterflies are a perfect subject for practicing color, pattern and symmetry. Their wings look complex, but every species follows the same basic plan: four wings attached to a slender body, divided by veins into cells, with patterns sitting inside those cells. Once you see that structure, even an ornate swallowtail becomes manageable.
This guide on how to paint a butterfly with acrylic paint starts with a monarch, the most recognizable butterfly in North America, viewed from above with wings spread. It then covers painting butterflies at an angle, on flowers, and in simple decorative styles.
Butterfly Anatomy for Painters
You only need a few anatomical facts.
- Body: three segments. A small round head with two long antennae ending in little clubs, a thicker thorax where the wings attach, and a long, tapering abdomen.
- Forewings: the top pair. Larger, roughly triangular, with a long front edge (the leading edge) and a curved outer edge.
- Hindwings: the bottom pair. Smaller and rounder; some species have tails, like swallowtails.
- Veins: lines radiating from the body outward through the wings, dividing them into cells. Patterns follow these veins.
- Borders: many butterflies have a dark outer border on each wing, often with white or colored spots.
Butterflies have antennae with a club or knob at the tip. Moths often have feathery or tapered antennae. It’s a small detail, but it helps your painting look correct.
Materials
- Canvas panel, canvas or heavy paper, 8×10 to 12×16 inches for a single butterfly.
- Brushes: a 1/2-inch flat, a size 6 and size 2 round, a size 0 detail brush and a 10/0 liner.
- Paints: titanium white, mars black or a mixed black (burnt umber and ultramarine), cadmium orange, cadmium yellow medium, burnt sienna, and any other wing colors for your species.
- Pencil, tracing paper and a ruler.
- Fine paint markers or acrylic ink (optional, for veins and borders).
- Glazing medium.
Monarch butterfly palette
| Part | Mix |
|---|---|
| Wing base (bright orange) | Cadmium orange + a touch of cadmium yellow |
| Inner wing glow | Cadmium orange + burnt sienna |
| Veins and borders | Black or burnt umber + ultramarine |
| Border spots | Titanium white, with a few in pale yellow-orange |
| Body | Black with white spots on the thorax |
Monarch orange needs to be vivid and opaque. Orange pigments vary a lot between paint lines; low-pigment oranges look streaky and dull, especially over a dark background. For colors that stay bright in a single coat or two, compare options in our guide to the best acrylic paint brands for bright, opaque color.
How to Paint a Butterfly With Acrylic Paint: Step by Step
Step 1: Paint the background
Choose a background that contrasts with the wing colors. A monarch’s orange looks great against a soft blue, a deep teal or a pale green. Paint the background first and let it dry. A loose, out-of-focus floral background works well if you want context without competition.
Step 2: Draw a symmetrical butterfly
Symmetry is the biggest challenge, so use this method:
- On tracing paper, draw a vertical center line for the body.
- Draw the body along this line: a small circle for the head, an oval for the thorax and a long tapered abdomen.
- On one side only, draw the forewing and hindwing. The forewing starts at the top of the thorax, extends outward in a long leading edge, curves around the outer edge and returns to the body. The hindwing tucks under it, attaching lower on the thorax.
- Draw the main veins radiating from the body, plus the dark border.
- Fold the tracing paper along the center line and trace the wing onto the other side.
- Transfer the full drawing to your canvas with graphite transfer paper, or by rubbing pencil on the back of the tracing.
Step 3: Base coat the wings
Fill each wing with bright orange. Two thin coats will look smoother than one thick coat. Let each coat dry for 10 to 15 minutes.
While the second coat is still slightly wet, blend a deeper orange-sienna near the body, where wings are usually darker and richer. This gradient adds depth.
Step 4: Paint the borders
Paint the dark outer border along the edge of each wing with black and a small round. On a monarch, the border is fairly wide, with a thicker dark area at the tip of the forewing.
Step 5: Paint the veins
Using a liner or size 0 brush, paint the veins with thinned black paint, following your drawing. Start at the body and pull outward to the border. Monarch veins are bold and thick; for other species they may be thinner and fainter.
Veins taper slightly as they move away from the body. Keep a steady hand by resting your little finger on a dry part of the canvas or on a mahlstick.
Step 6: Add spots and patterns
With pure white and the tip of a small brush or a dotting tool, add the white spots along the dark border in two rows. On the forewing tips, add a few larger white and pale orange spots. Keep spots slightly irregular; perfect dots look mechanical.
Step 7: Paint the body
Paint the body black. Add tiny white spots on the head and thorax. Paint the antennae with a liner: two thin black lines curving outward from the head, each ending in a small, rounded club.
Step 8: Add highlights and soft shadows
Butterfly wings have a subtle sheen. Glaze a thin, light line along the leading edge of each forewing. Add a soft, transparent shadow beneath the butterfly if it’s resting on a surface, or a faint shadow where the forewing overlaps the hindwing.
Step 9: Final refinements
Tidy edges with background color. Check symmetry by turning the canvas upside down or viewing it in a mirror; asymmetries jump out when the image is flipped.
Painting Other Butterfly Species
| Species | Main colors | Distinctive features |
|---|---|---|
| Monarch | Orange, black, white | Bold black veins, white-spotted border |
| Blue morpho | Iridescent blue, black or brown edges | Large, bright blue wings with dark borders |
| Eastern tiger swallowtail | Yellow, black | Black stripes, tails on hindwings, blue and orange spots near tails |
| Painted lady | Orange, black, white, pink-brown | Mottled pattern, white spots near forewing tips |
| Cabbage white | White, cream, small black spots | Simple, delicate; ideal for practicing subtle shading |
Painting an iridescent blue morpho
Blue morpho wings get their color from microscopic structures that reflect blue light, so they shimmer. To capture it:
- Paint the wings in phthalo blue mixed with a little white, darker near the body.
- Glaze a brighter cerulean or cobalt teal over the center of each wing.
- Add interference blue medium over the bright areas for a shifting sheen.
- Paint wide black or dark brown borders, and add a few small white spots near the forewing tips.
Painting a Butterfly at an Angle or on a Flower
A butterfly resting on a flower is often seen from the side or at an angle, with wings partly closed.
- Side view: wings fold up together above the body. You see the underside of the wings, which often has different, more muted colors than the top.
- Three-quarter view: the near wings look larger and the far wings smaller and foreshortened. The body is angled.
- On a flower: paint the flower first. Then place the butterfly with its legs touching the petals, and add a slight shadow on the flower beneath it.
Butterflies have six thin legs, usually only a few visible in a side view. Paint them with a liner as thin, jointed lines.
Wing Undersides and Muted Patterns
Many butterflies look completely different with their wings closed. The underside is often camouflaged, designed to blend in with bark or leaves while the butterfly rests. A monarch’s underside is a paler, buff-orange with the same black veins. A painted lady’s underside is a complex mosaic of brown, gray and cream with small eyespots. Some leafwing butterflies look almost exactly like dead leaves.
When painting an underside, lower the saturation of your mixes. Add a touch of the complementary color or a little burnt umber to each wing color so it sits back. Use glazes to build mottled patterns: dab a mid-tone, let it dry, then glaze slightly darker shapes over part of it. Eyespots, which are common on undersides, are painted as small concentric rings: a dark outer ring, a lighter middle ring and a tiny white dot off-center.
Painting the underside next to a fully open top view, as a pair of studies of the same species, is a great way to learn how one butterfly can carry two very different color schemes.
Easy Decorative Butterflies
- Symmetry fold butterflies: on paper, paint one half of a butterfly with thick paint, fold the paper along the center line and press. Unfold for a mirrored print. Great for kids.
- Silhouette butterflies: paint a colorful gradient background, then paint butterflies as flat black shapes.
- Pattern butterflies: paint wing shapes in flat colors, then fill them with dots, stripes or swirls using paint markers.
- Watercolor-style acrylic butterflies: thin acrylic with water or glazing medium and paint soft, flowing wings, then add crisp black details.
Common Mistakes When Painting Butterflies
- Asymmetrical wings. Use the fold-and-trace method and check in a mirror.
- Wings attached at the wrong place. Wings attach to the thorax, not the head or abdomen.
- Body too thick or too short. Butterfly bodies are slender and long, with the abdomen tapering to a point.
- Veins that don’t connect. Veins should radiate from the body toward the edges in a logical pattern.
- Dull colors from overmixing. Paint the base color cleanly and add patterns once it’s dry.
- Missing antennae clubs. Without the knob at the tip, a butterfly can look like a moth.
For crisp veins and borders, many painters prefer fluid paint or ink because it flows smoothly off a liner. Our Daler-Rowney acrylic ink review discusses how that ink performs in fine linework.
FAQs
How do you paint a butterfly for beginners?
Draw one side of the butterfly on tracing paper, fold and trace for perfect symmetry, then base coat the wings, add dark borders and veins, and finish with white spots. A monarch is a great first species because its pattern is bold and clear.
What colors do I need for a monarch butterfly?
Cadmium orange, cadmium yellow, burnt sienna, black and titanium white. Orange forms the wings, sienna deepens them near the body, black makes the veins and borders, and white creates the spots.
How do you make butterfly wings symmetrical?
Draw one half on tracing paper, fold it along the body line and trace the second half. Transfer the full design to your canvas, and check the finished painting in a mirror or upside down.
How do you paint shimmery butterfly wings?
Glaze a thin layer of interference or iridescent medium over the brightest areas once the paint is dry. It works best over dark or saturated colors, such as the blue of a morpho.
How long does it take to paint a butterfly?
A simple decorative butterfly takes 30 to 60 minutes. A detailed, realistic butterfly with a background usually takes two to four hours.
Can I paint butterflies on rocks or wood?
Yes. Acrylic adheres well to clean, dry rocks and sealed or primed wood. Seal outdoor pieces with a clear exterior varnish.
Next Step
Once you can paint a symmetrical, clean monarch, try a swallowtail with tails, a morpho with iridescence, or a group of butterflies on a flowering branch. Each species teaches a new pattern and color challenge.
Butterfly wings are a showcase for strong, saturated color, so it’s worth having paints that deliver it. See our comparison of acrylic paint brands with the brightest, most saturated colors to find a set that does your butterflies justice.




