
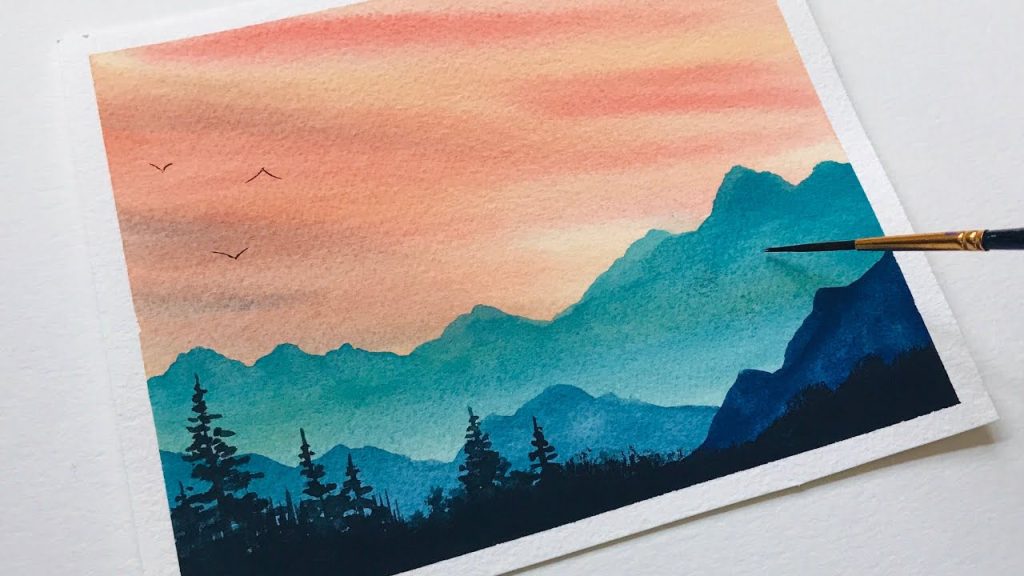
Quick answer: To paint landscapes with watercolors, work from back to front and light to dark. Start with a wet-on-wet sky, let it dry, then paint the distant hills in pale, cool, blue-leaning color, the middle ground a little stronger and warmer, and the foreground last with the darkest values and sharpest detail. Reserve whites from the start, let each layer dry before painting over it, and finish with a few crisp dry-brush accents.
Watercolor and landscape belong together. The medium’s soft edges are perfect for mist and sky, its transparency mimics light, and its unpredictability creates textures that look like nature without being fussy. The challenge is that watercolor rewards planning: once a light area is painted, getting it back is difficult.
This guide breaks down how to paint landscapes with watercolors into a repeatable process, from supplies and planning to a full step-by-step demonstration, plus techniques, color mixing and fixes for common problems. If you’re looking for finished landscape pieces for inspiration or for your walls, browse our collection of landscape painting essentials.
Supplies for Watercolor Landscapes
- Paper: 140 lb (300 gsm) cold-press, ideally 100% cotton. Cold-press texture helps dry-brush effects and holds big washes. A quarter sheet (11 x 15 inches) is a manageable size.
- Brushes: a large flat or mop (1 inch or wider) for skies and washes, a size 10–12 round for shapes, a size 4–6 round for details, and an old flat or fan brush for grass and texture.
- Paints: a small set of single-pigment colors (see the palette below).
- Extras: masking tape, a board, a spray bottle, paper towels, two water jars and a pencil.
- Optional: masking fluid for reserving small whites like sparkles on water.
Best watercolor brushes for landscapes
Many landscape painters rely on just three brush types. A soft, absorbent mop holds a lot of water for skies. A pointed round does most shape-making. A rigger (a long, thin liner) creates branches and grasses. Synthetic-natural blends are a good middle ground on price and water capacity.
Best Watercolor Palette for Landscapes
A compact, mostly earthy palette makes natural greens and harmonious skies easier.
| Color | Use in landscapes |
|---|---|
| Ultramarine blue | Skies, shadows, distant hills; granulates beautifully |
| Cerulean or cobalt blue | Soft, pale skies near the horizon |
| Raw sienna or yellow ochre | Warm light, fields, sandy ground |
| Burnt sienna | Earth, tree trunks, warming greens; with ultramarine it makes rich grays and near-blacks |
| Lemon or hansa yellow | Fresh spring greens when mixed with blue |
| Quinacridone gold (optional) | Glowing autumn foliage and warm greens |
| Permanent rose (optional) | Sunset clouds, flowers, purple shadows with blue |
Mixed greens almost always look more natural than tube greens. Try ultramarine with raw sienna for olive tones, phthalo or ultramarine with lemon yellow for spring greens, and add burnt sienna to any green to warm and darken it.
Plan the Painting Before You Wet the Paper
- Simplify the scene. Reduce the reference to four or five big shapes: sky, distant hills, middle ground, foreground and maybe a focal point such as a tree or barn.
- Place the horizon off-center. A horizon at the upper or lower third usually feels more balanced than one across the middle.
- Do a value sketch. In pencil, shade a 2 x 3 inch thumbnail with three values: light, middle, dark. Mark where the lightest light and darkest dark meet, which is usually the focal point.
- Decide what stays white. Clouds, sparkles on water, a white building, snow. Mark them lightly or mask them now.
- Draw lightly. A few faint lines on the paper are enough.
How to Paint Landscapes with Watercolors: Step-by-Step Demo
This sequence describes a simple scene: a sky, distant hills, a middle-ground tree line, a field and a path.
Step 1: The sky (wet-on-wet)
- Tape the paper to a board and tilt it slightly, about 10–15 degrees.
- Wet the entire sky area with clean water using a large brush until it has an even sheen.
- Drop in a mid-strength blue at the top, letting it fade as you move toward the horizon.
- For clouds, leave patches of white, or lift color with a crumpled tissue while it’s wet.
- Touch a hint of warm color, such as diluted raw sienna or rose, near the horizon if you want a sense of warm light.
- Let the sky dry completely. This step matters more than any other.
Step 2: Distant hills
Distant objects look lighter, cooler and less detailed because of the atmosphere between you and them. This effect, called atmospheric or aerial perspective, is the key to depth. Mix a pale blue-violet (ultramarine with a touch of rose or burnt sienna) and paint the hill shapes with a single, flat pass. Don’t add detail.
Step 3: Middle ground
Once the hills are dry, paint the tree line or middle hills with a slightly stronger, warmer, greener mix. Vary the color inside the shape by dropping in more yellow in sunlit areas and more blue or burnt sienna in shadow while the paint is wet. Soft, wet-into-wet transitions here suggest foliage without painting leaves.
Step 4: The field and foreground
Lay a warm, light wash of yellow ochre or a pale yellow-green across the field. While it’s damp, drop in darker greens near the bottom of the paper. The foreground should hold the strongest color and the darkest values in the painting.
Step 5: Shadows and form
After everything is dry, glaze transparent shadows: under trees, along the edge of the path, across the field. Use a cool mix of ultramarine with a little burnt sienna or rose. Glazes deepen color without hiding what’s beneath.
Step 6: Details and texture
- Use a rigger for a few branches and fence posts.
- Drag a dry, loaded brush quickly across the textured paper for grass and sparkle (dry brush).
- Flick upward strokes from the bottom edge for grasses.
- Add a small number of dark accents near the focal point.
Stop sooner than you think. Many watercolor landscapes lose their freshness in the last ten minutes of fiddling.
Wet on Wet Watercolor Landscape Techniques
Wet-on-wet means painting onto damp paper. The paint spreads with soft, blurred edges, which suits skies, distant trees, reflections and fog.
- Timing: shiny-wet paper gives big, soft spreads; damp paper with a dull sheen gives more controlled soft edges. A nearly dry surface causes blooms (“cauliflowers”) if you add more water.
- Paint strength: the paint on your brush should be stronger than you think, because the water on the paper dilutes it.
- Brush moisture: your brush should be less wet than the paper. A wetter brush pushes pigment out and causes blooms.
Wet on wet watercolor landscape tutorial: a misty tree line
- Wet a band across the paper.
- Drop in a pale gray-blue and let it spread.
- When the shine dulls slightly, touch in a stronger blue-green along the bottom of the band.
- Tilt the board upward so color creeps up in soft, tree-like shapes.
- Let it dry, then add a few sharper trunks with a rigger in the foreground only.
How to Paint Watercolour Landscapes for Beginners: Key Principles
- Back to front: sky first, foreground last.
- Light to dark: you can always darken but rarely lighten.
- Big to small: large washes before small details.
- Soft to hard: wet-on-wet early, crisp wet-on-dry details at the end.
- Cool far, warm near: blues and violets recede; yellows and oranges advance.
Painting Water, Trees and Skies: Quick Methods
Still water and reflections
Reflections are usually slightly darker and less detailed than the objects reflected. Paint them with vertical strokes into a damp surface so the edges soften, then pull a few horizontal lines out with a thirsty brush or leave thin strips of white paper to suggest ripples and light.
Trees in the middle distance
Don’t paint leaves. Paint the tree as one shape with a light side and a shadow side, dropping darker green into the shadow side while wet. Leave a few “sky holes” of lighter color so the shape breathes. Add a trunk and a couple of branches only where they show.
Dramatic skies
For storm clouds, wet the sky, lay in a pale warm wash, then drop in a strong blue-gray mix (ultramarine and burnt sienna) along the top. Tilt the board so the gray creeps downward. Lift a few bright edges with a tissue where light breaks through. Keep the land beneath simpler so the sky stays the star.
Distant mountains
Paint each ridge as a flat silhouette, letting each dry before painting the next nearer ridge slightly darker and warmer. Three or four ridges are enough to create a convincing sense of distance.
Common Problems and How to Fix Them
| Problem | Likely cause | Fix or prevention |
|---|---|---|
| Cauliflower blooms in the sky | Wetter paint added to a drying wash | Work while the paper is shiny, or wait until bone dry |
| Muddy greens | Too many pigments or overmixing | Mix greens from two colors, three at most |
| Flat, no depth | Background as strong as foreground | Keep distant shapes paler, cooler and simpler |
| Paper buckles | Lightweight paper, untaped | Use 140 lb or heavier paper, tape all edges |
| Hard edges where you wanted soft | Paper dried too fast | Work in smaller sections or re-mist carefully |
| Lost whites | No planning | Reserve whites early or use masking fluid |
Watercolor Painting Ideas: Landscape Subjects to Try
- Sunset over a lake: a graded warm sky with a mirrored, slightly darker reflection.
- Snowy hills: mostly white paper with blue-violet shadow shapes.
- Rolling farmland: layered fields in varied yellow-greens with a single tree.
- Foggy forest: wet-on-wet tree silhouettes in three values.
- Desert mesa: warm burnt sienna and raw sienna against a cerulean sky.
- Coastal cliffs: dry-brush rock texture and white foam reserved with masking fluid.
For larger pieces meant to hang at home, our guide to painting a landscape for wall decor covers sizing, composition and finishing for display.
Practice Plan: Four Short Sessions
- Session 1: Paint six small skies on one sheet, each with a different wet-on-wet approach.
- Session 2: Paint value strips of three layered hills, each darker and warmer than the last.
- Session 3: Mix a green chart using two blues and three yellows, plus burnt sienna.
- Session 4: Combine everything in a small 5 x 7 inch landscape.
Paint each session’s studies on the same paper you plan to use for finished work. Different papers absorb and dry differently, so practicing on cheap paper and then switching to cotton can make familiar techniques behave unexpectedly. Small studies teach faster than one big painting, because you get more chances to see what water and pigment do.
FAQs
What is the easiest way to paint landscapes with watercolor?
Keep it to three or four layers: a wet-on-wet sky, pale distant hills, a stronger middle ground and a dark foreground. Let each layer dry before the next, and finish with a few crisp details. Simplifying the scene is the biggest help.
How do you paint a wet on wet watercolor landscape?
Wet the paper evenly, then drop in color with a brush that’s less wet than the paper. Let pigment spread for soft skies and distant trees. Add stronger paint as the shine starts to fade, and let it dry fully before adding any crisp details.
What are the best watercolor brushes for landscapes?
A large mop or flat brush for washes, a medium pointed round for shapes and a rigger for branches and grasses cover nearly everything. A worn flat brush is useful for dry-brush texture.
What colors do you need for watercolor landscapes?
Ultramarine, a lighter blue like cerulean, raw sienna or yellow ochre, burnt sienna and a lemon yellow handle most scenes. These mix natural greens, warm earths and rich shadows.
How do you make watercolor landscapes look realistic?
Use atmospheric perspective: make distant shapes paler, cooler and less detailed, and keep the strongest color, contrast and detail in the foreground. Mixed, varied greens also look more natural than tube greens.
How long should watercolor dry between layers?
Until the paper is completely dry, which usually takes 5–20 minutes depending on humidity and how wet the wash was. Touch the back of your hand near the paper: if it feels cool, it’s still damp.
Final Thoughts
Plan the values, reserve your whites, and paint back to front and light to dark. Those principles carry every watercolor landscape, from a quick sky study to a full scene. For a more general walkthrough that also covers other media, see our step-by-step landscape painting guide, and for ideas on displaying or collecting finished work, explore our guide to landscape paintings for your space.





One Comment