Quick answer: Knowing how to paint with acrylics comes down to a few habits: squeeze out small amounts of paint, keep it workable with a light mist of water or a slow-drying medium, and build your painting in layers from large, thin color shapes to smaller, thicker details. Acrylic dries in minutes and becomes water-resistant once dry, so you can layer quickly, but you must clean brushes before paint dries in them. Mediums let you change the paint’s flow, finish, transparency and drying time.
Acrylic is the most forgiving paint for learning, but only once you understand what it is doing. It behaves like watercolor when thinned, like oil when used thickly, and like nothing else in how fast it dries. Most frustration comes from fighting that speed instead of using it.
This guide covers how to paint with acrylics from the ground up: how the paint works, the main paint types, essential techniques, how to use acrylic mediums and retarders, acrylic gouache and pouring, and a reliable painting workflow you can apply to any subject.
How Acrylic Paint Works
Acrylic paint is pigment suspended in an acrylic polymer emulsion. While wet, the polymer particles float in water, which is why you can thin the paint and clean brushes with water. As the water evaporates, the particles fuse into a flexible plastic film that locks the pigment in place.
That chemistry explains the paint’s three defining habits:
- It dries fast. Thin layers can be dry to the touch in 10 to 30 minutes. Thick layers take longer, sometimes hours, and full curing can take days.
- It is permanent once dry. Dried acrylic does not rewet. You can paint over it without disturbing the layer underneath, which makes layering easy.
- It shifts slightly darker as it dries. The binder looks milky when wet and turns clear as it dries, so colors deepen a little. Mix slightly lighter than your target.
Types of Acrylic Paint and When to Use Them
| Type | Consistency | Best for |
|---|---|---|
| Heavy body | Thick, buttery, holds peaks | Impasto, palette knife, visible brushstrokes |
| Soft body | Creamy, smooth, self-leveling | General painting, blending, smooth layers |
| Fluid | Pourable, like heavy cream | Glazing, detailed work, pouring |
| High-flow and inks | Like ink or watercolor | Washes, line work, airbrush, pens |
| Open or slow-drying acrylic | Varies; stays wet much longer | Wet blending, portraits, plein air |
| Acrylic gouache | Creamy, opaque, matte | Flat color design, illustration |
| Craft acrylic | Thin to medium, lower pigment | Crafts, decor, school projects |
Within each type, student and artist grades differ mainly in pigment load and the use of fillers. Artist-grade paint covers in fewer coats and mixes cleaner, while student grade is cheaper for practice. For side-by-side picks across budgets, see our roundup of the best acrylic paint brands for every skill level.
Basic Setup: How to Use Acrylic Paint Without Waste
- Squeeze out small amounts. A pea- to grape-sized dab of each color. Acrylic dries on the palette, so you can always add more.
- Use a stay-wet palette or mist often. A stay-wet palette (a sponge or damp paper under a membrane) keeps paint usable for hours or even days with a lid.
- Keep two water containers. One for the first rinse, one for clean rinsing, so you are not loading dirty water back into mixes.
- Never let paint dry in a brush. Keep brushes not in use resting in water briefly or wipe and rinse them right away. Dried acrylic at the ferrule ruins brushes.
- Prime your surface. Most canvas comes pre-primed with acrylic gesso. Wood, paper and board benefit from a coat of gesso so paint sticks and colors stay bright.
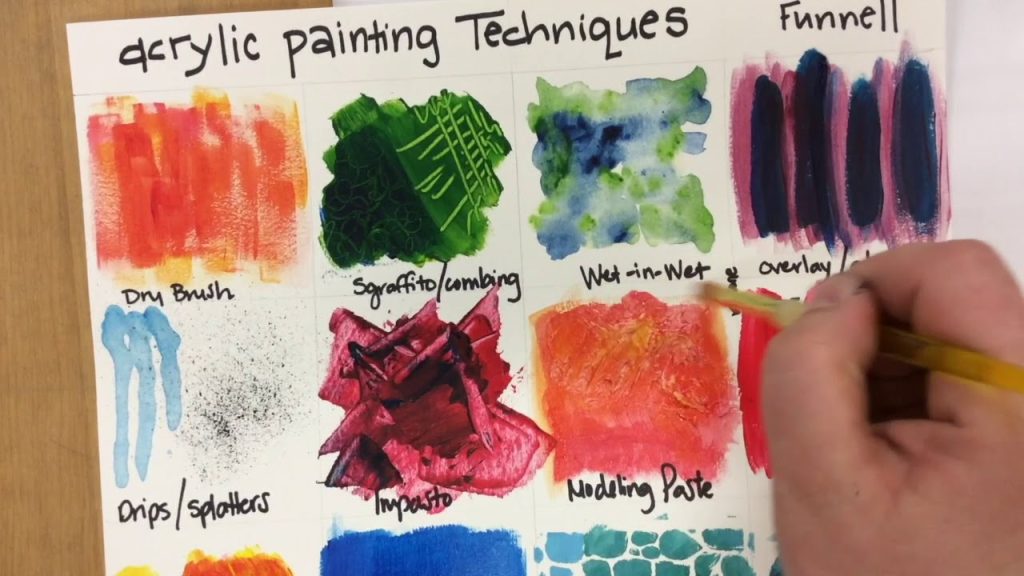
Essential Acrylic Painting Techniques
Blocking in
Cover the canvas with large, simple shapes of approximate color. This establishes the composition and kills the white of the canvas, which makes judging colors much easier.
Layering
Because dry acrylic will not lift, you can build a painting in successive layers. Work general to specific: big shapes first, then medium forms, then details and highlights.
Wet-on-wet blending
Place two wet colors side by side and soften the edge with a clean, damp brush. Work in small areas and quickly. A slow-drying medium extends this window considerably.
Glazing
Brush a thin, transparent layer over dry paint to shift its color or deepen shadows. Glazes are made by mixing paint with a gloss or glazing medium rather than lots of water, which keeps the layer durable.
Dry brushing
Load a brush lightly, remove most of the paint and drag it across a dry surface. The paint catches on texture, creating broken, scratchy marks useful for wood grain, grass, fur and rough rock.
Scumbling
Scrub a thin, semi-opaque, usually lighter layer over dry paint in small circular motions. It softens and unifies areas, and it suggests haze or atmosphere.
Impasto and palette knife
Apply thick paint with a brush or knife so strokes stand up from the surface. Heavy-body paint or a gel medium holds peaks.
Stippling and sponging
Dab color with a brush tip or sponge to build texture, such as foliage, stone and sand.
Hard and soft edges
Crisp edges pull attention, soft edges recede. Painter’s tape gives perfectly hard edges; a damp brush softens them.
How to Use Acrylic Medium
Acrylic mediums are paint without pigment: the same binder, adjusted to change how the paint behaves. Mixing medium into paint changes its body, finish or drying time without weakening adhesion the way excess water can.
| Medium | What it does | Typical use |
|---|---|---|
| Gloss or matte medium | Thins paint, increases transparency, sets sheen | Glazing, unifying finish |
| Glazing medium | Thin, transparent layers with slightly longer open time | Glazes, color shifts |
| Gel medium (soft, regular, heavy) | Thickens and extends paint | Impasto, texture, collage glue |
| Modeling or molding paste | Builds hard, sculptable texture | Raised textures, relief |
| Flow improver | Reduces surface tension so paint flows | Smooth washes, line work, large flat areas |
| Retarder or slow-drying medium | Extends drying time | Blending, soft transitions |
| Pouring medium | Makes paint pourable while keeping film strength | Acrylic pouring |
A general approach: mix medium into paint on the palette with a palette knife, starting with a small ratio (for example, one part medium to four parts paint) and increasing until the paint behaves the way you want. Follow the manufacturer’s guidance on maximum ratios, especially for retarders.
Using acrylic retarder
Retarders slow the evaporation that causes acrylic to dry. Liquid retarders are often recommended at relatively low ratios; adding too much can leave the paint tacky for a long time or weaken the film. Gel-type slow-drying mediums typically tolerate higher ratios because they contain more binder. Read the label for the specific product before mixing.
How to Use Acrylic Gouache
Acrylic gouache combines the flat, matte opacity of traditional gouache with the permanence of acrylic. Unlike traditional gouache, it does not reactivate with water once dry, so you can layer over it freely.
- Thin it to a creamy consistency with a little water. Too thick and it streaks; too thin and it loses opacity.
- Paint flat shapes in single, even passes. Acrylic gouache excels at clean, graphic color areas.
- Work light over dark or dark over light freely, because the paint is very opaque.
- Clean brushes promptly. Because it dries permanent, it behaves like acrylic in your brushes.
It is popular for illustration, design work and paintings that need a uniform matte finish without varnish glare.
How to Do Acrylic Pouring
Acrylic pouring is a fluid technique in which thinned paint is poured onto a surface and allowed to flow into organic patterns. The basic method:
- Prepare the paint. Mix each color with a pouring medium until it flows like warm honey. Many pourers start around one part paint to one or two parts medium, adjusting for the paint’s thickness.
- Layer colors in a cup. Pour colors one after another into a single cup (a “dirty pour”) or keep them separate for other techniques.
- Pour onto a level, primed surface. Flip the cup onto the canvas or pour in a stream, then tilt the canvas so paint covers the edges.
- Optional cells. A few drops of silicone oil in the paint, and a brief pass with a heat torch, encourage cells to form.
- Dry flat and covered. Pours stay wet for a long time and can take a day or more to dry and several weeks to cure fully.
Color Mixing Basics for Acrylic
Good color mixing matters more than owning many tubes. A limited palette of a warm and cool version of each primary plus white can mix almost anything you need, and it keeps colors harmonious.
- Mix with a palette knife. Brushes leave unmixed streaks and wear out faster. A knife blends evenly and wipes clean.
- Add dark to light, not light to dark. A tiny touch of blue changes a pile of white quickly; it takes a lot of white to lighten a pile of blue. Start with the lighter color and add the darker one gradually.
- Dull colors with their complement. To tone down a bright green, add a touch of red rather than black. Black tends to make mixes look dead, especially with yellows, which turn olive.
- Know your transparent and opaque colors. Transparent pigments (such as phthalos and quinacridones) are good for glazes; opaque pigments (such as cadmium-type colors and titanium white) cover well. Many tubes show this on the label.
- Mix enough. Running out of a color halfway through an area and trying to match it is one of the most common causes of patchy painting.
Test mixes on a scrap of the same surface and let them dry before judging, since acrylic shifts slightly darker as it dries.
A Reliable Workflow for Any Acrylic Painting
- Plan: Make a small thumbnail sketch to decide composition and the location of lights and darks.
- Tone the canvas: A thin wash of a mid-value color (burnt sienna or a gray) makes it easier to judge values than stark white.
- Sketch: Lightly draw the main shapes with thinned paint or pencil.
- Block in: Fill large areas with thin paint, background first.
- Develop forms: Add mid-tones and shadows, working from back to front.
- Refine: Adjust edges, color temperature and contrast. Add details.
- Highlights: Add the brightest lights last with thicker, opaque paint.
- Varnish: After the painting has cured (often several days for normal layers), apply a varnish to protect it and even out sheen.
Mid-range paints with solid pigment loads make this workflow easier because you need fewer coats to cover. Our Daler-Rowney acrylic paint review walks through how one well-known range handles coverage, mixing and finish.
Common Acrylic Painting Mistakes
- Too much water: Heavy dilution weakens the binder and can cause chalky, poorly adhered paint. Use a medium for thin layers.
- Overworking tacky paint: Brushing paint that has started to set lifts it and leaves streaks. Stop and let it dry.
- Squeezing out too much paint: Paint dries on the palette before you use it.
- Muddy color: Over-mixing or combining too many colors, especially complements. Limit mixes to two or three colors.
- Starting with details: Details painted early get covered or look disconnected. Save them for the end.
- Skipping brush cleaning: Dried paint in brushes is the fastest way to destroy them.
FAQs
How do you use acrylic paint for beginners?
Start with a small canvas, a limited palette (white, a yellow, a red, a blue and a brown), two or three brushes and a spray bottle. Squeeze out small amounts, block in large shapes first, and build up layers once each one dries.
Do you need to add water to acrylic paint?
Not necessarily. Soft-body paint can be used straight from the tube. A small amount of water helps paint flow, but for thin layers many artists prefer a medium because excess water can weaken the paint film.
What is acrylic medium used for?
Acrylic mediums change the paint’s consistency, transparency, sheen or drying time. Gloss and matte mediums thin and control finish, gels thicken, flow improvers increase flow, and retarders slow drying.
How do I keep acrylic paint from drying so fast?
Use a stay-wet palette, mist your palette and canvas lightly, add a retarder or slow-drying medium, and avoid painting near fans, heaters or in direct sun.
Can you mix acrylic gouache with regular acrylic?
Generally yes, since both use acrylic binders. Mixing will change the finish, making the gouache glossier or the acrylic more matte, so test on scrap first.
Do acrylic paintings need varnish?
Varnish is not required, but it protects the surface from dust, UV light and scuffs, and evens out uneven sheen. Apply it only after the painting has fully dried.
Final Thoughts
Painting with acrylics becomes far easier once you work with the fast drying rather than against it: keep paint fresh on a stay-wet palette, build in thin layers, use mediums for thin or slow passes, and finish with thick, opaque highlights. The techniques above cover nearly every subject from landscapes to abstracts.
The right tubes make these techniques easier to learn. When you are ready to choose or upgrade your colors, compare options in our guide to acrylic paints worth buying for learning and finished work.