
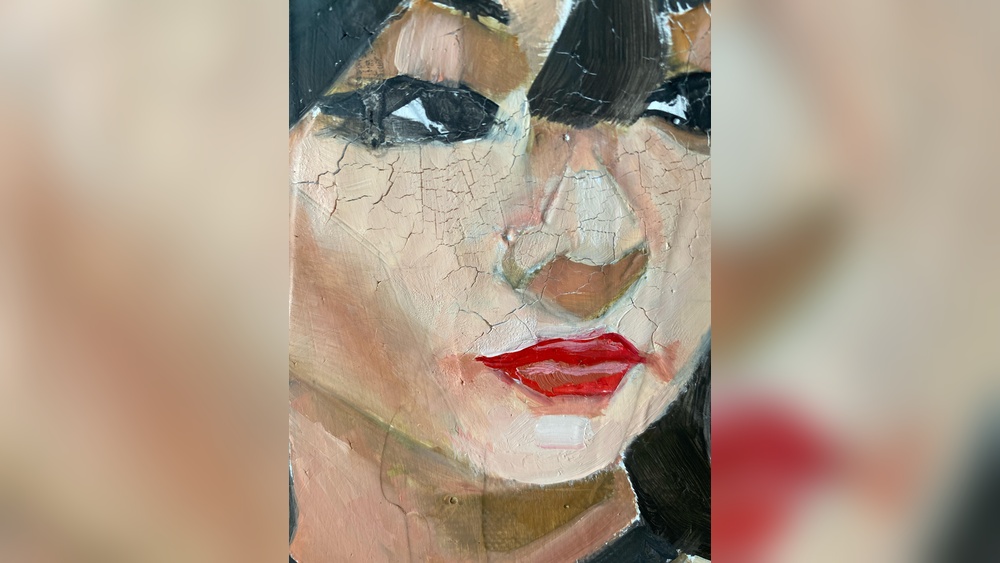
Quick answer: Here is how to prevent oil paint from cracking: follow fat over lean (each layer slightly more oil-rich than the one below), avoid over-thinning with solvent, let each layer dry before painting over it, use a well-prepared rigid or properly primed surface, and avoid very thick passages over thin, fast-drying layers. Store paintings in stable conditions, and wait until the painting is fully cured before varnishing.
Cracks in an oil painting are rarely random. They are usually a delayed message about how the painting was built, sometimes appearing weeks after you finish and sometimes years later. The good news is that the main causes are well understood, and almost all of them can be avoided with a few studio habits. If you are newer to the medium, our overview of oil painting styles and techniques is a helpful companion to this guide.
This guide covers how to prevent oil paint from cracking by explaining why oil paint cracks in the first place, the rules that keep layers stable, the role of surfaces, mediums and drying, and what to do if you are already seeing cracks.
Why Oil Paint Cracks
Oil paint does not dry by evaporation like acrylic or watercolor. The oil binder, usually linseed oil, reacts with oxygen and gradually forms a solid, flexible film. This process, called oxidation, continues for months and even years. As the film cures, it changes in volume and becomes less flexible over time.
Cracks appear when stresses within or beneath the paint film exceed its ability to flex. The main sources of stress include:
- Uneven drying between layers. If an upper layer dries and hardens faster than the layer below, the lower layer continues to move, and the rigid upper layer cracks.
- Different flexibility between layers. A lean, brittle layer over a fat, flexible one can crack as the flexible layer moves.
- Movement of the support. Canvas expands and contracts with humidity and temperature, and flexes when handled. Paint that is too brittle cannot follow.
- Poor adhesion. Paint applied over a slick, non-absorbent or contaminated surface may crack and flake.
- Excess thickness. Very thick paint can wrinkle and crack as its surface skins over while the interior stays soft.
Why Is My Oil Painting Cracking? Common Causes at a Glance
| Crack pattern | Likely cause | Typical timing |
|---|---|---|
| Fine network of cracks over specific areas | Faster-drying layer over slower-drying layer; violating fat over lean | Days to months |
| Wide, alligator-skin cracks showing underlayer | Thick or oily layer over one that was not dry; very slow-drying underlayer | Weeks to months |
| Wrinkling or puckered surface | Paint applied too thickly with lots of oil; surface dried before interior | Days to weeks |
| Cracks that flake off to the ground | Poor adhesion; paint over slick or unprimed surface; over-thinned paint | Months to years |
| Concentric or spiral cracks | Impact or pressure on the back of canvas | Any time after impact |
| Overall fine crackle in old works | Natural aging and embrittlement of the film plus canvas movement | Years to decades |
The Fat Over Lean Rule
The most important principle for preventing cracks is fat over lean. “Fat” means paint with a higher proportion of oil; “lean” means paint with less oil, typically thinned with solvent.
The rule: each successive layer should be slightly fatter (more flexible, slower drying) than the one beneath it. This ensures that lower layers dry first and upper layers remain flexible enough to accommodate any movement below.
A practical fat over lean sequence
- Underpainting or first layer: paint thinned with odorless mineral spirits. A rough guide is paint diluted with solvent to a thin, wash-like consistency. Little or no added oil.
- Second layer: paint used straight from the tube or with a small amount of medium mixed with solvent.
- Later layers: paint with a little more oil medium, such as a linseed-based medium, to improve flow.
- Final glazes: the most oil-rich layer, using a glazing medium.
Avoid adding large amounts of oil early on or switching back to very lean paint over fat layers. Small increases per layer are enough. Too much oil in any layer can cause wrinkling, yellowing and a soft film, so the goal is controlled steps, not maximum oil at the end.
Pigments vary in oil content
Different pigments naturally require different amounts of oil and dry at different rates. Earth colors such as burnt umber and burnt sienna often dry relatively quickly, while some whites, cadmiums and alizarin crimson tend to dry more slowly. Using a slow-drying color in an underlayer and a fast-drying one on top can create the same problem as violating fat over lean. Underpaintings in fast-drying earth colors are a traditional way to keep lower layers lean and quick.
How to Prevent Oil Paint From Cracking: Studio Checklist
- Use a properly prepared surface. Use canvas or panels primed with acrylic gesso or an oil ground intended for oil painting. Do not paint directly on raw canvas, which can be damaged by oil over time.
- Do not over-thin paint. Diluting paint heavily with solvent breaks down the binder, leaving a weak, underbound film that can crack and powder. Use solvent mainly for early, thin layers.
- Follow fat over lean. Increase oil content gradually with each layer.
- Allow each layer to dry. Paint over a layer once it is touch dry, unless you are working wet-into-wet in one session. Painting over a layer that is partly dry, with a skin on top and wet paint below, is a common cause of cracks.
- Be careful with thick impasto. If you want texture, consider building it gradually or using an impasto medium designed for the purpose. Avoid very thick, oily passages over thin ones that are still curing.
- Limit fast-drying mediums over slow layers. Alkyd mediums speed drying. They are useful, but applying a fast-drying alkyd layer over slow-drying, oily paint can cause stress.
- Avoid unstable additives. Large amounts of driers, certain household oils that do not dry properly, or non-artist materials can create films that never fully cure or become brittle.
- Keep the canvas taut but not overstretched. A slack canvas flexes more; one stretched extremely tight is under constant tension. Firm and even is the goal.
- Handle and store carefully. Avoid pressing on the back of a canvas, rolling finished paintings or stacking them face to face. Keep them away from heaters, damp basements and direct sunlight.
- Wait before varnishing. Varnish over paint that has not cured enough can trap solvents and add stress. Follow the varnish manufacturer’s guidance; many painters wait several months for typical work and longer for thick paintings.
Choosing Surfaces That Resist Cracking
The support plays a big part in long-term stability. For more on surfaces, paints and mediums, our guide to oil painting with expert tips and buying advice covers the options in detail.
| Support | Crack risk | Notes |
|---|---|---|
| Rigid panel (wood, hardboard, aluminum composite) | Low | Does not flex like canvas; good for thin, detailed work |
| Linen canvas | Low to moderate | Strong and responds less to humidity than cotton; traditional choice |
| Cotton canvas | Moderate | More affordable; more prone to movement with humidity |
| Canvas boards | Low to moderate | Rigid backing; quality varies |
| Paper (with proper sizing and ground) | Moderate | Must be well prepared; flexes easily if not mounted |
Whatever you choose, make sure the ground is clean and free of dust or grease, which can affect adhesion.
Mediums and Solvents: Using Them Safely for Durability
- Odorless mineral spirits: thin early layers; clean brushes. Keep ratios modest so the paint keeps enough binder.
- Linseed oil: increases flexibility and gloss. Add in small amounts to later layers. Refined or cold-pressed linseed oil is common for painting.
- Stand oil: a thicker, polymerized oil that levels well and is often used in glazes. A small amount goes a long way.
- Alkyd mediums: speed drying and improve flow. Consider using them consistently across layers rather than only on top.
- Prepared painting mediums: mixtures of oil, solvent and sometimes resin. Follow the manufacturer’s recommendations for which layers they suit.
A useful habit is to keep two small cups: a lean one (mostly solvent) for early layers and a fat one (more oil) for later layers. Label them so you do not mix them up.
Drying Times and Layer Timing
Drying depends on pigment, thickness, medium, temperature, humidity and airflow. As a rough guide, thin layers are often touch dry in one to three days, typical layers in several days, and thick impasto can take weeks to dry on the surface and much longer to cure through.
- Test before painting over a layer. Touch an inconspicuous area lightly. If paint transfers or it feels tacky, wait longer.
- Warm, dry, ventilated rooms speed drying. Cold, humid or dark conditions slow it.
- Do not try to rush drying with direct heat, such as hair dryers held close or heaters. Uneven heating can cause skinning and wrinkling.
Alla Prima Painting and Cracking
Paintings completed wet-into-wet in a single session are generally less prone to layer-related cracking because all the paint dries together as one film. The main risks with alla prima are very thick passages wrinkling as they dry and too much solvent weakening thin areas. Moderate thickness and moderate dilution keep alla prima work stable.
What to Do If Your Painting Is Already Cracking
Recent cracks in a painting you are still working on
If cracks appear in a layer that is still curing, stop adding layers to that area. Let the painting dry thoroughly. You may be able to paint over fine cracks once everything is dry, using paint that is slightly fatter than the cracked layer. Be aware that cracks can sometimes reappear through new layers if the underlying cause remains.
Minor cracks in finished work
Fine, stable cracks without lifting paint may not need intervention. Keep the painting in stable conditions and avoid handling the canvas.
Lifting, flaking or serious damage
If paint is lifting, flaking or the painting has sentimental or financial value, consult a professional paintings conservator. Attempting repairs with household adhesives or heat can cause irreversible damage.
Common Myths About Cracking
- “More oil always prevents cracks.” Too much oil can cause wrinkling, yellowing and slow, soft films. Balanced increases are better.
- “Cheap paint always cracks.” Student-grade paints can be stable when used correctly. Technique and layering usually matter more than price, though quality paints tend to be more consistent.
- “Varnish prevents cracks.” Varnish protects the surface from dirt and UV but does not fix structural problems in the paint layers.
Practical Habits That Help
Beyond the main rules, small routines make cracking far less likely over a lifetime of painting. Keep a brief note on the back of each canvas or in a notebook listing the mediums used and the dates of each layer; it helps you understand what went right or wrong if problems appear later. Practice a full layered painting on a small panel, which is cheap and less vulnerable than canvas, before committing to a large piece. Applying these habits to subjects that use many thin layers, like our guide to painting fog in oil, shows how layering for atmosphere and layering for durability go hand in hand.
FAQs
Why is my oil painting cracking?
The most common reasons are violating fat over lean, painting over layers that are not dry, using too much solvent, applying very thick oily paint, or painting on a poorly prepared or flexible surface. The crack pattern often hints at the cause.
Does adding linseed oil stop cracking?
Adding small, increasing amounts of oil in later layers helps keep upper layers flexible. Adding too much, especially early on, can cause wrinkling and slow, weak films.
How long should oil paint dry between layers?
Wait until the layer is touch dry, often one to several days for thin and typical layers. Thick passages and slow-drying pigments need longer. Test before painting over.
Can I fix cracks in an oil painting?
Fine cracks in your own work can sometimes be painted over once fully dry, though they may reappear. For valuable paintings or flaking paint, a professional conservator is the safest choice.
Do panels crack less than canvas?
Rigid panels generally present less risk of cracking from support movement because they do not flex. Paint layer issues such as fat over lean still apply.
Does thick paint crack more?
Very thick paint can wrinkle or crack if its surface dries before the interior. Building texture gradually or using an impasto medium reduces this risk.
Final Thoughts
Durable oil paintings come from respecting how oil paint cures: lean below, fatter above, enough drying time between layers, sound surfaces and careful storage. Build these habits into every painting and cracking becomes a rare exception instead of a worry.
For guidance on choosing paints, mediums and supports that support long-lasting work, explore our oil paintings guide with styles, care tips and buying recommendations.




