
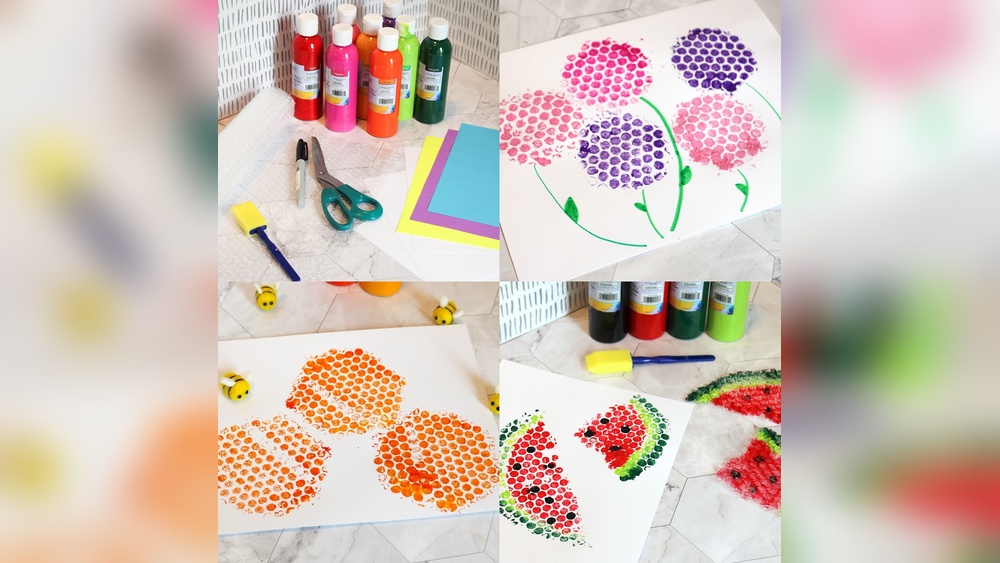
Quick answer: Fun painting ideas with bubble wrap include honeycomb and bee prints, fish and dragon scales, corn cobs, grapes and berries, snowy night skies, sunflower centers, textured abstract backgrounds, and bubble wrap “rain boots” for kids. For clean prints, roll or brush a thin, even layer of acrylic or poster paint onto the bubble side, press it firmly onto paper or canvas without sliding, and lift straight up. Use small bubbles for fine texture and large bubbles for bold dots.
Bubble wrap is an art supply that arrives free with your online orders. Painted and pressed onto paper, it leaves a grid of round dots that reads instantly as honeycomb, scales, snow or berries. It is simple enough for preschoolers and versatile enough for adults making textured mixed-media pieces.
This guide covers how to get crisp prints, the best paints and surfaces, and twenty project ideas grouped by theme and season. Since bubble wrap textures fit so many holidays and seasons, you will find plenty of crossover with our list of the best seasonal painting ideas.
What You Need
- Bubble wrap in at least two bubble sizes (small, about 3/16 inch, and large, about 1/2 inch, are common).
- Paint: Acrylic, tempera or poster paint for most projects. Washable paint for young kids. Fabric paint for textiles.
- Surface: Heavy paper (cardstock or mixed-media paper), canvas panels, or fabric.
- Applicator: A foam brush, flat brush or small foam roller (brayer).
- Scissors and tape for cutting shapes and wrapping bubble wrap around objects.
- Paper plates or a tray as a palette.
- Optional: Cardboard tubes, rolling pins or blocks to wrap bubble wrap around for rolling and stamping.
How to Get Clean Bubble Wrap Prints
- Cut the bubble wrap to the shape and size you want before painting.
- Tape it bubble-side up to the table so it does not slide while you paint.
- Apply a thin, even coat of paint with a foam brush or roller. Thick paint fills the gaps and blurs the dots.
- Lay the paper on top of the painted bubble wrap, or press the bubble wrap onto the paper, whichever is easier for the size.
- Press firmly and evenly with your palm or a clean roller. Do not slide.
- Lift straight up in one smooth motion.
- Repaint between prints. A second print from the same paint load can be lighter and more delicate, which is useful for layering.
Bubble wrap printing tips
- Mix two colors directly on the bubble wrap for a multicolor print in one press.
- Print light colors first, let dry, then layer darker prints for depth.
- Smooth paper gives crisper dots; textured paper gives softer prints.
- Pop a few bubbles before painting for an irregular, organic pattern.
- Rinse and pat dry bubble wrap to reuse it for a new color.
Animal and Nature Ideas
1. Honeycomb and bees
Print yellow and orange bubble wrap across the paper for honeycomb, then paint simple bees with a brush. Large bubbles read best as honeycomb cells.
2. Fish scales
Cut a fish shape from bubble wrap, paint it in blue, teal and purple, and press. Add an eye and fins with a brush. An ocean background done with a sponge makes it a full scene.
3. Dragon or dinosaur skin
Print green, purple or orange bubble texture inside a dragon or dinosaur outline for instant scales. Kids love this one.
4. Turtle shell
Paint a turtle body, then print a shell shape with green bubble wrap and outline the shell segments with a marker.
5. Corn on the cob
Cut a cob shape from bubble wrap, paint yellow, and print. Add green husks with a brush. A great autumn or harvest project.
6. Grapes and berries
Print clusters of purple or red with large bubbles, then add stems and leaves. Individual bubble dots read as small berries.
7. Sunflower centers
Paint yellow petals with a brush, then press a circle of brown bubble wrap in the center for seed texture.
Seasonal and Holiday Ideas
8. Snowy night
Print white bubble wrap onto dark blue paper for falling snow. Add a painted snowman, houses or trees.
9. Winter trees
Cut triangular bubble wrap pieces and print green trees, then add white bubble prints on top for snow.
10. Spring flowers
Cut small circles of bubble wrap, print pink and yellow blooms, and add brush-painted stems.
11. Easter eggs
Cut egg shapes from bubble wrap and print in pastel colors. Mix two colors on the wrap for a two-tone effect.
12. Valentine hearts
Cut heart-shaped bubble wrap and print in reds and pinks. Great for handmade cards. Our guide to easy Valentine’s Day painting ideas has more projects for the holiday.
13. Pumpkins
Print orange bubble wrap circles, add a green stem and vertical lines for pumpkin ribs.
Abstract and Decorative Ideas
14. Textured abstract background
Print overlapping bubble wrap layers in three or four colors, rotating the wrap between prints. Use it as a finished piece or as a background for collage.
15. Ombre bubble print
Print a row of dark color, then gradually lighter rows, by adding white to the paint between prints.
16. Bubble wrap and watercolor
Paint a loose watercolor wash, let it dry, then print a single color of bubble wrap over it. The contrast between soft wash and crisp dots is striking, and the section below on watercolor covers how to make it work reliably.
17. Gift wrap and cards
Print kraft paper or plain cardstock with bubble wrap in metallic or bright colors to make custom wrapping paper and cards.
Kid-Friendly Bubble Wrap Activities
18. Bubble wrap stomping
Tape bubble wrap around a child’s feet (over socks or shoes), dip in washable paint on a tray, and let them stomp across a long sheet of paper outdoors. Supervise closely; bubble wrap can be slippery.
19. Bubble wrap rolling pin
Tape bubble wrap around a rolling pin or cardboard tube, roll it through paint and across paper for continuous patterns.
20. Bubble wrap hand stamps
Wrap a small piece around a child’s hand or a block, dip in paint and stamp.
For a project that grandparents and kids can enjoy together, bubble wrap printing needs very little fine motor control. Our guide to easy painting ideas for seniors includes more relaxed projects suited to mixed-age groups.
Choosing Paint and Surfaces
| Paint | Result | Best for |
|---|---|---|
| Acrylic | Crisp, vibrant, permanent | Canvas, cards, mixed media |
| Tempera or poster paint | Matte, bright, washable versions available | Kids’ projects on paper |
| Watercolor | Faint, soft prints | Subtle textures over washes; use thick, concentrated paint |
| Fabric paint | Permanent on textiles after heat-setting | Tote bags, T-shirts, pillowcases |
| Gouache | Opaque, velvety | Illustrative prints on paper |
Bubble Size Guide
| Bubble size | Effect | Project ideas |
|---|---|---|
| Small (about 3/16 inch) | Fine dotted texture | Fish scales, snow, sand, abstract textures |
| Large (about 1/2 inch) | Bold, distinct dots | Honeycomb, grapes, polka dots, corn |
| Mixed or partly popped | Irregular, organic | Rocks, lichen, distressed backgrounds |
Watercolor Painting Ideas and Tips for Bubble Wrap Mixed Media
Watercolor alone rarely prints well from bubble wrap, because it is too thin to sit on the bubbles. Combined with a more opaque printing layer, though, it opens up some of the most attractive bubble wrap projects.
- Wash first, print second. Paint a loose watercolor sky, sea or abstract wash on watercolor paper and let it dry completely. Then print bubble wrap on top in white gouache or acrylic for snow, sea foam or bokeh-like light.
- Print first, glaze second. Print bubble wrap in white acrylic on watercolor paper and let it dry. Then wash watercolor over the whole sheet. The acrylic dots resist the wash slightly and stay lighter, creating a subtle pattern.
- Concentrated pan watercolor. If you want a pure watercolor print, load very concentrated paint on small-bubble wrap and print onto damp, not wet, paper. Expect a soft, ghostly result that works well as a background.
- Salt plus bubble wrap. Sprinkle salt into a wet watercolor wash, let it dry, brush off the salt, then add a bubble wrap layer. The two textures complement each other on ocean and galaxy pieces.
Step-by-Step: Honeycomb Canvas
- Prepare the canvas. An 8 by 10 or 11 by 14 inch canvas panel works well. Paint a pale cream or light yellow background and let it dry.
- Cut the bubble wrap. Use large-bubble wrap, cut into an irregular patch roughly the size of the area you want covered.
- Load two colors. Brush golden yellow on most of the bubbles and a little orange or ochre along one edge. Blend slightly where they meet.
- Print in clusters. Press the bubble wrap onto the canvas in two or three overlapping areas rather than covering it all. Partial coverage looks more natural.
- Add depth. Once dry, print a second, smaller patch in a slightly darker amber over part of the first layer.
- Paint the bees. With a small round brush, paint two or three simple bees: an oval body in yellow, black stripes, and pale wings in thinned white.
- Finish with highlights. A tiny dot of white on some honeycomb cells suggests glossy honey.
Bubble Wrap Projects by Age
| Age group | Best projects | Notes |
|---|---|---|
| Toddlers (with close supervision) | Stomping, rolling pin prints, simple dot sheets | Washable paint only; keep bubble wrap away from faces |
| Preschool and early elementary | Corn, grapes, fish, snowy nights | Pre-cut shapes save frustration |
| Older kids and tweens | Dragon scales, layered seasonal scenes, cards | Encourage mixing colors on the wrap |
| Teens and adults | Mixed-media abstracts, watercolor combos, gift wrap | Experiment with metallics and layered prints |
Common Mistakes and Fixes
- Too much paint: Dots merge into blobs. Apply a thin layer and blot on scrap if needed.
- Sliding while pressing: Creates smears. Press straight down and lift straight up.
- Thin paper wrinkling: Use cardstock or mixed-media paper for wet paint.
- Faint prints: Paint dried on the bubble wrap before printing. Work faster, especially with acrylic.
- Muddy layered prints: Let each layer dry before printing another color on top.
Displaying and Preserving Bubble Wrap Art
Bubble wrap prints made with acrylic on heavy paper or canvas are durable, but a little care keeps them looking crisp.
- Flatten paper prints under a few heavy books once they are completely dry, with a clean sheet of paper on top to protect the surface.
- Frame behind glass or acrylic for kids’ artwork you want to keep, or slip it into a clear sheet protector in a portfolio binder.
- Seal canvas pieces with a clear acrylic varnish if they will hang in a kitchen or bathroom where they may collect grease or moisture.
- Photograph seasonal pieces before storing them, then rotate the originals on display each season.
Cleanup and Reuse
- Rinse bubble wrap in warm soapy water immediately after use and lay it flat to dry.
- Dedicated bubble wrap pieces for each color family save time.
- Store cut shapes flat in a folder for future projects.
- Recycle according to local guidelines when it is too worn to use.
FAQs
What kind of paint works best with bubble wrap?
Acrylic and tempera or poster paint work best because they are thick enough to sit on top of the bubbles. Washable paint is ideal for young children.
How do you get a clear print with bubble wrap?
Apply a thin, even layer of paint, press firmly without sliding, and lift straight up. Smooth, heavy paper gives the crispest results.
What can I make with bubble wrap painting?
Honeycomb and bees, fish and dragon scales, grapes, corn, snowy skies, pumpkins, hearts, abstract backgrounds, gift wrap and greeting cards are all popular projects.
Is bubble wrap painting good for toddlers?
Yes, with supervision and washable paint. Stomping, rolling and stamping activities are great for sensory play. Keep bubble wrap away from faces and supervise closely.
Can you use watercolor with bubble wrap?
You can, but prints are faint unless the paint is very concentrated. Many artists paint a watercolor wash first and then add bubble wrap prints in acrylic or gouache on top.
Can bubble wrap be reused for painting?
Yes. Rinse it in warm soapy water right after use and let it dry flat. It can usually be reused several times before the bubbles flatten.
Final Thoughts
Bubble wrap printing is fast, cheap and surprisingly versatile. Keep the paint thin, press without sliding and match bubble size to the subject, and you can create everything from honeycomb to snowy skies. Because so many of these projects match holidays and seasons, our guide to seasonal painting ideas throughout the year can help you plan your next bubble wrap project.


One Comment