
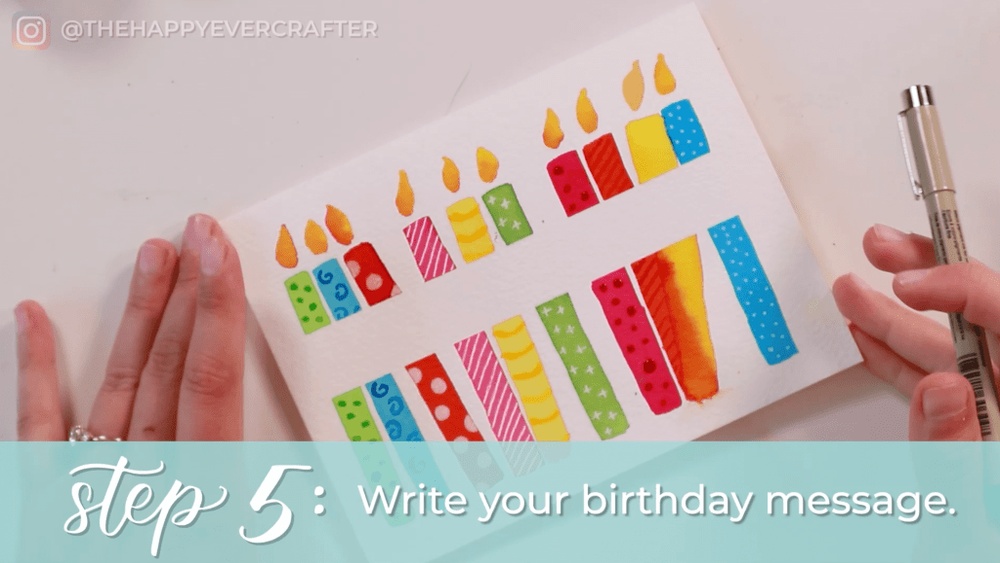
Quick answer: To make DIY watercolor greeting cards, use pre-cut watercolor cards or cut 140 lb cold-press paper to 5×7 inches and score it to fold to 5×3.5 (or paint a 4×6 panel to mount on a 5×7 card base). Tape the edges, paint a simple design such as a floral wreath, loose bouquet, gradient sky or bold lettering, and let it dry completely. Press flat under a heavy book overnight, remove the tape for crisp borders, and add a message inside with a fine pen.
A handmade watercolor card says something a store-bought card cannot. It is also one of the most practical ways to practice: cards are small, so each painting is quick, and they get used rather than piling up in a drawer. Making DIY watercolor greeting cards well depends on a few details beyond the painting itself, such as the right paper weight, folding cleanly and keeping cards flat.
This guide covers card formats and sizes, paper options, a step-by-step method, 12 designs that work at card size, lettering, mass-producing sets and finishing touches. Paint quality makes a noticeable difference on small, focused designs, so for options with bright, even color, see our roundup of the best watercolor paints for artists.
Choose a Card Format
| Format | How it works | Pros | Cons |
|---|---|---|---|
| Paint on a folded card | Watercolor paper folded in half, painted on the front | Simple, one piece | Paper can buckle; fold may crack on heavy paper |
| Mounted panel | Paint a separate panel, glue to a card base | Panel stays flat; easy to discard failed paintings | Extra step and materials |
| Pre-made watercolor cards | Pre-scored, pre-cut watercolor cards, often with envelopes | Fast, consistent size | Less choice of paper quality |
| Flat postcard | A single panel, no fold, message on back | Quick to make in batches | Less formal |
Common card sizes in the US
- A2: 4.25 x 5.5 inches folded (from a 5.5 x 8.5 sheet); fits A2 envelopes.
- A7: 5 x 7 inches folded (from a 7 x 10 sheet); fits A7 envelopes.
- Postcard: 4 x 6 inches; widely available envelopes and frames.
Decide on envelope size first and work backward to the card.
Watercolor Paper for Cards
- Weight: 140 lb (300 gsm) is the standard. Lighter paper buckles; very heavy paper (300 lb) is hard to fold.
- Texture: cold-press has a gentle tooth that suits most card designs. Hot-press is smoother and better for fine lettering and detailed botanicals.
- Fiber: 100% cotton allows smoother blending; cellulose (wood-pulp) paper is cheaper and fine for simple designs and practice.
- Pre-cut cards: packs of watercolor paper cards with envelopes save cutting and scoring time and are good for batches.
Supplies
- Watercolor paper or pre-made watercolor cards
- Watercolor paints (a small palette of five to eight colors is plenty)
- Round brushes: size 6 or 8 and a size 2 for details
- Low-tack masking tape or washi tape
- Pencil and eraser
- Bone folder or the back of a butter knife for scoring
- Ruler and craft knife or paper trimmer
- Fine waterproof pen and white gel pen
- Card stock for card bases (if mounting panels)
- Double-sided tape or glue for mounting
- Envelopes to match the card size
How to Make DIY Watercolor Greeting Cards: Step by Step
Step 1: Cut and score
Cut paper to the unfolded size, such as 7 x 10 inches for an A7 card. Measure the midpoint and score along it with a bone folder against a ruler. Scoring before painting gives a cleaner fold later. If mounting a panel instead, cut panels about 1/4 inch smaller than the card front on all sides.
Step 2: Tape the borders
Tape the painting area to your work surface or a board on all four sides. This reduces buckling and creates a crisp white border when removed. Press the tape edges down firmly so paint does not creep under.
Step 3: Sketch lightly
Draw a light pencil outline. Use a hard pencil and minimal pressure; graphite becomes permanent under paint once sealed by a wash.
Step 4: Paint in layers
Start with the lightest washes, let them dry, then add mid-tones and details. Keep the design simple; cards are viewed briefly and at arm’s length.
Step 5: Let it dry completely
Wait until the paper is fully dry, including under the tape. A hair dryer on a low setting can speed this up if held at a distance.
Step 6: Remove the tape
Peel slowly at a low angle, pulling away from the painting. If the tape starts to lift paper fibers, warm it gently with a hair dryer to soften the adhesive.
Step 7: Flatten
If the card has buckled, place it face down between two sheets of clean paper under a stack of heavy books overnight.
Step 8: Fold, mount and finish
Fold along the score. If you painted a panel, attach it to a card base with double-sided tape. Add lettering, highlights with a white gel pen, and your message inside.
12 Watercolor Card Designs That Work at Small Size
| Design | Occasion | Key technique |
|---|---|---|
| Leafy wreath | Any, especially holidays | Press-and-lift leaves around a circle |
| Loose floral bouquet | Birthday, Mother’s Day, thank you | Wet-in-wet petals, crisp stems |
| Gradient sunset with silhouette | Sympathy, thinking of you | Variegated wash |
| Balloons | Birthday | Simple ovals, highlight left white |
| Single bold flower | Any | Large, simple shapes |
| Watercolor lettering | “Thank you,” “Congrats,” “Love” | Faux calligraphy with brush |
| Christmas tree | Holidays | Triangle of layered greens, gold star |
| Snowy night | Holidays, winter | Dark wash with white gel dots |
| Heart cluster | Valentine’s, anniversary | Small hearts in pink and red tones |
| Cake or cupcake | Birthday | Simple shapes, sprinkles in pen |
| Abstract color blocks | Any | Taped geometric shapes |
| Botanical sprig | Thank you, sympathy | Fine line stems and delicate leaves |
Design tips for small formats
- Leave white space. A small painting surrounded by white feels elegant and intentional.
- Use three to five colors per card.
- Make the focal point large enough to read from a few feet away.
- If lettering is included, plan space for it before painting.
Walkthrough: A Leafy Wreath Card
The wreath is a versatile design that works for birthdays, holidays, weddings and thank-you notes, simply by changing the colors and the greeting in the center.
- Trace a circle. Use a small bowl, roll of tape or jar lid about 3 inches across, centered on the card front. Draw very lightly.
- Mix three greens. A yellow-green (lemon yellow plus a little blue), a mid green and a deep green (add a touch of red or brown to darken).
- Paint the first leaves. Using press-and-lift strokes with a size 6 round, place leaves along the line in small groups, all angled in the same direction around the circle, like a clock. Use the lightest green first.
- Fill gaps with the other greens, letting some leaves overlap while the earlier ones are still damp so colors mingle slightly.
- Add accents. Once dry, add a few red berries for Christmas, pink buds for spring or small blue dots for a calm, neutral wreath.
- Add thin stems with a size 2 brush, connecting some leaves to suggest branches.
- Erase the pencil once everything is completely dry.
- Letter the center with a fine pen or brush: “Thank you,” “Merry Christmas,” a name or initials.
A full wreath takes about 20 minutes of painting. Leaving a deliberate gap in the circle at the bottom or side, sometimes with a small painted bow, adds interest.
Adding Lettering
Lettering can be painted or drawn.
- Brush lettering: use a small round brush; press for thick downstrokes and lift for thin upstrokes. Practice on scrap first.
- Faux calligraphy with pen: write in cursive with a fine pen, then thicken every downstroke by drawing a second line beside it and filling in.
- Negative lettering: write the word with masking fluid, paint a wash over it, then remove the masking fluid to reveal white letters.
- Printed overlay: some makers print the greeting on vellum and layer it over the painting.
About masking fluid
Masking fluid is a liquid latex that resists paint. Apply it with an old brush or a ruling pen, let it dry, paint over it, and rub it off with a clean finger or eraser once the paint is fully dry. Some crafters experiment with DIY alternatives such as rubber cement, but commercial masking fluid is more predictable and less likely to damage paper. Always test on a scrap of the same paper first.
Making Cards in Batches
Holiday seasons and events often call for many cards. An assembly-line approach saves time and keeps a set consistent.
- Tape a large sheet into a grid of card-sized rectangles, leaving tape lines between them.
- Paint the first layer on every rectangle in one session, such as a background wash.
- Add the next layer to all once dry, then details.
- Remove tape and cut along the tape lines with a paper trimmer.
- Mount panels on card bases for a clean, professional finish.
Small variations between cards are part of the handmade charm. For smooth, even backgrounds across a batch, our guide on how to blend colors in watercolor painting explains graded and variegated washes in detail.
Finishing Touches
- White gel pen for highlights, snowflakes and dots.
- Metallic watercolors or gold pens for stars, accents and borders.
- Deckled edges: tear panel edges against a ruler for a soft, handmade edge.
- Matching envelopes: paint a small leaf or flower on the envelope flap.
- Signature: sign and date the back for a keepsake feel.
Common Problems
| Problem | Fix |
|---|---|
| Card warps after painting | Tape all edges, use 140 lb paper, flatten under books |
| Fold cracks or looks rough | Score before folding; fold along the grain if possible |
| Paint bled under tape | Press tape edges firmly; use less water near edges |
| Tape tears the paper | Use low-tack tape; warm with a hair dryer before peeling |
| Pen ink smears on paint | Let paint dry completely; use waterproof, archival ink |
| Design looks crowded | Reduce elements; leave more white space |
Mailing Handmade Cards
Handmade cards with mounted panels, ribbon or thick embellishments may be thicker or more rigid than standard cards, which can affect postage. Square envelopes and unusually rigid cards can also require extra postage in the US. Check with your local post office if a card feels bulky. Slipping the card into a clear sleeve inside the envelope protects the painting from moisture and scuffs in transit.
Tips by Skill Level
Beginners
Start with balloons, heart clusters and gradient skies. They rely on simple shapes and teach water control at a small, low-risk size.
Intermediate
Add wreaths, loose bouquets and brush lettering. Try making a matching set of four cards in one color scheme.
Advanced
Paint detailed botanicals on hot-press paper, combine masking fluid lettering with layered washes, and design seasonal collections.
FAQs
What paper is best for watercolor greeting cards?
140 lb (300 gsm) cold-press watercolor paper is the standard. It holds water without heavy buckling and folds cleanly when scored.
What size should a watercolor card be?
A2 (4.25 x 5.5 inches) and A7 (5 x 7 inches) are common in the US. Choose based on the envelopes you have.
How do you keep watercolor cards from warping?
Tape the paper on all sides while painting, use 140 lb paper, avoid flooding with water, and press the dry card under heavy books overnight.
Should I paint on the card or on a separate panel?
Painting a separate panel and mounting it on a card base keeps the painting flatter and lets you discard failed attempts without wasting a card.
Are pre-made watercolor cards worth it?
Pre-cut and pre-scored watercolor cards with envelopes save time, especially for batches. Check the paper weight and texture before buying.
How do you write on a watercolor card?
Wait until the paint is completely dry, then use a waterproof fine-liner or a white gel pen. For painted lettering, practice brush strokes on scrap paper first.
Final Thoughts
Good handmade cards come from simple designs, the right paper weight and a little finishing care: score before folding, tape the edges and flatten when dry. Start with wreaths, balloons and gradient skies, then build a collection for every occasion. For paints that give clean, vibrant color on small designs, browse our picks for the top watercolor paint sets.


One Comment