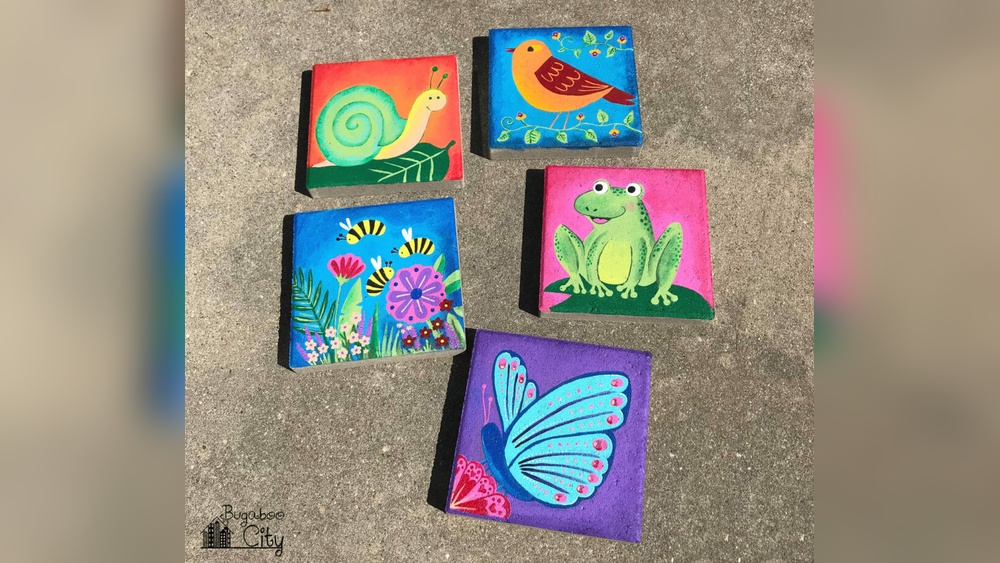
Quick answer: To paint garden stepping stones, start with a clean, fully cured, completely dry concrete stone, apply a masonry or concrete primer, and paint your design with exterior-grade acrylic or concrete paint in thin coats. Let the paint cure for at least 24 to 48 hours, then seal with two or three coats of a non-slip, UV-resistant concrete sealer before setting the stone in the garden.
A stepping stone takes more abuse than almost any other painted object: boots, mower wheels, rain, frost, and full sun all summer. That is why a design that looks perfect on the workbench can fade or flake within one season if the wrong paint or sealer goes on.
The good news is that knowing how to paint garden stepping stones properly is mostly about the right sequence. This guide walks through stone types, prep, paint choice, design ideas, sealing for foot traffic, and what to do when things go wrong. For specific paint options suited to concrete underfoot, see our roundup of paints that hold up on DIY stepping stones.
Types of Stepping Stones You Can Paint
| Stone type | Surface | Paint grip | Notes |
|---|---|---|---|
| Store-bought concrete pavers | Smooth or lightly textured | Good after cleaning | Some have a factory sealer; test with a drop of water |
| Homemade cast concrete | Varies with mix and mold | Good once fully cured | Wait about 28 days for full cure before painting |
| Natural flagstone or slate | Uneven, layered | Fair | Slate can flake; paint only stable areas |
| Large river stones | Very smooth | Fair | Need primer; best for borders, not heavy foot traffic |
| Stepping stone mold kits | Smooth top | Good | Often designed for embedding mosaic as well as paint |
Water test: drip a little water on the stone. If it soaks in and darkens the concrete within a minute, the surface is porous and ready for primer. If it beads up, the stone has a sealer or curing compound and needs a light scuff with coarse sandpaper or a wire brush before paint will bond.
Materials Checklist
- Stepping stones (cured and dry)
- Stiff nylon scrub brush or wire brush
- Mild detergent; a concrete cleaner for oily or mossy stones
- Masonry or concrete primer (exterior)
- Exterior acrylic, patio paint or concrete paint
- Brushes: 1-inch flat, small rounds, a liner; stencil brushes or foam pouncers for stencils
- Chalk or a white charcoal pencil for sketching
- Stencils, painter’s tape, or freezer paper for masks
- Clear exterior concrete sealer, ideally with anti-slip additive or a texture additive you can mix in
- Gloves and a well-ventilated outdoor work area
How to Paint Garden Stepping Stones: Step-by-Step
Step 1: Let new concrete cure
Freshly cast concrete is alkaline and full of moisture. Painting it too soon can cause the paint to blister or fade as the concrete continues to release water and alkali. Most concrete guidance suggests waiting about 28 days for full cure. If you made the stones yourself, write the pour date on the bottom with a marker.
Step 2: Clean deeply
Scrub the top and edges with warm water and detergent. For older stones, remove moss, algae and dirt completely; a diluted oxygen bleach solution helps with green growth. Rinse thoroughly. Any residue left behind weakens adhesion.
Step 3: Dry for at least 24 to 48 hours
Concrete holds water deep inside. Bring stones under cover and let them dry in a warm, airy spot. Tape a small square of plastic wrap to the surface overnight: if condensation forms underneath by morning, the stone is still too damp to paint.
Step 4: Prime
Apply a thin coat of exterior masonry primer over the entire top surface and the upper edges. Primer seals the porous concrete so paint does not soak in unevenly, and improves bond strength. Let it dry per the label, often one to four hours.
Step 5: Sketch the design
Chalk or a white charcoal pencil shows up well on primed concrete and brushes off easily. Keep designs bold. Fine details are hard to see from standing height and wear away first under foot traffic.
Step 6: Paint in thin layers
Block in large areas first with a flat brush, then add smaller details once the base shapes are dry. Two thin coats always outperform one heavy coat on concrete, because thick paint traps air and can bubble in the sun. Allow roughly an hour between coats in warm weather.
Step 7: Add details and outlines
Outlines in a dark color make designs readable from a distance. A liner brush or an outdoor paint pen gives clean lines. Let everything dry completely.
Step 8: Cure the paint
Give the painted stone at least 24 to 48 hours in a dry place before sealing. Cooler temperatures slow curing, so add time if you are working in spring or fall.
Step 9: Seal for traffic and weather
Apply a clear exterior concrete sealer in two or three thin coats, letting each dry fully. Extend the sealer down the sides of the stone. A gloss sealer looks rich but becomes slippery when wet, which is a real hazard on a path. Choose a satin or matte formula, or mix a fine anti-slip grit into the final coat.
Step 10: Wait before installing
Most sealers need 24 to 72 hours to cure before light foot traffic. Check the label. Then set the stones in a bed of sand or soil so they sit level and do not rock, which reduces cracking and edge wear.
Stepping Stone Painting Ideas
Mandala and dot designs
Concentric rings of dots look striking on round stones and are easy to scale. Start at the center, work outward, and rotate the stone as you go. Larger dots last longer underfoot than tiny ones.
Garden creatures
Ladybugs, turtles, bees and frogs suit round or oval stones well. A ladybug is simply a red circle, a black head, a center line and spots. Kids can manage these with little help.
Leaf and fern prints
Brush paint onto the back of a real leaf, press it onto the primed stone, and peel it off. The vein pattern transfers beautifully. Use two or three greens for depth.
Personalized stones
Names, house numbers, handprints, dates and short phrases make meaningful gifts. Use stencils or tape for letters, and keep text at least 1 inch tall so it stays legible.
Faux mosaic
Tape off a grid with thin tape, paint each tile a different color, pull the tape, and fill the gaps with gray to imitate grout. It gives a mosaic look without cutting glass.
Painted river stone accents
If you have smaller stones for edging between the steppers, they can echo the same colors. Our guide on painting smooth river stones covers techniques for those slick, rounded surfaces.
Choosing Paint for Concrete Stepping Stones
Not every paint is built for something you walk on. Here is how common options compare in general terms.
| Paint type | Durability underfoot | Ease of use | Best for |
|---|---|---|---|
| Exterior acrylic / patio paint | Good when sealed | Easy, water cleanup | Most painted designs |
| Concrete or porch-and-floor paint | Very good | Moderate; fewer colors | Solid base colors and large areas |
| Outdoor paint pens | Fair; needs sealer | Very easy | Outlines, lettering, details |
| Standard craft acrylic | Low to fair even with sealer | Easy | Decorative stones not walked on |
| Concrete stain | Excellent; soaks in | Moderate | Color washes, not detailed designs |
Pigment quality affects fading. Earth tones, blacks and many blues tend to hold up well outdoors; some bright reds, pinks and purples fade faster in strong sun. A UV-resistant sealer helps but does not fully prevent it.
Sealing Stepping Stones the Right Way
The sealer does more work than the paint. A few rules:
- Match sealer type to paint. Water-based acrylic sealers are generally safest over water-based paints. Solvent-based sealers can sometimes lift or smear acrylic paint; test on a scrap stone first.
- Use thin coats. Thick sealer can turn milky if moisture is trapped.
- Seal in dry weather. Avoid sealing when rain is forecast within 24 hours or humidity is very high.
- Reseal yearly. Stones on a busy path benefit from a fresh coat every spring.
Common Mistakes When Painting Stepping Stones
- Painting uncured or damp concrete. Leads to bubbling, peeling and white efflorescence pushing through.
- Skipping primer. Paint soaks unevenly into raw concrete and wears through faster.
- Using a glossy sealer on a walkway. Wet gloss surfaces can be slippery.
- Tiny detailed designs. They wear off fastest and are hard to see from above.
- Sealing only the top. Water enters from the sides and pushes paint off at the edges.
- Setting stones directly on hard ground unevenly. Rocking stones crack and chip.
Troubleshooting
White powder appears on the paint
That is efflorescence: mineral salts carried to the surface by moisture moving through the concrete. It usually means the stone was not dry or sits in a wet spot. Brush it off when dry, let the stone dry thoroughly indoors, and reseal. Improving drainage under the stone helps.
Paint is peeling at the edges
Water is getting in from the sides or underneath. Sand the loose paint away, dry the stone, touch up, and seal all exposed edges.
Colors faded after one summer
UV breaks down some pigments and sealers. Repaint the faded areas and use a sealer labeled UV-resistant. Placing stones in partial shade also helps.
Sealer turned cloudy
Moisture got trapped during application. In mild cases it clears as the stone dries. If not, a compatible solvent or a light sanding and resealing may be needed; follow the sealer maker’s instructions.
Painting Stepping Stones With Kids
Stepping stones are a fun family project because each child can make one for the garden path. Handle cleaning, priming and sealing yourself, since primers and sealers often need ventilation and adult handling. Then let kids paint primed stones with outdoor-rated acrylics or paint pens. Simple designs like handprints, initials and bugs work best. Let them sign and date the underside so the stones become keepsakes.
How Long Do Painted Stepping Stones Last?
Lifespan depends far more on placement and maintenance than on the design. A properly primed and sealed stone in a lightly used side path can look good for several years. The same stone in the middle of a busy walkway, or in a low spot where water pools, may need touch-ups after one season.
A simple yearly routine keeps them looking fresh:
- Early spring: lift each stone, brush off soil and moss, and let it dry indoors for a couple of days.
- Inspect: look for faded colors, chipped edges and dull or worn sealer, especially along the walking line.
- Touch up: lightly scuff damaged areas with fine sandpaper, wipe clean, and repaint with the original colors.
- Reseal: apply one or two fresh coats of the same type of sealer you used originally, top and sides.
- Reset: level the sand bed and set the stone back so it sits flat without rocking.
In freezing climates, consider storing decorative stones indoors over winter. Water that soaks into concrete expands when it freezes and can pop off paint or crack the stone. Stones that stay out should sit on well-drained gravel or sand rather than clay soil.
FAQs
What kind of paint do you use on stepping stones?
Exterior acrylic, patio paint or concrete paint are the most common choices. Whatever you use, apply it over a masonry primer and finish with a clear exterior concrete sealer so it can handle foot traffic and weather.
Can you use acrylic paint on concrete stepping stones?
Yes, but outdoor-rated acrylic lasts longer than standard craft acrylic. Prime the concrete first and seal the finished design with several coats of exterior sealer.
How do you keep paint from coming off stepping stones?
Start with clean, cured, completely dry concrete, use a masonry primer, paint thin coats, let it cure, and seal every exposed surface including the sides. Resealing every year helps a lot.
How long should painted stepping stones dry?
Allow 24 to 48 hours for the paint to cure before sealing, then another 24 to 72 hours after sealing before walking on them, depending on the sealer’s instructions.
Do painted stepping stones get slippery?
They can, especially with a gloss sealer. Use a matte or satin sealer, or add an anti-slip grit additive to the final coat for safer footing when wet.
Should I paint stepping stones before or after placing them?
Paint and seal them before placing them. Working on a table indoors or in a garage keeps them dry, clean and easier to handle, and lets the sealer cure without foot traffic.
Next Step
Painted stepping stones last when the concrete is cured and dry, primed before painting, and sealed with a non-slip exterior finish on every exposed side. Bold designs and an annual reseal keep them looking fresh for years.
Paint choice makes a real difference in how well colors hold up to sun and foot traffic. Compare suitable options in our guide to the best paint for DIY stepping stones before you start your next batch.