
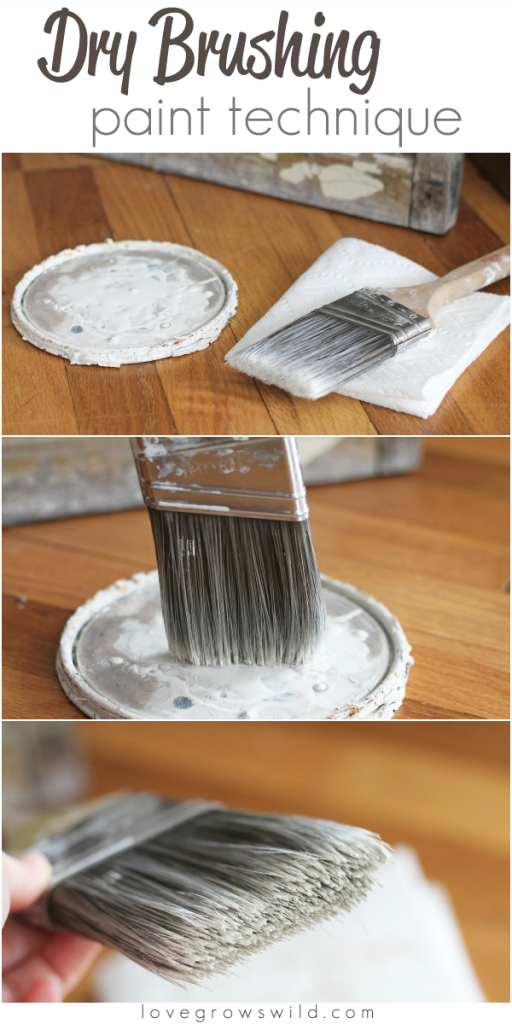
Dry brushing is one of those techniques that seems almost too simple to work: a nearly empty brush, a few quick strokes, and suddenly flat surfaces show texture, edges and wear. It is a staple for miniature painters, crafters working with air dry clay, and artists painting fur, wood grain or weathered stone. This beginner’s guide explains what dry brushing paint means, how to do it, and the mistakes that turn it chalky or streaky.
Quick answer: Dry brushing is a painting technique where you load a brush with a small amount of paint, wipe almost all of it off on a paper towel, then lightly sweep the brush across a textured surface. The remaining pigment catches only the raised edges, highlighting texture and detail. It is commonly used on miniatures, air dry clay, sculpted crafts, terrain models, wood effects and in fine art for broken, scratchy strokes.
What Is Dry Brushing Paint?
Dry brushing is not a type of paint; it is a way of applying paint. The “dry” refers to the brush, which holds so little paint that it feels almost dry to the touch. When this nearly empty brush moves lightly over a surface, paint transfers only where bristles meet the highest points. Recesses stay untouched.
The result is an instant highlight effect. On a sculpted surface, edges and ridges become lighter, making detail visible. On a flat surface, dry brushing creates broken, textured strokes that suggest grass, fur, clouds or rough materials.
Dry brushing is especially popular on air dry clay projects because handmade clay pieces have natural texture that the technique brings out. If you are choosing paints for clay crafts, our guide to the best paint for air dry clay covers options that suit both base coats and dry brushing.
Where Dry Brushing Is Used
| Use | What it does | Typical colors |
|---|---|---|
| Miniatures and figurines | Highlights armor edges, fur, hair, textured bases | Lighter versions of the base color |
| Air dry clay and polymer crafts | Brings out sculpted texture and handmade marks | Metallics, light neutrals |
| Tabletop terrain and models | Adds weathering to rocks, bricks and wood | Grays, tans, rust tones |
| Furniture and home decor | Creates a weathered, aged look | White over dark, or contrasting color |
| Fine art (acrylic, oil) | Broken color for grass, fur, foam, light on water | Highlights and texture colors |
| Textured abstract art | Highlights ridges of modeling paste | Light or metallic over darker base |
What You Need
- A dry brushing brush: A flat or round brush with stiff, slightly worn bristles. Dedicated dry brushes with soft, dense bristles are common in miniature painting, and makeup-style brushes are also popular for smooth results. Avoid using your best detail brushes; dry brushing wears bristles quickly.
- Paint: Acrylic is the most common. Slightly thicker paints, or paints formulated for dry brushing, transfer more smoothly.
- Paper towel: For wiping off excess paint.
- Palette: A flat surface to load the brush.
- A base-coated piece: Dry brushing goes over a dry base layer.
When it comes to the best brushes for dry brushing miniatures, look for a brush with firm but not scratchy bristles, a flat or domed shape, and a size that matches the area. Larger brushes suit terrain and big pieces; small ones suit details. Many painters keep several old brushes specifically for this job.
How to Dry Brush: Step by Step
- Base coat the piece. Paint the whole surface in a darker base color and let it dry completely. Dry brushing over wet paint will smear rather than highlight.
- Choose a highlight color. Pick a color noticeably lighter than the base, or a metallic. For subtle results, mix the base color with white or a lighter tone.
- Load the brush lightly. Dip just the tips of the bristles into the paint.
- Wipe off most of the paint. Brush back and forth on a paper towel until almost no paint transfers and the strokes look faint and powdery. This step is the key to the technique.
- Sweep lightly across the surface. Use quick, light strokes, moving across the texture rather than along it. Raised edges will catch the paint.
- Build gradually. Repeat in several light passes rather than pressing harder. Each pass brightens the highlights a little.
- Add a final lighter highlight. For extra depth, mix a still lighter color and dry brush only the very highest points with even less pressure.
- Seal if needed. Pieces that will be handled benefit from a matte or satin varnish.
Dry Brushing on Air Dry Clay
Air dry clay pieces often have fingerprints, tool marks or sculpted texture. Dry brushing turns those details into a feature. A few tips specific to clay:
- Let the clay dry fully before painting, often 24–72 hours depending on thickness. Damp clay can cause paint to peel or crack.
- Seal or prime porous clay with a base coat or gesso so paint does not soak in unevenly.
- Use a dark base such as charcoal, deep brown or navy, then dry brush a light or metallic color to highlight texture.
- Metallic dry brushing (gold, copper, silver) over a dark base gives clay pieces an aged metal or antique look.
- Varnish afterward to protect paint and clay from moisture and handling.
For the full process from shaping to painting, see our guide on how to paint air dry clay crafts.
Dry Brushing in Fine Art
In acrylic and oil painting, dry brushing is used to create broken color. Dragging a lightly loaded brush across a textured canvas leaves paint only on the weave’s high points, letting underlying color show through. This is ideal for:
- Grass and foliage texture in landscapes
- Sea foam and sparkle on water
- Fur and hair
- Weathered wood, stone and rust
- Soft cloud edges
In watercolor, “dry brush” refers to a similar idea: a damp, not wet, brush with concentrated pigment dragged across textured paper to leave sparkling, broken strokes.
Dry Brushing vs Other Highlighting Techniques
| Technique | How it works | Best for | Difficulty |
|---|---|---|---|
| Dry brushing | Nearly dry brush sweeps over raised areas | Texture, fur, rough surfaces | Easy |
| Edge highlighting | Thin lines painted on edges with a fine brush | Crisp edges, armor, hard surfaces | Moderate |
| Washes | Thinned paint flows into recesses | Shading crevices | Easy |
| Layering | Successive thin coats of lighter colors | Smooth transitions | Moderate to advanced |
| Glazing | Transparent layers alter color | Color depth, unifying | Moderate |
Many painters combine techniques: a wash to darken recesses, followed by dry brushing to lighten raised areas. Together they create strong contrast quickly.
Example: Dry Brushing a Clay Pinch Pot
Here is how the technique comes together on a simple air dry clay piece with fingerprint texture.
- Dry the pot completely, then lightly sand any sharp edges with fine sandpaper.
- Prime with a thin coat of gesso or a sealing base coat to even out absorption.
- Base coat the pot in a deep teal or charcoal and let it dry for at least 30 minutes.
- First dry brush pass: A mid-tone, such as a lighter teal or warm gray, swept lightly over the whole outside.
- Second pass: A pale version of the same color, applied only to the rim and the most raised fingerprint ridges.
- Accent: A whisper of metallic copper or gold along the rim with an almost empty brush.
- Seal with a matte or satin varnish once fully dry. Keep in mind that air dry clay is not waterproof, so treat the pot as decorative or for dry items only.
The finished pot will show every subtle texture in the clay, with depth that a single flat coat of color could never achieve.
Dry Brushing for Weathered Furniture and Decor
The same technique scales up for home decor. On wooden picture frames, small shelves or craft boxes, paint a darker base, then dry brush a lighter color with a wider brush, moving with the grain. The paint catches the raised grain and edges, creating a weathered, sun-bleached look without sanding. A white or cream dry brush over gray, navy or brown is a popular farmhouse-style combination. Seal with a water-based clear coat to protect it.
Common Dry Brushing Mistakes
Too much paint on the brush
The most common problem. Excess paint fills recesses and creates streaks. Wipe more off than feels necessary; you can always add another pass.
Chalky, dusty look
Using pure white or a highlight color that is too light can look powdery. Choose a color only a few steps lighter than the base and build up gradually.
Visible brush streaks on flat areas
Dry brushing works best on textured surfaces. On smooth, flat areas it leaves directional streaks. Use edge highlighting or layering there instead.
Pressing too hard
Pressure pushes paint into recesses. Use a light touch and let the bristles skim the surface.
Ruining good brushes
The scrubbing motion wears bristles. Keep dedicated old or inexpensive brushes for dry brushing.
Painting over a wet base
The base must be completely dry, or colors will blend into a muddy mess.
Color Combinations That Work Well
- Stone: Dark gray base, light gray dry brush, very pale gray final highlight
- Wood: Dark brown base, tan dry brush along the grain
- Rust metal: Dark brown base, orange-brown dry brush, small touches of bright orange
- Antique gold: Black or deep brown base, gold dry brush
- Weathered white: Charcoal or navy base, white dry brush for a distressed look
- Fur: Mid-brown base, light tan dry brush following the fur direction
Tips for Better Results
- Practice on scrap: Test the amount of paint on a textured scrap or an old piece before starting.
- Work in good light: Highlights can be subtle; bright, even light helps you judge progress.
- Use a circular motion for rounded forms and straight strokes across ridges for linear textures.
- Clean the brush periodically. Dried paint builds up near the ferrule, making the brush stiff.
- Stop earlier rather than later. Over-dry brushing flattens contrast.
Caring for Dry Brushing Brushes
Because the technique involves scrubbing a nearly dry brush, paint can dry in the bristles faster than usual. Rinse the brush in water every few minutes during long sessions, then reshape and let it dry before continuing so water does not dilute the next load. At the end of the session, wash with mild soap, work the lather gently toward the ferrule, rinse well and reshape. Brushes with splayed or uneven tips are often still useful for dry brushing even after they are too worn for detail work, which makes this technique a good second life for old brushes.
Practice Exercises for Beginners
A few short exercises build control quickly:
- Texture sampler: Press a piece of air dry clay or modeling paste against tree bark, burlap, a coin and a shell to create four textures. Base coat dark and dry brush each with the same light color to see how different surfaces catch paint.
- Pressure test: On one textured strip, dry brush with very light, light and medium pressure. Compare how far paint travels into recesses.
- Two-step highlight: Dry brush one mid-tone, then a lighter tone on only the top edges, to see how layering adds depth.
- Metallic finish: Dry brush gold over black on a small clay piece for an antique effect.
FAQs
What is dry brushing in painting?
It is a technique where a brush with very little paint is swept lightly over a surface, depositing color only on raised areas to highlight texture.
What paint is best for dry brushing?
Acrylic paint is most common. Slightly thicker acrylics, or paints made for dry brushing, transfer smoothly and dry quickly.
What are the best brushes for dry brushing miniatures?
Firm, dense brushes with flat or domed tips, often dedicated dry brushes or soft makeup-style brushes. Use old or inexpensive brushes, since the technique wears bristles.
Can you dry brush on air dry clay?
Yes. Let the clay dry fully, apply a dark base coat, then dry brush a lighter or metallic color to bring out texture. Seal afterward.
Why does my dry brushing look chalky?
The highlight color is too light or there is too much paint on the brush. Use a color closer to the base and wipe off more paint.
Is dry brushing good for beginners?
Yes. It is one of the easiest ways to add depth and detail quickly, and it works on almost any textured surface.
Final Thoughts
Dry brushing is quick, forgiving and transformative: a dark base, a slightly lighter color, a nearly empty brush and a light touch. Practice on scrap first, build up in gentle passes and keep dedicated brushes for the job. If you are planning a clay project, start by choosing a paint that grips porous surfaces well; our roundup of top paints for air dry clay crafts is a good place to begin.




2 Comments