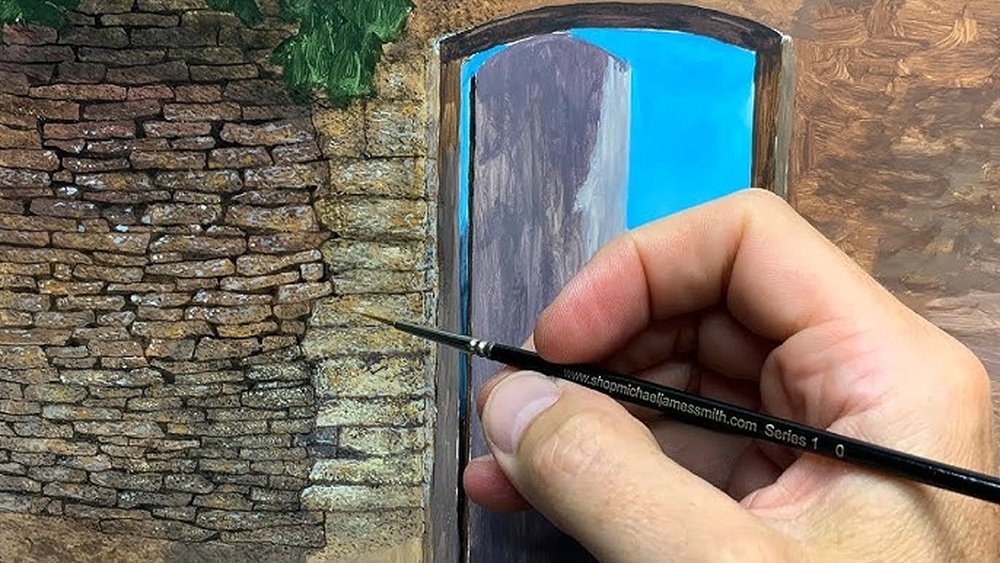
Quick answer: To paint old stone walls in oil, block in the whole wall as one big light and shadow shape first, then break it into a few stone groups rather than individual bricks. Mix warm and cool grays from earth colors (ochres, siennas, umbers) and ultramarine, scumble and drag thick paint for weathered texture, paint mortar lines as shadows rather than outlines, and finish with a few sharp highlights, cracks, moss and stains only where light falls strongest.
Old stone walls appear in countless landscape, village and architectural paintings, yet they are easy to get wrong. The temptation is to outline every stone, which produces a wall that looks like a drawing of a brick pattern instead of a weathered, three-dimensional structure. Convincing stone comes from value grouping, broken color and texture rather than precise outlines.
This guide shows how to paint old stone walls in oil, from observing how stone catches light to mixing weathered colors, building texture with brushes and knives, and adding moss, lichen, stains and cracks. For more oil subjects and techniques, browse our full collection of oil painting tutorials.
How Old Stone Walls Really Look
Spend a few minutes studying a real wall or good reference photos. You will notice:
- The wall reads as one mass first. From a distance, you see a sunlit plane and a shadowed plane before you see individual stones.
- Stones vary in color. Within a single wall, stones range from warm ochres and pinks to cool grays and greenish tones.
- Edges are worn and rounded. Old stones have soft, chipped edges, not sharp rectangles.
- Mortar is often recessed. Joints sit in shadow, so they appear darker on the side away from light and may catch light on the lower edge.
- Weathering follows gravity and water. Stains run downward from ledges, moss grows in damp shaded areas, and lichen spots the tops and sunny faces.
Types of Stone Walls and How They Differ
| Wall type | Stone shapes | Mortar | Painting approach |
|---|---|---|---|
| Dry stone wall | Irregular, stacked flat stones | None; deep dark gaps | Strong shadow accents between stones |
| Rubble masonry | Irregular rounded stones | Thick, uneven mortar | Group stones, vary sizes, soft mortar transitions |
| Ashlar (cut stone) | Rectangular blocks | Thin, regular joints | Emphasize perspective and worn edges |
| Fieldstone wall | Rounded, mixed colors | Varies | More color variety, cast shadows under each stone |
| Ruins and castle walls | Mixed, broken stones | Crumbling | Heavy weathering, missing stones, vegetation |
Palette for Stone Walls
Earth pigments are the backbone of stone painting. A practical palette:
- Titanium white
- Yellow ochre and raw sienna (warm sandstone and limestone)
- Burnt sienna (warm accents, rust stains)
- Raw umber and burnt umber (shadows, neutral grays)
- Ultramarine blue (cool shadows and grays)
- Venetian red or light red (warm stones and brick-like tones)
- Sap green or a mixed green (moss)
- Optional: viridian, terre verte, or naples yellow
Mixing stone grays
| Stone color | Mix |
|---|---|
| Warm limestone | White + yellow ochre + a touch of raw umber |
| Cool granite gray | White + ultramarine + burnt umber |
| Sandstone | White + raw sienna + a little light red |
| Shadow side | Ultramarine + burnt umber + a little of the stone’s local color |
| Greenish weathered stone | Gray + a touch of terre verte or sap green |
| Dark mortar gaps | Burnt umber + ultramarine, kept transparent |
Mixing grays from complements and earth colors gives far richer stone than black and white.
Materials
- Canvas or panel, toned with a warm mid-value
- Oil paints as above
- Odorless mineral spirits for early layers
- Painting medium for later layers
- Brushes: large and medium bristle flats and filberts, a worn or splayed brush for texture, small rounds and a liner
- Palette knives: a small trowel-shaped knife for texture
- Rags and paper towels
- Optional: a sponge or crumpled paper for texture stamping
How to Paint Old Stone Walls in Oil: Step-by-Step
Step 1: Tone the canvas warm
A thin wash of burnt sienna or raw sienna, wiped back to a mid-value, gives a warm undertone that peeks through gaps in later layers, mimicking the warmth in old stone.
Step 2: Draw the wall’s big structure
Sketch the wall’s overall shape, perspective lines and where light and shadow planes fall. If the wall recedes, establish its vanishing point so courses of stone converge correctly. Draw only a few key stones as guides.
Step 3: Block in light and shadow masses
Paint the entire sunlit plane in one warm mid-light stone color and the shadow plane in one cooler, darker mix. Ignore individual stones for now. If the wall looks convincing as two flat planes, the stones will look correct later.
Step 4: Introduce color variation
Working wet-in-wet, drop in patches of slightly different stone colors: warmer ochres, cooler grays, a pinkish tone, a greenish one. Keep the values close to the original mass so the wall holds together. This broken color is what makes stone look natural.
Step 5: Suggest stone groups
Instead of painting each stone, suggest groups. Use a small brush with a dark shadow mix to paint the bottom and shadow-side edges of a few stones, implying the gaps beneath them. Leave many stones undefined; the viewer’s eye will complete the pattern.
Step 6: Paint mortar as shadow
Mortar joints are usually recessed. Paint the shadow side of each joint darker and let the opposite edge, where the stone below catches light, be slightly lighter. Vary the thickness and break the lines so they do not look drawn.
Step 7: Build texture
Load a bristle brush or palette knife with thicker paint and drag it lightly across the lit faces of stones. The paint catches the texture of the layer beneath, creating a broken, weathered surface. Scumbling, scrubbing a thin, opaque layer over a dry or tacky layer, softens and ages areas. A splayed old brush can stipple rough granite or lichen texture.
Step 8: Add cast shadows and form
Where stones protrude, paint small cast shadows below them. Add soft shading on rounded stones to show form. These small shadows give the wall depth.
Step 9: Weathering details
- Water stains: drag thin, darker vertical streaks downward from ledges and cracks.
- Moss: dab soft, muted greens in damp, shaded crevices and along the base.
- Lichen: stipple small spots of pale yellow-green, orange or gray on the tops and sunny faces.
- Cracks: use a liner brush with a dark mix, then add a thin lighter line on the lit edge of the crack.
- Chips and wear: lighten broken edges where light catches them.
Step 10: Final highlights
Add a few bright, thick highlights on the most sunlit stone edges, especially near your focal point. Keep them limited; too many highlights flatten the wall.
Oil Painting Techniques Like the Old Masters
Traditional painters often built architectural surfaces in layers, and some of these methods are well suited to stone:
- Monochrome underpainting: establish the wall’s values in a single earth color, such as burnt umber, before adding color. This was common in workshop practice.
- Glazing: once dry, thin transparent layers of raw umber or burnt sienna can deepen shadows and add aged warmth, or unify a wall that looks too patchy.
- Scumbling: semi-opaque light layers dragged over dry darker paint create softness and atmosphere on distant walls.
- Impasto highlights: thicker paint on the brightest lit stones catches real light on the canvas surface.
- Fat over lean: keep early layers thin and lean, and later layers richer, to reduce the risk of cracking.
Studying how painters like Canaletto, Corot or Andrew Wyeth handled walls and architecture can teach a lot about value grouping and texture.
Painting Stone Walls in Different Light
Bright sunlight
Strong contrast between lit and shadow planes. Lit stones appear warm; shadows are cool and may reflect sky blue. Texture is most visible where light rakes across the surface.
Overcast light
Lower contrast, softer shadows, more emphasis on color variation and texture. Moss and damp stains appear more saturated.
Evening or golden hour
Warm orange light on lit faces and long, purple-blue shadows. Excellent for dramatic village scenes.
Wet stone
Wet stone is darker and more saturated, with bright specular highlights on flat surfaces and puddles reflecting the sky.
Painting Walls in a Landscape Composition
Stone walls are strong compositional tools:
- Leading lines: walls running into the distance draw the eye to the focal point.
- Perspective: stones get smaller and less detailed as the wall recedes; apply atmospheric perspective to distant sections.
- Contrast with nature: soft foliage, grass and flowers against hard stone add interest.
- Simplify distance: distant walls become a band of color with only a hint of texture.
If your scene includes coastal elements, our guide on painting sand and beach in oil covers textures and earth-tone mixing that pair well with weathered seawalls.
Brush and Knife Marks That Read as Stone
The mark you make should resemble the material. A few go-to marks:
- Flat brush, short broken strokes: good for cut stone faces, following the plane of each block.
- Palette knife, flat drag: leaves a crisp, slightly broken layer that looks like weathered limestone or sun-bleached granite.
- Knife edge, tapping: creates thin, sharp lines for cracks and edges of stone.
- Splayed bristle brush, stippling: suggests grainy texture, lichen and pitting.
- Rag or paper towel blot: lifts wet paint to create random, porous patterns on rough stone.
Vary the marks. A wall painted with one kind of stroke throughout looks mechanical.
Common Mistakes
- Outlining every stone. Produces a flat, cartoonish pattern.
- Uniform stone sizes and colors. Real walls vary.
- Mortar painted as light lines. Mortar in recessed joints usually reads as shadow.
- Too much detail everywhere. Detail belongs near the focal point and in the foreground.
- Black for shadows. Leads to dead, dirty-looking walls. Mix shadows from umbers and blues.
- Ignoring perspective. Stone courses must converge correctly on receding walls.
- Overdoing moss and stains. A few well-placed touches look more natural.
Practice Exercises
- Single-stone studies: paint one rock from life, focusing on light, shadow and texture.
- Two-plane wall: paint a corner of a wall with only two values first, then add stones.
- Texture sampler: on a small panel, try dry brushing, scumbling, palette knife dragging and stippling side by side.
- Weathering study: paint a small section of wall and add stains, moss, lichen and cracks.
FAQs
How do you paint stone texture in oil?
Use broken color and thick paint dragged lightly with a bristle brush or palette knife over a dry or tacky layer. Scumbling, stippling with a worn brush and adding small cast shadows under protruding stones also build convincing texture.
What colors do you use for old stone walls?
Earth colors like yellow ochre, raw sienna, burnt sienna, raw umber and burnt umber, mixed with white and ultramarine blue for grays. A touch of green suggests moss and weathering.
Should I paint every stone in a wall?
No. Paint the wall as a mass first, then suggest groups of stones and define only a few in detail, especially near the focal point. The viewer’s eye fills in the rest.
How do you paint mortar between stones?
Treat mortar joints as recessed shadows. Paint the shadow side darker and let the lower edge catch a little light. Vary thickness and break the lines so they do not look outlined.
How do you make a stone wall look old?
Add vertical water stains, moss in damp shaded areas, lichen spots on sunny faces, cracks and chipped edges. Glazing with thin layers of warm earth colors can also add an aged quality.
What brushes are best for painting stone?
Bristle flats and filberts for blocking in and texture, a worn splayed brush for stippling, small rounds and liners for cracks, and a palette knife for crisp edges and thick highlights.
Final Thoughts
Painting old stone walls in oil is about seeing the wall as a structure of light and shadow first, then layering broken color, texture and weathering. Resist outlining, group stones, treat mortar as shadow, and reserve detail for where it matters most. The result will feel solid, aged and real.
Ready for your next subject? Explore more oil painting techniques and subject guides to keep developing your skills.