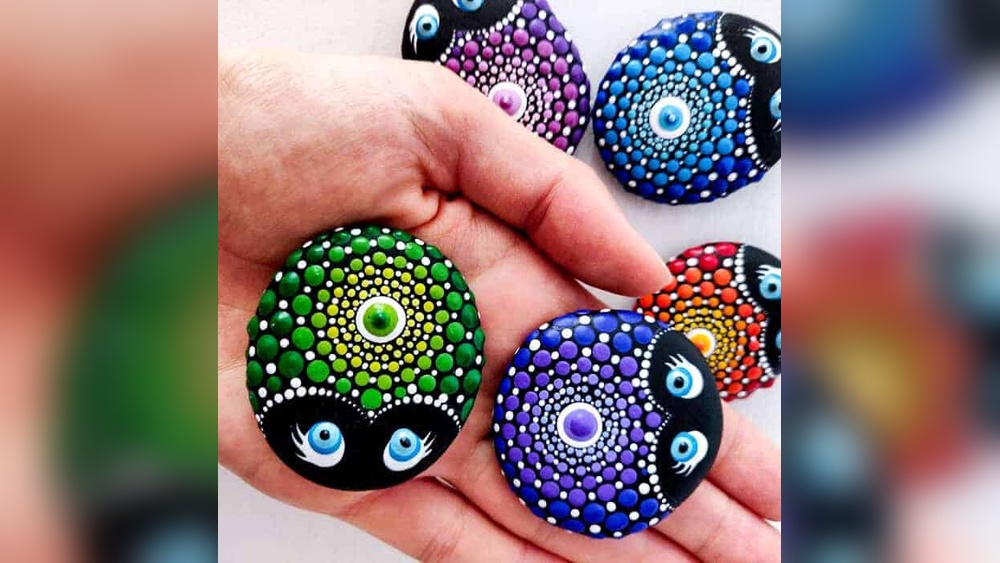
Quick answer: To do DIY mandala rock painting, wash and dry a smooth, flat rock, paint a solid base coat in acrylic, then build the mandala from the center outward: one large center dot, a ring of slightly smaller dots around it, and more rings of dots, petals or tear-drop shapes in alternating colors. Use dotting tools or pencil erasers for even dots, let each ring dry before starting the next, and finish with two thin coats of clear sealer.
Mandala rocks look complicated, but they are built from one repeated action: pressing a round tool into paint and touching it to stone. That is why mandala rock painting has become one of the most popular rock crafts for adults and older kids alike. The skill lies in spacing, sizing and patience, not drawing.
This tutorial covers choosing rocks, the tools and paint consistency that matter, a full step-by-step build of a classic dot mandala, five pattern variations, color schemes and fixes for the problems everyone runs into. Paint choice affects how well dots hold their shape, so if you are still deciding, our guide to the best paint for rock painting compares acrylic types and paint pens for this kind of detail.
What Makes a Mandala Rock
A mandala is a circular design that radiates from a center point in rings. In rock painting, mandalas are usually made of dots, but you can add petals, lines, arches and teardrops as your control improves. Symmetry is the goal, though small irregularities often add charm on a natural stone.
Most mandala rocks share these features:
- A single focal dot at the center
- Concentric rings that grow outward
- Dots that shrink in size within each ring element or between layers
- Repeating color sequences
- A dark or bold base coat that makes the dots stand out
Supplies for Mandala Rock Painting
| Supply | What to look for | Why it matters |
|---|---|---|
| Rocks | Smooth, flat, palm-sized, slightly domed | Dots sit evenly; curve shows off the rings |
| Acrylic paint | Opaque, medium-to-high pigment, smooth consistency | Dots need to cover in one press |
| Dotting tools | Set of ball-tipped styluses in several sizes | Consistent dot sizes |
| Household dotters | Pencil erasers, dowels, paintbrush handles, toothpicks, nail-head pins | Free substitutes in a range of sizes |
| Brushes | One wide flat for base coat, one small round for petals | Clean base and occasional shapes |
| Palette | Small plastic lid or tile | Holds small puddles of paint |
| Sealer | Clear acrylic spray or brush-on varnish (outdoor-rated if placing outside) | Protects the design |
| Extras | Pencil or chalk, ruler, paper towels, water cup | Marking center and cleanup |
DIY rock painting kit vs gathering your own supplies
A mandala rock painting kit usually bundles a few smooth rocks, a set of dotting tools, a small range of acrylic colors and sometimes stencils. Kits are convenient for gifts or first attempts. Gathering your own lets you choose better paint and more rocks. A middle path is to buy a dotting tool set and use your existing acrylics.
Choosing and Preparing the Rock
- Pick a smooth, flat or gently domed stone. River rocks and beach pebbles (where collecting is allowed) are ideal. Craft stores and garden centers also sell bags of smooth stones. Avoid porous, crumbly or very rough rocks; dots spread unevenly on them.
- Wash with soap and water. Scrub off dirt and algae with an old toothbrush.
- Dry completely. Leave the rock in the sun or overnight. Moisture trapped in the stone can lift paint later.
- Optional primer: on porous stones, a coat of white gesso or primer stops the rock from soaking up paint and helps colors look bright.
Getting the Paint Consistency Right
This is the single biggest factor in neat dots. Paint that is too thick leaves peaks and lumpy dots; paint that is too thin spreads into flat puddles and runs on curved surfaces.
- Target consistency: similar to heavy cream or melted ice cream. It should flow off a stirring stick in a ribbon that settles back quickly.
- Thinning: add water one drop at a time. Too much water weakens coverage.
- Thickening: let a puddle sit a few minutes in open air.
- Test first: make a few dots on paper or a spare rock. A good dot is domed and round, not peaked or flat.
How to Paint Mandala Rocks for Beginners: Step by Step
Step 1: Paint the base coat
Cover the top surface with a solid color. Black, navy, deep teal and dark purple are popular because bright dots pop against them. Apply two thin coats rather than one thick coat, letting the first dry for about 15 to 20 minutes. If you want to paint the edges and underside too, do the top first, let it dry, then flip.
Step 2: Mark the center
Find the visual center of the rock, not necessarily the geometric center. On an oval rock, it is often slightly off-center toward the wider end. Mark it lightly with a white pencil or chalk.
Step 3: Make the center dot
Dip your largest dotting tool or a pencil eraser in paint and press it straight down onto the mark, then lift straight up. This dot sets the scale for the whole mandala.
Step 4: Add the first ring
With a slightly smaller tool and a contrasting color, place dots evenly around the center dot. A useful method is to place four dots first, at 12, 3, 6 and 9 o’clock, then fill the gaps between them. That keeps spacing even. Leave a small gap between each dot and the center.
Step 5: Let it dry
Wait at least 10 minutes before working close to the previous ring. Large dots can take longer. Brushing a hand across wet dots is the most common way mandalas get ruined.
Step 6: Build the second ring
Place new dots in the gaps between the first ring’s dots, slightly farther out. This staggered placement is what gives mandalas their flower-like look.
Step 7: Use the dot-on-dot technique
Once a ring is dry, add a smaller dot of a different color on top of each dot. This adds depth and makes simple rings look intricate.
Step 8: Try decreasing dots
For a petal effect, make one dot and, without reloading, press the tool three or four more times in a line. Each dot gets smaller as paint runs out, forming a tapering trail. Arrange these trails radiating outward.
Step 9: Continue outward
Keep adding rings, alternating colors and sizes, until you approach the edge of the rock. Many painters finish with a ring of tiny dots near the border.
Step 10: Dry and seal
Let the finished rock dry for at least 24 hours, because thick dots dry slowly on the inside. Then apply two thin coats of clear sealer. Spray sealer should be applied outdoors or in a well-ventilated area, holding the can at the distance stated on the label. Brush-on sealer can smear dots if they are not fully dry, so dab rather than brush.
Planning Your First Mandala on Paper
A five-minute plan prevents most of the frustration beginners feel halfway through a rock.
- Trace the rock. Set the rock on paper and draw around it. This gives you a true-size outline.
- Draw rings with a compass or by hand. Sketch three to five circles from the center outward. Narrow rings near the middle, wider rings toward the edge, looks balanced.
- Assign a color and dot size to each ring. Write them in the margin, such as “Ring 2: turquoise, medium tool, 8 dots.”
- Decide on dot counts. Using multiples of four (8, 12, 16) makes even spacing much easier because you can always start from the quarter points.
- Test the colors. Dab each color on a scrap of the base color to check contrast. Some light colors need two layers to show on black.
Keep the plan beside you while painting. If you make a few mandala rocks, save the plans; they become a personal pattern library.
Five Mandala Patterns to Try
| Pattern | How it is built | Difficulty |
|---|---|---|
| Classic dot flower | Center dot, staggered rings, dot-on-dot accents | Beginner |
| Sunburst | Center dot with decreasing-dot trails radiating out like rays | Beginner |
| Petal mandala | Brush-stroke teardrops around rings of dots | Intermediate |
| Swoosh mandala | Dragging a dot with a toothpick into a comma shape | Intermediate |
| Off-center wave | Mandala begins near one edge, rings spill off the side | Intermediate |
How to do the swoosh technique
Place a dot, then immediately drag a toothpick or fine stylus through it in a curve. The dot becomes a comma or flame shape. Repeat around a ring for a swirling effect.
Color Schemes for Mandala Rocks
- Rainbow on black: red, orange, yellow, green, blue and purple rings in order. Bright and cheerful.
- Ocean: navy base with turquoise, aqua, white and a touch of gold.
- Sunset: dark purple base with magenta, coral, orange and yellow.
- Monochrome: one color in several tints and shades, plus white. Elegant and calm.
- Metallic: black base with gold, silver and copper dots.
Pick one dominant color, one supporting color and one accent. Too many colors in a small mandala can look busy.
Troubleshooting Common Problems
| Problem | Cause | Fix |
|---|---|---|
| Dots have peaks | Paint too thick | Add a drop of water; lift tool straight up |
| Dots spread flat | Paint too thin | Let paint thicken; use less water |
| Uneven dot sizes in a ring | Inconsistent loading | Reload the tool after every dot |
| Smudged rings | Working before paint dried | Wait 10 minutes per ring; rest hand on a towel |
| Rings drifting off-center | Not using quarter points | Place 12, 3, 6, 9 o’clock dots first |
| Sealer clouding or lifting dots | Paint not fully cured or sealer too heavy | Wait 24 hours; use light coats |
Tips for Cleaner Mandalas
- Wipe the dotting tool on a paper towel every few dots so dried paint does not build up and change the dot size.
- Put fresh paint on the palette often; small puddles thicken quickly.
- Rotate the rock, not your hand, so you always work at the same angle.
- Put the rock on a small piece of non-slip shelf liner or a lump of reusable putty to stop it rolling.
- If a dot goes wrong, let it dry fully, cover it with the base color and repaint.
Mandalas are only one style. For more designs to try on stones, see our collection of painted rocks ideas for beginners and kids.
Where to Use Mandala Rocks
- Garden accents: tucked in plant pots or along paths. Use an outdoor-rated sealer.
- Paperweights and desk decor.
- Gifts: pair with a small card or place on a stand.
- Kindness rocks: hidden in public places where permitted, with a message on the back.
- Meditation stones: many people find the repetitive dotting relaxing in itself.
FAQs
What kind of paint is best for mandala rocks?
Opaque acrylic paint with a smooth, creamy consistency works best because dots need to cover in a single press. Acrylic paint pens are also popular for the smallest dots and outlines.
What can I use if I don’t have dotting tools?
Pencil erasers, the ends of paintbrush handles, dowels, toothpicks, cotton swabs and the heads of sewing pins all make good dots in different sizes.
How do you keep mandala dots even?
Reload paint after every dot, keep paint at a cream-like consistency, press straight down and lift straight up, and start each ring with four evenly spaced dots before filling the gaps.
How long should mandala rocks dry before sealing?
Wait at least 24 hours. Large raised dots can feel dry on the surface while still soft inside, and sealing too early can cause clouding or smudging.
Is a mandala rock painting kit worth it for beginners?
A kit is convenient and makes a good gift because it includes rocks, tools and paint. If you already own acrylic paint, buying a set of dotting tools alone is often enough.
Can kids do mandala rock painting?
Yes. Children around seven and older usually manage simple dot mandalas well. Use larger tools, fewer colors and non-toxic water-based acrylic, and let an adult handle spray sealers.
Final Thoughts
Mandala rocks reward patience more than talent: start with a dark base, a single center dot and evenly spaced rings, and let each layer dry before the next. Once you have the consistency and spacing down, swooshes, petals and dot-on-dot accents will come naturally. For paints that give dense, round dots and hold up outdoors, see our top picks for rock painting paint.