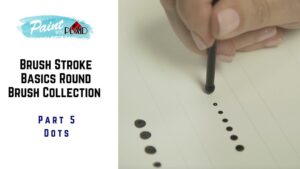
Painting dots may look simple, but doing it well takes a bit of practice and the right approach. Many artists and crafters love making dots, whether for decorative patterns, pointillism, mandala art, or just adding playful details to their work. Using a round brush is one of the best methods to get clean, perfect dots. But why do some dots turn out messy or uneven while others look sharp and neat? This guide will show you exactly how to paint dots with a round brush—step by step, with techniques, tips, and troubleshooting advice you won’t find in most tutorials.
If you’re a beginner, don’t worry. You don’t need expensive tools or years of art school. With a bit of patience and the right method, you can make beautiful dots on canvas, paper, wood, or even fabric. Even if you’ve tried before and struggled, you’ll learn what makes a dot crisp and what common mistakes to avoid.
Ready to make your art pop with perfect dots? Let’s dive in.
Why Use A Round Brush For Dot Painting?
A round brush is a favorite tool for dot painting for good reason. Its shape allows you to control the size and roundness of each dot. When you press the tip straight down, the paint forms a natural circle. You can make tiny dots with just the tip or larger ones by pushing a bit harder.
Here’s what makes a round brush ideal for dots:
- Tapered tip: Lets you create dots of different sizes.
- Flexible bristles: Helps control the pressure and paint release.
- Easy to clean: Especially when working with acrylics or watercolors.
Artists often prefer round brushes over other types like flat or fan brushes, which don’t offer the same level of control for circular shapes.
Choosing The Right Materials
To get sharp, clean dots, your materials matter more than most beginners realize. Here’s a quick guide to what works best.
Paint Types
- Acrylic paint: Dries quickly, works on many surfaces, and holds its shape well for dots.
- Watercolor: Makes softer, lighter dots but can bleed if the paper is too wet.
- Gouache: Opaque and vibrant, similar to acrylic but reactivates with water.
- Fabric paint: For textiles; must be heat-set for durability.
Surface Selection
- Canvas: Holds acrylic and gouache dots well.
- Paper: Use heavier paper for wet media; smooth paper gives cleaner edges.
- Wood: Needs to be sealed or primed to prevent paint soaking in.
- Ceramic or glass: Use specialty paints for non-porous surfaces.
Round Brush Size Comparison
Brush size affects dot size. Here’s how common sizes compare:
| Brush Size | Dot Diameter (approx.) | Best For |
|---|---|---|
| 000–0 | 1–2 mm | Tiny details, fine dots |
| 2–4 | 3–6 mm | General dotting, mandalas |
| 6–8 | 7–10 mm | Larger dots, backgrounds |
Other Useful Tools
- Palette: For thinning and mixing paint.
- Water cup: For cleaning your brush.
- Paper towel/rag: For blotting excess paint.
- Ruler or compass: If you want evenly spaced dots.
Many beginners overlook the importance of surface preparation. Make sure your surface is clean and dry before starting, or your dots may bleed or lift.

Credit: www.shutterstock.com
Preparing Your Paint And Brush
Getting your paint to the right consistency is crucial. Too thick, and your dot will look uneven; too thin, and it will bleed or spread.
- Mix your paint: Place a small amount on your palette. Add a drop or two of water if needed—acrylic should have a creamy, not runny, texture.
- Load your brush: Dip the tip into the paint, rolling the brush gently to coat it evenly. Don’t overload—excess paint can drip and make messy dots.
- Test on scrap: Before dotting your main surface, make a few test dots on a scrap piece. Adjust paint thickness or brush loading if your dots are too light or heavy.
Most beginners forget to test first and end up with unwanted blobs or streaks. Always test on scrap!
Step-by-step: How To Paint Dots With A Round Brush
Now, let’s walk through the actual process. Take your time and don’t rush—smooth, steady movements are key.
1. Hold The Brush Vertically
Hold your round brush straight up and down, perpendicular to the surface. This helps the tip form a perfect circle when you press down.
2. Dip And Dab
Dip just the tip into the paint. Position the brush above where you want the dot. Gently touch the tip to the surface, applying even pressure. Hold for a second, then lift straight up.
3. Control Dot Size
- For small dots: Use only the tip and very light pressure.
- For larger dots: Press down a bit more, letting the bristles spread slightly.
- For extra-large dots: Reload the brush with more paint, but don’t overload.
4. Repeat Consistently
Each time, reload your brush slightly to keep dot size and color consistent. If you notice the dots getting lighter or smaller, your brush needs more paint.
5. Let Dots Dry
Let each dot dry before painting overlapping or nearby dots, especially if you’re using thick paint or layering colors.
Step-by-step Dot Painting Summary
| Step | What to Do | Why It Matters |
|---|---|---|
| 1 | Hold brush vertically | Ensures round, even dots |
| 2 | Load paint on tip | Prevents excess blobs |
| 3 | Test on scrap | Adjusts paint thickness |
| 4 | Press and lift | Forms crisp circles |
| 5 | Let dry | Prevents smudging |
Techniques For Different Dot Effects
Once you’ve mastered basic dots, you can try different methods for variety and style.
Making Uniform Rows Or Patterns
- Mark guidelines: Use a pencil and ruler to draw light lines or a grid.
- Use a template: A piece of plastic with holes (like a stencil) can help place dots evenly.
- Mandala circles: Draw concentric circles as guides for complex mandala dotting.
Layering Colors
Wait for the first dot to dry, then add a smaller dot of another color on top. This adds dimension and can create a “bullseye” effect.
Creating Gradients
Start with one color, and mix in a little white or another shade with each dot. This technique is great for pointillism or backgrounds.
Varying Pressure For Size
Practice pressing more firmly or lightly to change dot size without changing brushes.
Texture Dots
For a raised, bumpy effect, use thick paint and don’t thin it with water. This technique is often used in dot mandala stones.
A common beginner mistake is pressing too hard, causing the brush to splay and the dot to lose its shape. Always start with light pressure and increase gently if needed.
Fixing Common Dot Painting Problems
Even experienced artists sometimes get uneven or misshapen dots. Here’s how to avoid or fix the most common issues:
Uneven Dots
- Cause: Uneven pressure or bristles bent to one side.
- Fix: Hold the brush straight and apply even, gentle pressure.
Bleeding Or Spreading
- Cause: Paint too thin or surface too wet.
- Fix: Thicken the paint, or let the first layer dry before adding more dots.
Fuzzy Edges
- Cause: Rough or textured surface.
- Fix: Use smoother surfaces, or apply a primer/gesso layer.
Gaps In The Center
- Cause: Not enough paint on the brush.
- Fix: Reload your brush before each dot, especially with larger brushes.
Dot Size Inconsistency
- Cause: Not reloading paint consistently.
- Fix: Make it a habit to reload after every dot, especially for patterns.
If you make a mistake, let the paint dry, then paint over it with the background color and try again. Don’t try to wipe it off while wet; that usually makes things worse.
Creative Uses For Dot Painting
Painting dots isn’t just for art on canvas. Once you master the technique, you can use it in many creative ways:
- Mandala stones: Create beautiful stone mandalas with layered dots.
- Greeting cards: Add festive dots for birthdays, holidays, or invitations.
- Textile decoration: Use fabric paint to dot T-shirts, bags, or pillow covers.
- Home decor: Dot patterns on flower pots, mugs, or wall art.
- Pointillism art: Build up images using only dots—try painting a simple landscape this way.
Many artists combine dots with other techniques, like lines or washes, to create unique mixed media pieces.
Pro Tips For Perfect Dots
Even with the basics, a few expert tips can make your dot painting stand out.
- Rotate your work: Turn your canvas or paper as you paint, so your hand is always at a comfortable angle.
- Clean your brush often: Dried paint makes bristles stiff and uneven.
- Use a damp brush: For watercolor or gouache, a slightly damp brush helps the paint flow more smoothly.
- Practice on scrap: Keep a test piece nearby to check dot size and color.
- Try different surfaces: Each one reacts differently—experiment to see what you like best.
A less obvious insight: Dot painting is often used for mindfulness. The repetitive, careful process can be calming—many people use it as a form of art therapy.

Credit: www.youtube.com
Practice Exercises For Improving Dot Painting
Here are some exercises to improve your dotting skills:
- Dot size control: Paint a row of dots, each slightly larger than the last, then reverse.
- Dot spacing: Practice making dots equal distances apart, using just your eyes.
- Color layering: Make a row of dots, then add smaller dots of another color on top.
- Pattern creation: Fill a square with a repeating dot pattern (like checkerboard or spiral).
The more you practice, the more consistent and beautiful your dots will become.
Real-world Examples And Inspiration
Many cultures and artists use dot painting in stunning ways. For example, Aboriginal Australian art often uses dots to create complex, symbolic images. Modern artists use dotting for everything from custom sneakers to wall murals.
If you want to see masterful dot paintings, check out the work of Georges Seurat, who developed pointillism—a style built entirely with dots. You can learn more about his technique on the Wikipedia Pointillism page.
Comparison: Dotting Tools Vs. Round Brush
While round brushes are great, you might see dotting tools advertised. Here’s how they compare:
| Feature | Round Brush | Dotting Tool |
|---|---|---|
| Size Range | Variable (by pressure/brush size) | Fixed (tool size only) |
| Edge Sharpness | Softer, may feather | Very crisp |
| Paint Types | All (acrylic, watercolor, etc.) | Mainly thick paints |
| Ease of Cleaning | Needs more attention | Easy, wipe off |
| Cost | Usually cheaper | May require a set |
A round brush is more versatile and lets you blend or paint lines as well as dots. Dotting tools make perfect, crisp dots but can’t do much else.
Frequently Asked Questions
What Size Round Brush Is Best For Dot Painting?
The best size depends on your project. For tiny, detailed dots, use a size 0 or 1 round brush. For general dotting on canvas or stones, size 2–4 is versatile. If you want large dots, a size 6 or 8 works well. Many artists keep a few sizes for different effects.
Can I Use Any Type Of Paint With A Round Brush For Dotting?
Most paints work, but acrylics are easiest for beginners because they hold their shape and dry quickly. Watercolors can work but may bleed if too watery. Gouache is also good for opaque, vibrant dots. Always adjust paint thickness to avoid bleeding or spreading.
How Do I Stop My Dots From Spreading Or Getting Fuzzy Edges?
Make sure your paint isn’t too thin and your surface is not wet or too textured. Use a smooth, primed surface for the cleanest dots. If you see spreading, try thickening your paint or letting each layer dry before adding more.
What Should I Do If I Make A Mistake?
Let the mistake dry completely, then paint over it with the background color before trying again. Don’t try to wipe it off while wet, or you’ll smear the paint and make the problem worse. For small errors on paper, a fine brush with white paint (or correction fluid) can help.
Can I Use Other Tools To Make Dots Besides A Round Brush?
Yes. Dotting tools (styluses, dowels, or the ends of paintbrushes) can make very uniform, crisp dots, especially with thick paints. However, a round brush gives you more control and flexibility for different dot sizes and styles.
Dot painting with a round brush is a simple but powerful technique that unlocks many creative possibilities. With the right materials, a little practice, and attention to detail, you’ll be able to add perfect dots to your art every time.
Enjoy the process—and don’t be afraid to experiment and make your own patterns. Happy dotting!
Credit: www.vecteezy.com