Foam stamp painting crafts are a fun and creative way to make art at home, in classrooms, or during group activities. They are perfect for kids, but adults can also enjoy making beautiful designs with foam stamps. The best part?
You do not need to be an expert artist. With a few simple tools and some imagination, anyone can enjoy this relaxing and satisfying craft.
If you are looking for a hands-on project that does not require expensive supplies, foam stamp painting is a great choice. It lets you experiment with colors, shapes, and patterns. It also helps develop fine motor skills, especially for children.
In this guide, you will learn everything you need to know about how to do foam stamp painting crafts—from choosing materials to mastering techniques. You will also discover tips that many beginners miss, so your projects look clean and professional.
What Is Foam Stamp Painting?
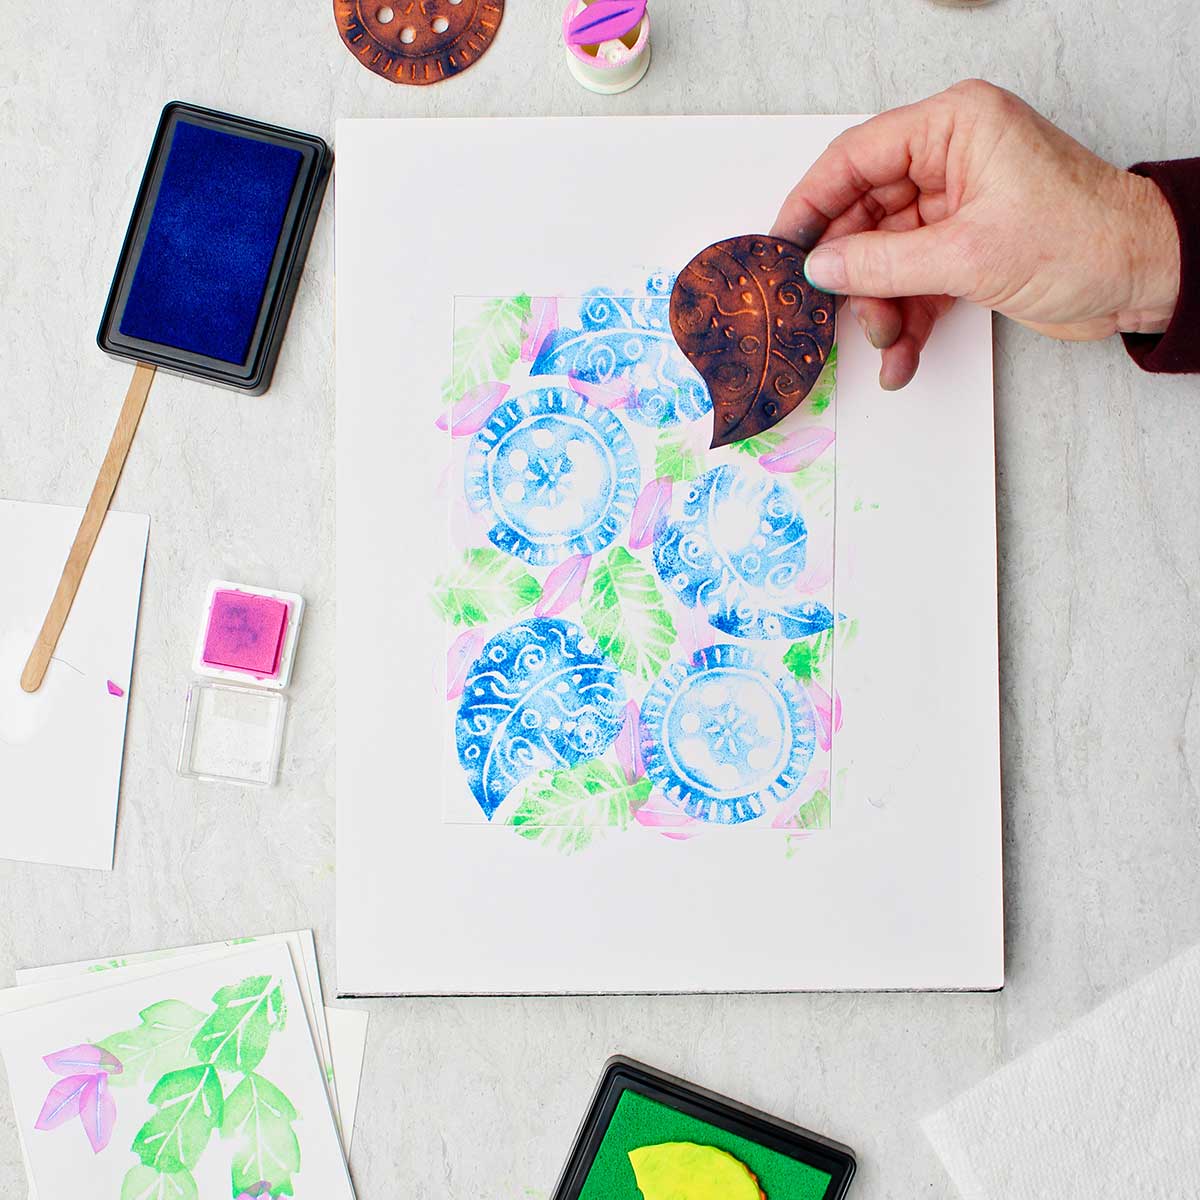
Foam stamp painting involves using stamps made from craft foam to create prints on paper, fabric, wood, or other surfaces. The foam is soft, easy to cut, and holds paint well. You can make your own custom stamps or buy pre-made ones. When you press the painted foam onto a surface, it leaves a bold, textured print.
People love foam stamp painting because it is simple, mess-friendly, and allows for endless design possibilities. Unlike rubber stamps, foam stamps are lightweight and safe for children.
Essential Materials You Need
To start foam stamp painting, gather these basic supplies:
- Craft foam sheets – Thin, colorful sheets found at most craft stores.
- Scissors or craft knife – For cutting shapes and patterns.
- Glue (PVA or hot glue gun) – To attach foam to handles or blocks.
- Handles (optional) – Corks, wood blocks, or bottle caps make good handles for easier stamping.
- Paint – Acrylic paint, tempera paint, or fabric paint, depending on the surface.
- Paintbrush or roller – For applying paint evenly to the stamp.
- Paper, fabric, or wood – The surface to stamp on.
- Palette or plate – To hold and mix paint.
- Paper towels and water – For cleaning up.
Two things beginners often forget: If you plan to reuse your stamps, avoid using glue that is water-soluble, and always keep a damp towel nearby to clean stamps between colors. This keeps prints sharp and colors bright.
Step-by-step Guide: How To Make Your Own Foam Stamps
Creating your own foam stamps is easy and lets you design any shape you want.
- Draw or trace your design onto the craft foam. Start with simple shapes like stars, circles, or leaves.
- Cut out the shapes using scissors or a craft knife. Be careful with sharp tools.
- Glue the foam shape onto a handle or directly onto a thicker foam block for support.
- Let the glue dry completely before using your stamp.
- Test your stamp on scrap paper. Make sure the design prints clearly and the handle is secure.
If you want multi-layered designs, try stacking thin pieces of foam for a raised effect. This adds texture and makes your prints stand out.
How To Paint And Stamp Like A Pro
Using foam stamps is simple, but a few tricks will make your prints look professional.
- Apply paint thinly – Use a brush or roller to spread a thin, even layer of paint on the stamp. Too much paint causes smudging.
- Press firmly but gently – Press the stamp onto your surface with even pressure. Do not move it around or the print will blur.
- Lift straight up – When you finish stamping, lift the stamp straight up to avoid smearing.
- Repeat or overlap prints for patterns – Try stamping in rows, circles, or random patterns.
- Clean between colors – Wipe the stamp with a damp towel before switching paint colors.
A common mistake is using too much paint. This makes the design lose detail. Less paint usually gives a sharper print.
Creative Ideas For Foam Stamp Painting Crafts
Foam stamp painting is not just for paper. Here are some creative ways to use your foam stamps:
- Personalized greeting cards – Stamp unique designs on blank cards for birthdays or holidays.
- Wall art – Make bold prints on canvas or poster board to hang in your room.
- Tote bags – Use fabric paint to stamp on plain tote bags.
- Gift wrap – Decorate brown paper with custom stamps for one-of-a-kind wrapping paper.
- T-shirts – Make your own printed shirts with foam stamps and fabric paint.
- Bookmarks – Cut strips of cardstock and stamp fun patterns.
- Party decorations – Make banners, place cards, or tablecloths with themed prints.
- Scrapbooking – Add stamped designs to scrapbook pages for a personal touch.
If you want your prints to last on fabric, always follow the paint manufacturer’s instructions. Some fabric paints need heat setting to become permanent.
Comparing Foam Stamps With Other Stamp Types
To understand why foam stamps are popular, see how they compare with rubber and wooden stamps:
| Stamp Type | Cost | Ease of Making Custom Designs | Best For | Durability |
|---|---|---|---|---|
| Foam | Low | Very Easy | Kids, Beginners, Crafting | Medium |
| Rubber | Medium-High | Hard | Detailed Art, Professional Use | High |
| Wooden | Medium | Hard | Traditional Crafts | High |
Most crafters choose foam stamps for their flexibility and price. They are not as detailed as rubber stamps but are much easier and cheaper to make at home.
Safety Tips For Foam Stamp Painting (especially For Kids)
Foam stamp painting is safe, but here are some tips to keep things worry-free:
- Use child-safe scissors for younger kids.
- Choose non-toxic paints and glues.
- Supervise children when using hot glue guns or sharp tools.
- Wear old clothes or aprons to protect against stains.
- Clean up spills quickly to avoid slipping.
For group activities, always set up a cleaning station with water, towels, and wipes. This keeps the area neat and makes switching colors easier.
How To Care For And Store Your Foam Stamps
Foam stamps will last longer if you clean and store them properly:
- Clean immediately after use with water and a mild soap. Do not let paint dry on the foam.
- Pat dry with a towel and let the stamp air dry completely.
- Store flat in a box or drawer to avoid bending or crushing the foam.
- Keep stamps away from heat and sunlight to prevent warping.
If your foam stamp loses its shape, you can sometimes reshape it gently with your fingers. But if it is badly damaged, it is easy and cheap to make a new one.

Credit: www.amazon.com
Tips For Clean, Crisp Prints Every Time
Getting sharp prints is not only about the design or materials. Here are two insights many people miss:
- Prime your stamp: Before the first use, press your stamp lightly on scrap paper to remove extra glue or loose foam bits. This helps paint stick evenly.
- Test different surfaces: Foam stamps may print differently on smooth paper versus textured fabric. Always test on a small area first.
If you want to try more advanced effects, experiment with layering colors (let each layer dry before adding the next) or use a sponge to dab paint for a softer look.
Foam Stamp Painting Project Example: Simple Floral Card
Here is a quick example to try at home:
Materials:
- Craft foam sheet (any color)
- Scissors
- Acrylic paint (red, yellow, green)
- Small wood block or bottle cap (handle)
- Blank card or thick paper
- Paintbrush
Steps:
- Draw a simple flower shape on foam. Cut it out.
- Glue the foam flower to the wood block. Let it dry.
- Brush red paint onto the flower. Stamp onto the card.
- Clean the stamp, then add yellow paint to the center and stamp again.
- Cut a leaf shape from foam, glue to another block, and stamp with green paint.
- Let your card dry.
You now have a hand-stamped floral greeting card. Repeat with other colors and shapes for more designs.
Common Mistakes And How To Fix Them
Even experienced crafters can make mistakes. Here’s how to avoid the most frequent problems:
- Blurry prints: Caused by too much paint or moving the stamp. Fix by using less paint and pressing down evenly.
- Uneven prints: Sometimes the foam is not level. Check the back of the stamp and press all areas firmly.
- Paint buildup: Happens when you do not clean stamps between uses. Always wipe stamps clean before changing colors.
If your print is not as bold as you want, try adding a second thin layer of paint or switch to thicker paint.
Different Types Of Foam For Stamps
Not all foam sheets are the same. Here is a quick comparison:
| Foam Type | Thickness | Best Use | Pros | Cons |
|---|---|---|---|---|
| Thin craft foam | 1-2 mm | Detailed shapes | Easy to cut, cheap | Less durable |
| Thick foam blocks | 5-10 mm | Handles, big shapes | Sturdy, easy to hold | Harder to cut small details |
| Self-adhesive foam | 2 mm | Quick stick to handles | Convenient | Adhesive may weaken with washing |
Most beginners start with thin craft foam. If you want a more comfortable grip or bigger stamps, try thicker foam blocks.
Credit: welcometonanas.com
Where To Find Inspiration And Patterns
You do not have to invent every design from scratch. Look for inspiration in:
- Nature (leaves, flowers, animals)
- Geometric shapes (circles, triangles, lines)
- Holiday themes (hearts for Valentine’s, pumpkins for Halloween)
- Online craft sites or coloring books
For free patterns, you can search for “simple stamp designs” or use resources from craft blogs. Pinterest and WikiHow also have step-by-step foam stamp projects.
Frequently Asked Questions
What Kind Of Paint Works Best For Foam Stamp Painting?
Acrylic paint is the most popular choice because it dries quickly and works on paper, fabric, and wood. For fabric projects, use fabric paint so the design stays after washing. Tempera paint is good for kids or classroom projects because it is washable and non-toxic.
Can You Reuse Foam Stamps?
Yes, you can reuse foam stamps many times if you clean them right after use. Avoid soaking them for long periods, as this can weaken the glue. Store them flat and dry.
How Do You Make Detailed Designs With Foam Stamps?
Start with simple shapes, then build up details by layering different foam pieces. Use a craft knife for finer cuts. For very small details, rubber stamps may be better, but foam is great for bold and simple designs.
Is Foam Stamp Painting Safe For Young Children?
Yes, if you use child-safe scissors and non-toxic paint. Supervise young kids when using glue or sharp tools. Foam is soft and easy for little hands to use.
What Surfaces Can I Stamp On?
Foam stamps work on paper, cardboard, fabric, wood, and even some plastics. Always test on a small area first and use the right paint for the material. For long-lasting prints on fabric, follow the paint’s instructions for heat setting.
Foam stamp painting crafts open a world of creativity for all ages. With the right tools and some practice, you can make beautiful art, useful gifts, and decorations for any occasion. The process is simple, enjoyable, and always leaves room for your personal touch.

Credit: www.amazon.com