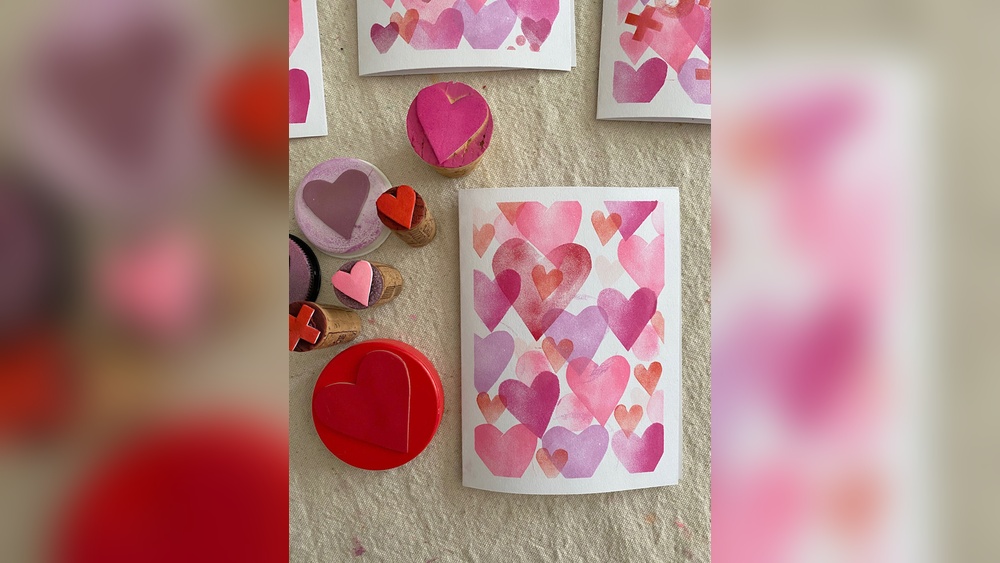
Foam stamps make repeat patterns easy. Load a shape with paint, press it down, lift, and you have a clean print you can repeat a hundred times without any drawing skill. That simplicity is why foam stamp painting crafts are a staple for kids’ rooms, classroom projects, tote bags, gift wrap and even accent walls.
Quick answer: To do foam stamp painting crafts, roll or dab a thin, even layer of acrylic craft paint onto the face of a foam stamp with a foam brush or small brayer, press the stamp straight down onto your surface with firm, even pressure for two or three seconds, then lift straight up. Re-load paint for every print, wipe the stamp when paint builds up, and test on scrap paper first. Use fabric medium for textiles and seal hard surfaces once dry.
This guide covers store-bought and homemade foam stamps, how to load paint for crisp prints, pattern layouts, surface-by-surface tips, and fixes for blotchy or faint impressions. For a palette with enough colors to layer, our roundup of the best craft paint sets for DIY home projects is a good place to start.
Why Foam Stamps Work So Well
Foam is soft enough to flex over slightly uneven surfaces and porous enough to hold a thin film of paint. When pressed, it releases most of that paint in a single, even print. Rubber stamps give finer detail but need ink pads; foam stamps take paint directly, which means you can use the same acrylics you already have and stamp on much larger areas.
The trade-off is detail. Foam stamps print bold shapes rather than fine lines. Designs with large solid areas, such as leaves, stars, hearts, geometric shapes and letters, print best.
Supplies for Foam Stamp Painting
- Foam stamps: Store-bought shapes with handles, or homemade stamps cut from craft foam sheets.
- Paint: Acrylic craft paint for most surfaces; fabric paint or acrylic mixed with fabric medium for textiles.
- Applicators: Foam brushes, a small soft rubber brayer, or a makeup sponge.
- Palette: A paper plate, a piece of glass, or a plastic lid.
- Surfaces: Paper, card stock, kraft paper, canvas, wood, terra-cotta, fabric, walls.
- Layout tools: Ruler, pencil, chalk, painter’s tape, a level for walls.
- Cleanup: Baby wipes, a bowl of warm soapy water, paper towels.
- Finish: Clear sealer for wood and pots; an iron for heat-setting fabric paint.
How to Load Paint on a Foam Stamp
Paint loading is the most important skill. Too much paint fills the edges and creates blurry, blobby prints. Too little gives spotty, broken shapes.
- Squeeze a small puddle of paint onto your palette.
- Dip a foam brush or roll a brayer through the paint until it is evenly coated but not dripping.
- Dab or roll the paint onto the stamp face in a thin, even layer. Cover the whole surface, including the edges.
- Check the stamp under light. You should see an even sheen, with no thick ridges or bare patches.
Avoid dipping the stamp directly into a puddle of paint. It loads far too much and floods the fine edges of the design.
Step-by-Step: Making a Foam Stamp Print
- Test first. Make two or three prints on scrap paper to check loading and pressure.
- Position. Hold the stamp just above the surface and line it up with any guide marks.
- Press. Lower straight down. Apply firm, even pressure across the whole stamp for two to three seconds. For larger stamps, press the back with your other hand, working from center to edges.
- Lift. Pull straight up without sliding or rocking.
- Re-load. Apply fresh paint before every print for consistent results. Second prints from the same load can be used deliberately for a lighter, “ghost” look.
- Clean as needed. When paint starts to build up in corners, wipe the stamp with a damp wipe and blot dry before continuing.
Homemade Foam Stamps
Custom stamps let you print names, logos, or shapes that are not available in stores. Craft foam sheets, particularly the thicker 2 to 3 mm sheets, work well.
- Draw your design on the foam with a pen. Remember that the print will be reversed, which matters for letters and numbers.
- Cut it out with sharp scissors or a craft knife on a cutting mat.
- Mount it onto a block of wood, a thick piece of cardboard, or an acrylic block with strong glue or double-sided tape.
- Add a handle such as a cork or a bottle cap glued to the back, for easier pressing.
- Let the glue cure before stamping.
Self-adhesive foam sheets save the gluing step. You can also carve simple designs into dense foam blocks, but sheet foam shapes are easier for beginners and kids.
Other quick homemade stamps
- Pool noodle slices for circles and flower shapes
- Foam cups cut into rings
- Kitchen sponges cut into geometric shapes (softer, more textured prints)
- Bottle caps wrapped in foam for small dots
- Cardboard tubes pinched into hearts or leaves
Pattern Layouts That Look Professional
Random stamping can look charming, but planned layouts look polished. Mark a light grid in pencil or chalk before you begin.
| Layout | How to set it up | Works well for |
|---|---|---|
| Straight grid | Equal rows and columns | Modern, minimal designs |
| Half-drop | Every other column shifted down by half | Wallpaper-style patterns |
| Brick | Every other row shifted sideways by half | Fabric, gift wrap |
| Diagonal | Rows on a 45-degree line | Energetic, playful pieces |
| Border | Single line along edges | Frames, cards, pillowcases |
| Scattered | Random with even density | Confetti, leaves, stars |
| Rotated | Same grid, stamp turned each time | Geometric shapes, tiles |
For scattered layouts, place a few prints evenly across the whole surface first, then fill the gaps. This keeps density even and avoids crowded patches.
Foam Stamping on Different Surfaces
Paper and card stock
The easiest surface. Place a stack of newspaper or a craft mat underneath to give slight cushioning, which helps the stamp print evenly. Great for cards, wrapping paper and wall art.
Canvas
Canvas has texture, so press firmly and consider a slightly heavier paint load. Support the back of a stretched canvas with a book so it does not flex while you press.
Wood
Sand smooth and wipe away dust. A base coat gives a consistent background. Seal finished pieces with a clear water-based finish.
Fabric
Wash new fabric to remove sizing, and place cardboard inside shirts or bags to prevent bleed-through. Use fabric paint or acrylic mixed with fabric medium, often around 1 part medium to 2 parts paint (check the label). Heat-set according to the product directions once dry.
Terra-cotta pots
Curved surfaces need a rolling press: touch one edge of the stamp to the pot and roll it across. Small stamps work better than large ones on tight curves.
Walls
Stamped accent walls are a budget-friendly alternative to wallpaper. Use wall paint or acrylic in a sample size, mark a level grid lightly with a pencil, and practice on a board painted in your wall color first.
Foam Stamp Painting Craft Ideas
- Gift wrap: Stamp stars, trees or hearts on a roll of kraft paper.
- Tote bags: Stamp a lemon or leaf pattern with fabric paint.
- Tea towels: Simple geometric shapes in one or two colors.
- Greeting cards: Stamp a single bold shape and add hand lettering.
- Nursery art: Stamp animal shapes on canvas in soft colors.
- Birdhouses: Stamp tiny flowers and leaves on a painted wooden birdhouse; our guide on making a painted birdhouse covers the base painting and sealing.
- Holiday decor: Snowflake-stamped pillowcases, pumpkin-stamped table runners, heart-stamped banners.
Multi-Color and Layered Stamping
Foam stamps can produce more complex effects than a single flat color.
- Split loading: Apply two colors to different parts of the stamp, like green on a leaf and a darker green along one edge.
- Gradient loading: Blend two colors on the brayer and roll them across the stamp together for an ombre print.
- Overprinting: Stamp a shape in a light color, let it dry, then stamp a smaller shape or detail stamp on top.
- Offset shadow: Stamp in a dark color, let it dry, then stamp slightly offset in a lighter color for a 3D look.
Step-by-Step: A Stamped Accent Wall
A stamped wall takes patience, but the materials cost a fraction of wallpaper, and you can paint over it later. Plan on a few hours for a small wall.
- Choose the stamp size. Larger stamps, around 3 to 6 inches, cover a wall faster and are easier to space evenly. Tiny stamps on a big wall can take days.
- Prepare the wall. Clean it and make sure the base paint is fully cured. Fresh paint can lift when a stamp is pressed and pulled away.
- Make a spacing tool. Cut a piece of cardboard to the exact distance you want between prints. Holding it against the last print gives consistent gaps without measuring every time.
- Mark a level starting line. Use a level and a light pencil line near the ceiling or at eye level. Starting from the middle of the wall and working outward helps the pattern look centered.
- Practice on a sample board. Paint a piece of poster board in the wall color and stamp a few rows to dial in loading and pressure.
- Stamp row by row. Load evenly, press firmly with the flat of your hand, and lift straight off. Use the spacing tool to place the next print.
- Handle corners and edges. At ceilings, corners and trim, bend the foam stamp into the corner or trim it to a partial shape. Partial prints at edges look natural in a repeating pattern.
- Touch up. Fix faint or broken prints with a small artist brush once the stamp layer is dry.
Step back every few rows. Small spacing errors are easier to correct early than after a full wall is done.
Foam Stamping With Kids
Foam stamping is ideal for toddlers and preschoolers because stamps with handles are easy to grip. Use washable kids’ paint on sponges in shallow trays so kids can press stamps into the sponge rather than handling brushes. Large sheets of paper on the floor or a table give lots of room. Older kids can design their own stamps from craft foam with adult help on cutting.
Troubleshooting Foam Stamp Prints
| Problem | Cause | Fix |
|---|---|---|
| Blobby, blurry edges | Too much paint | Load thinner; blot on scrap first |
| Spotty, broken print | Too little paint or uneven pressure | Load evenly; press firmly across whole stamp |
| Double image | Stamp shifted or rocked | Press straight down and lift straight up |
| Paint dries on stamp | Working slowly in dry air | Wipe frequently; add a drop of slow-dry medium |
| Prints uneven on fabric | No backing; fabric moving | Use cardboard underneath and tape fabric taut |
| Faded fabric prints after washing | Not heat-set | Heat-set per paint instructions |
Cleaning and Storing Foam Stamps
Clean stamps before paint dries. Rinse in warm soapy water, gently rubbing the surface with your fingers or a soft toothbrush. Avoid harsh scrubbing that can tear foam. Blot dry with paper towels and let them air dry face-up. Store stamps flat in a box, not stacked with heavy items on top, so they keep their shape.
FAQs
What paint works best with foam stamps?
Acrylic craft paint is the most versatile for paper, wood, canvas and terra-cotta. For fabric, use fabric paint or mix acrylic with a fabric medium. For walls, sample-size wall paint works well.
How do I get a clean print with a foam stamp?
Apply a thin, even coat of paint with a foam brush or brayer, press straight down with firm pressure for a few seconds, and lift straight up. Test on scrap paper before your project.
Can I make my own foam stamps?
Yes. Cut shapes from craft foam sheets and mount them on wood blocks, cardboard or acrylic blocks. Remember that letters print reversed, so cut them backward.
How do you clean foam stamps?
Rinse them in warm soapy water while the paint is still wet, gently rub with your fingers or a soft brush, then blot and air dry face-up.
Is foam stamp paint permanent on fabric?
It can be if you use fabric paint or acrylic mixed with fabric medium and heat-set it according to the product label. Plain acrylic on fabric may crack or fade with washing.
Are foam stamps good for toddlers?
Yes. Large stamps with handles are easy for small hands, and washable paint makes cleanup simple. Supervise closely and keep paint away from mouths.
Final Thoughts
Foam stamp painting crafts are about three habits: thin, even paint loading, straight-down pressure, and a planned layout. Practice on scrap paper, then move to gift wrap, tote bags, cards and wall art. With a few stamps and a small set of colors, you can produce dozens of coordinated pieces in an afternoon.
To build a stamping palette with coordinating colors, look through our guide to craft paint sets that suit home projects before your next session.