
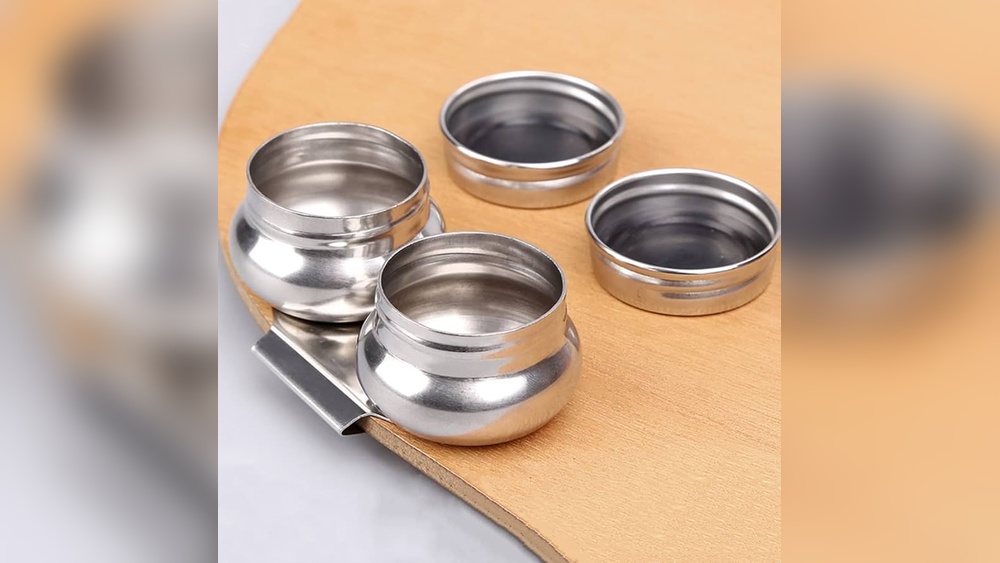
Quick answer: To use a palette cup for oil painting, clip it to the edge of your palette, fill it halfway with either odorless mineral spirits (for thinning early layers and rinsing) or a painting medium such as linseed oil (for later layers). Dip just the tip of the brush, work the liquid into paint in the mixing area, and close the lid when you pause. With a double cup, use one side for solvent and the other for medium so you can follow the fat-over-lean rule.
A palette cup, sometimes called a dipper, is a small metal or plastic container that clips onto the edge of a palette. It looks trivial, but it solves a real problem: keeping a small, controlled amount of solvent or medium right where you mix, instead of across the table in a jar you have to reach for.
This guide covers the types of palette cups, what goes in each, how to use a palette cup for oil painting through a full session, safety and cleanup. If you haven’t bought one yet, our roundup of the best palette cups for oil painting compares single, double, lidded and clip styles.
What a Palette Cup Does
Oil paint straight from the tube is stiff. Painters thin it to change how it flows, how fast it dries and how glossy it looks. A palette cup holds that thinning liquid within an inch of your mixing area, so you add exactly the amount you want with the tip of a brush or knife.
- Precision. A shallow cup encourages small, measured amounts rather than a brush dunked in a jar.
- Cleanliness. Dedicated cups keep solvent and medium separate from your rinse jar.
- Portability. Clipped to a handheld or plein air palette, the cup travels with you.
- Less evaporation. A lidded cup holds a smaller exposed surface than an open jar, reducing fumes.
Types of Palette Cups
| Type | Description | Best for | Watch for |
|---|---|---|---|
| Single cup with clip | One small cup that clamps to the palette edge | Medium only, simple setups | Too small for brush rinsing |
| Double cup | Two cups joined, one clip | Solvent and medium side by side | Label sides so you don’t mix them up |
| Palette cups with lids | Screw-on or snap lids, often with a gasket | Plein air, travel, leaving medium overnight | Check the lid seals fully before transport |
| Metal palette cups | Usually stainless steel or tin-plated | Solvent; durable and solvent-proof | Cheaper tin can rust if left wet |
| Large palette cups | Deeper or wider, 2–3 inches across | Bigger brushes, larger canvases | Heavier on handheld palettes |
| Porcelain palette cup | Free-standing ceramic dish | Table palettes, medium mixing | No clip; can tip if bumped |
Plastic cups are light, but some plastics soften with strong solvents such as turpentine. For solvent, metal or glass is the safer bet; plastic is fine for linseed oil and most alkyd mediums.
What Goes in the Cup: Solvent vs Medium
Solvent
Odorless mineral spirits (OMS) is the most common modern solvent for oil painting. It thins paint into a lean, fast-drying wash for the first layers and helps loosen paint from brushes between colors. Turpentine is traditional but has a strong odor and is more irritating; many painters now avoid it.
Medium
Medium adds oil or resin back into paint. It increases flow, gloss and flexibility, and it can speed or slow drying. Common options:
- Refined linseed oil: adds flow and gloss; slows drying slightly.
- Stand oil: thicker, levels brushstrokes and gives an enamel-like finish; often thinned before use.
- Alkyd mediums: speed drying, often to the touch within a day; useful for glazes.
- Homemade mixes: some painters combine solvent, oil and sometimes resin in set ratios. If you mix your own, label the jar with ingredients and proportions.
Why two cups: fat over lean
Each layer of an oil painting should contain the same or more oil than the one beneath. Early layers are “lean” (thinned with solvent); later layers are “fatter” (with medium). A double palette cup lets you work through that sequence without confusion: solvent on one side for the start of the painting, medium on the other for the later stages.
How to Use a Palette Cup for Oil Painting, Step by Step
- Attach the cup. Clip it to the edge of the palette on your brush-hand side, outside the mixing area. On a table palette, place it in a corner where you won’t drag a sleeve across it.
- Label it. A strip of tape marked “S” and “M” prevents mistakes. Clear OMS and pale linseed oil look almost identical.
- Fill halfway. Half to two-thirds full is enough. A brimming cup spills when you bump the palette or tilt it on an easel.
- Dip only the tip. Touch the end of the brush (or a palette knife) to the liquid, then move to a clean spot in the mixing area.
- Work it into the paint. Pull a little paint from a color pile and stir the liquid in. Add more in small amounts until you reach the consistency you want.
- Wipe, don’t rinse, between colors. Squeeze excess paint from the brush with a rag. Use a separate, larger brush washer for actual rinsing, not the palette cup, so your medium stays clean.
- Close the lid on breaks. This reduces fumes and keeps dust out.
- Empty or seal at the end. Pour leftover medium into a labeled, sealed jar or close the lid tightly if your cup seals well. Solvent can be poured into a settling jar.
How much medium to add
A useful rule of thumb many teachers give is to keep added medium well below the amount of paint in a mix, especially for oil-rich mediums, because too much oil can lead to wrinkling, slow drying or yellowing. For a glaze, more medium is normal, but the layer should be thin. Check the manufacturer’s guidance for your specific medium.
Using the Cup Through a Whole Painting
The way you use a palette cup changes as a painting develops. A typical three-stage session looks like this:
Stage 1: Toning and drawing (solvent side)
Dip the brush into the solvent and mix it with a little burnt umber or burnt sienna until it’s as thin as watercolor. Use this wash to tone the canvas and sketch the main shapes. The solvent evaporates quickly, leaving a lean, matte layer that’s soon dry to the touch.
Stage 2: Block-in (little or no liquid)
For the main color masses, many painters use paint as it comes from the tube, or with just a touch of solvent if it feels stiff. Too much liquid here makes the paint slide around and lose coverage.
Stage 3: Refinement and glazes (medium side)
Switch to the medium cup for later layers. A touch of medium makes paint flow for fine details and blending. For a glaze, mix more medium with a transparent color and brush it on thinly over a dry layer. Because these layers are “fatter,” they stay flexible over the leaner layers below.
If you only own a single cup, you can still follow this sequence: start the session with solvent in the cup, then empty it, wipe it out and refill it with medium when you move to the final stage.
Choosing the Right Size and Shape
Size matters more than most painters expect. A cup should be wide enough for your largest brush to dip in without hitting the rim, but small enough that you aren’t tempted to overfill.
- Small round brushes and detail work: a cup about 1.5 inches across is enough.
- Medium filberts and flats: 2 inches across is comfortable.
- Large brushes over 1 inch wide: look for large palette cups, or pour medium into a small dish on the palette instead.
- Clip fit: check that the clip opens wide enough for your palette’s thickness; thick wooden palettes and glass slabs often need a wider clamp, or a free-standing porcelain cup.
Palette Cups for Painting Outdoors
Plein air painters rely on palette cups with lids and clips because there’s no table and conditions change.
- Choose a cup with a lid that screws on and has a seal, so it won’t leak in a bag.
- Clip it on the side away from the wind so fumes blow away from you.
- Carry a small sealed bottle to refill rather than a large jar.
- Pack used solvent and rags out with you; never pour solvent on the ground.
Safety Notes
- Ventilate. Even odorless mineral spirits releases vapors. Open a window or use a fan that moves air outward.
- Keep lids closed whenever you’re not actively dipping.
- Dispose of oily rags safely. Rags soaked in linseed oil and other drying oils can heat up as they cure and, under the wrong conditions, ignite. Lay them flat to dry outdoors or keep them in water in a closed metal can before disposal.
- Keep away from flame and heat sources.
- Wear gloves if you have sensitive skin, and wash hands before eating.
Common Mistakes with Palette Cups
- Using the palette cup as a brush washer. It fills with sludge and contaminates every mix.
- Overfilling, which leads to spills on the palette and canvas.
- Mixing up solvent and medium, which breaks fat over lean.
- Adding too much medium, which can make paint slide, wrinkle or dry slowly.
- Leaving medium in an open cup overnight, where it thickens and forms a skin.
- Putting harsh solvent in thin plastic cups, which may soften or crack.
Cleaning Your Palette Cups
Clean cups after each session, especially those holding medium. Linseed oil left in a cup oxidizes into a sticky film that’s hard to remove later. Wipe the cup out with a paper towel, rinse with a little solvent, then wash with soap and warm water and dry fully so metal doesn’t rust. Our step-by-step guide on how to clean palette cups after oil painting covers dried medium, stuck lids and rust spots.
Storing medium between sessions
Medium left in an open cup thickens as the oil starts to oxidize. If your cup has a tight-sealing lid, medium can usually be kept for a day or two, but it’s safer to pour leftovers back into a small labeled glass jar with a screw lid. Avoid returning used medium to the original bottle, since it may contain pigment or dust picked up from the brush.
Palette Cup vs Brush Washer vs Jar
| Tool | Holds | Size | Main job |
|---|---|---|---|
| Palette cup | Clean solvent or medium | Small, 1–2 inches | Adding liquid to paint mixes |
| Brush washer | Solvent with a coil or grid | Larger, often lidded | Rinsing brushes |
| Glass jar | Anything | Varies | Storage, settling dirty solvent |
Most oil painters use a palette cup and a brush washer together. The cup stays clean; the washer gets dirty.
FAQs
What do you put in palette cups for oil painting?
One cup typically holds a solvent such as odorless mineral spirits for thinning early layers, and the other holds a medium such as linseed oil or an alkyd medium for later layers. Keeping them separate helps you follow the fat-over-lean rule.
Are palette cups with lids worth it?
Yes, especially for plein air painting and for leaving medium between short breaks. Lids reduce fumes, keep dust out and prevent spills when the palette moves. Check that the lid seals fully before putting the cup in a bag.
Are metal palette cups better than plastic?
For solvent, metal is the safer choice because some plastics can soften with strong solvents. Plastic is lighter and fine for linseed oil and most mediums. Stainless steel resists rust better than tin-plated metal.
How full should a palette cup be?
About half to two-thirds full. That’s enough for a session and leaves room so the liquid doesn’t spill when you tilt the palette or dip a brush.
Can I rinse brushes in my palette cup?
It’s better not to. Rinsing fills the cup with pigment sludge that ends up in your next mix. Use a separate brush washer or jar for rinsing and keep the palette cup clean for adding medium.
Do I need a palette cup to oil paint?
It’s not essential, since you could use small jars, but it’s far more convenient. A clip-on cup keeps solvent and medium within reach and limits how much you use and breathe in.
Final Thoughts
Clip the cup on your brush-hand side, label solvent and medium, fill halfway, dip only the tip and close the lid between uses. Those habits keep mixes clean, fumes low and layers sound. When you’re ready to choose a cup that fits your palette and painting style, our guide to oil painting palette cups compares lidded, double and metal designs.





One Comment