
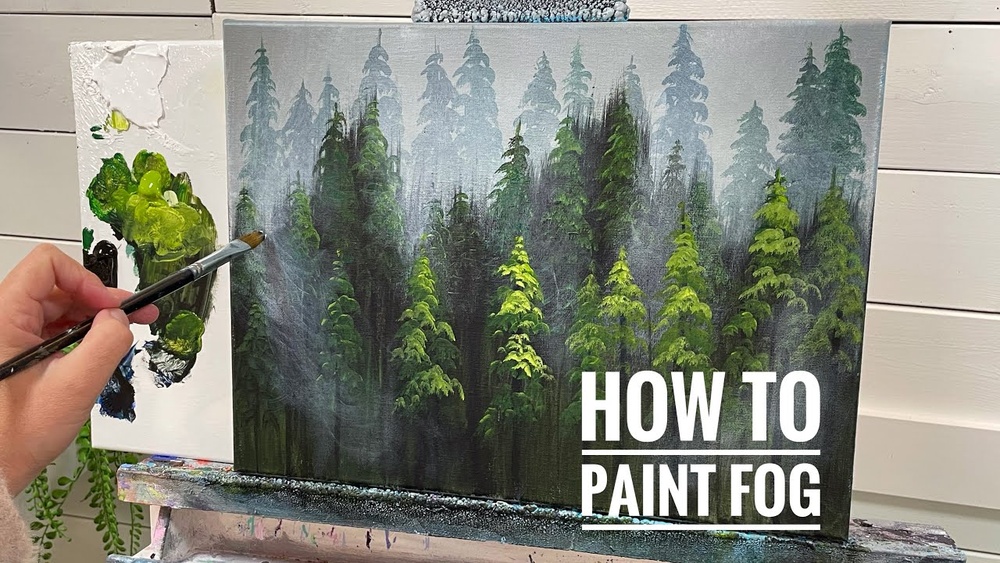
Quick answer: To paint fog with acrylic, reduce contrast and detail as objects recede, and lift every distant value toward a single light, slightly cool gray. The most reliable techniques are thin semi-transparent white glazes (white plus glazing medium), dry-brush scumbling over dry paint, and blending distant shapes into the sky color so their edges disappear. Paint from back to front, add a fog layer between each depth plane, and keep the foreground darker and sharper.
Fog is not something you paint on top of a scene so much as something you take away from it. It removes contrast, swallows edges and drains color. The painter’s job is to control how much it removes at each distance.
Acrylic is a slightly tricky medium for this because it dries fast, which makes soft blends harder. The upside is that fast drying is perfect for layering thin glazes, and glazes are the most controllable way to build mist. This guide covers how to paint fog with acrylic using several approaches, a full step-by-step misty forest, and the tips that keep fog looking airy instead of chalky.
How Fog Changes What You See
Water droplets in the air scatter light. The farther away an object sits, the more droplets lie between it and your eye, so the more it fades. In practical painting terms, fog does four things:
- Raises dark values. A black tree trunk in the distance becomes mid-gray, then pale gray, then nearly invisible.
- Lowers saturation. Bright greens and reds turn grayish as distance increases.
- Softens edges. Sharp silhouettes become blurry and eventually dissolve.
- Removes detail. Branches, leaves and textures vanish long before the overall shape does.
The key insight is that fog moves every value toward the fog color, not toward white. Morning fog is often a warm, pale gray-gold. Overcast fog leans cool blue-gray. Choose that target color first; everything distant will drift toward it.
Supplies for Misty Acrylic Effects
| Supply | Why you need it |
|---|---|
| Titanium white | Opaque white for mixing fog colors and heavier mist |
| Zinc white or a transparent mixing white (optional) | Less opaque; gives subtler, more transparent veils |
| Ultramarine blue, burnt umber, a touch of yellow ochre | Mixes for neutral and tinted fog grays |
| Glazing medium or matte medium | Thins paint into transparent layers without losing binder |
| Slow-dry (retarder) medium | Extends blending time for wet-in-wet transitions |
| Soft synthetic flat or mop brush, 1 inch | Feathering and blending glazes |
| Old, splayed flat or fan brush | Dry-brush scumbling |
| Spray bottle and lint-free cloth or makeup sponge | Keeping paint workable and dabbing soft fog |
Transparent glazes behave differently depending on the paint line. Some acrylics dry with a slightly plastic sheen or shift darker as they dry, which makes predicting fog values harder. Our roundup of acrylic paints with minimal color shift covers which brands stay truer from wet to dry.
Four Ways to Paint Fog With Acrylic
Each technique creates a slightly different kind of mist. Most finished paintings combine two or three.
1. Glazing (Transparent Veils)
Mix a small amount of white, or your fog color, into glazing medium. A starting ratio is roughly 1 part paint to 6 to 10 parts medium. The mix should look milky, not opaque. Brush it evenly over a dry section of the painting. Each layer lightens and softens what lies beneath without hiding it completely.
Glazing is the most controllable approach. If the fog is too weak, add another layer once the first dries. If it is too strong, paint back into it with darker values. Several thin layers look more natural than one thick one.
2. Dry-Brush Scumbling
Load an old flat or fan brush with a small amount of fog color, wipe most of it off on a paper towel, then drag or swirl it lightly over dry paint. The paint catches only on the raised texture, leaving a broken, hazy film. This works well for drifting mist bands and patchy fog that hangs in valleys.
3. Wet-in-Wet Blending
Paint the sky and distant shapes while the surface is still damp, blending the base of distant trees or hills directly into the sky color. Mist the canvas and add a little retarder to stretch your working time. This creates the softest transitions but demands speed; acrylic can start to drag within a few minutes.
4. Sponge or Cloth Dabbing
Dip a makeup sponge or soft cloth into thinned fog color, blot it, then gently dab or wipe across the area. This produces cloudy, irregular fog patches that look natural over water or in low ground.
| Technique | Best for | Difficulty | Main risk |
|---|---|---|---|
| Glazing | Overall haze, depth layering | Easy to moderate | Streaks if medium is uneven |
| Dry brush | Mist bands, rising fog | Easy | Looks scratchy if overloaded |
| Wet-in-wet | Soft dissolving edges | Moderate to hard | Paint drying mid-blend |
| Sponge dabbing | Patchy ground fog | Easy | Visible sponge pattern |
How to Paint Fog With Acrylic: Misty Forest Step by Step
This exercise paints a pine forest fading into fog on a 12×16-inch canvas. It uses layered planes, with a fog glaze between each one, which is the most reliable structure for beginners.
Step 1: Choose the Fog Color
Mix titanium white with a touch of ultramarine and a whisper of burnt umber for a cool, neutral fog. For warm morning fog, add a tiny amount of yellow ochre instead. Make a generous puddle; you will use it throughout.
Step 2: Paint the Sky
Paint the entire canvas in the fog color, slightly lighter at the top and a touch darker near the horizon. Let it dry.
Step 3: Paint the Farthest Trees
Add a small amount of your darkest mix (ultramarine plus burnt umber) into the fog color to make a value only slightly darker than the sky. Paint simple, triangular pine silhouettes along the horizon. No detail, no branches. Soften the bases into the background.
Step 4: First Fog Glaze
When dry, glaze milky fog color over the lower half of those trees and the area around their bases. The bottoms should disappear into mist while the tips remain faintly visible.
Step 5: Middle-Distance Trees
Mix a darker value, still grayed with fog color. Paint a second row of trees, slightly larger and positioned lower on the canvas. Add a hint of branch structure on their edges.
Step 6: Second Fog Glaze
Glaze again over the bases of this row. You should now see three distinct depth layers: sky, faint distant trees, and slightly clearer middle trees.
Step 7: Foreground Trees
Paint the nearest trees in your darkest values with richer green and full branch detail. Do not glaze over these. Their contrast against the misty background creates the sense of depth.
Step 8: Scumble Drifting Mist
Using a dry brush, add a few horizontal wisps of fog drifting between the middle and foreground layers. Keep them irregular and partially transparent.
Step 9: Light Accents
If the scene has a light source, glaze a slightly warmer, lighter fog color in the area where light would penetrate. A soft glow behind the trees increases the sense of atmosphere.
Painting Fog Over Water, Mountains and Cities
Fog Over Water
Mist over lakes and rivers tends to hug the surface in low horizontal bands. Paint the water and far shore first, then sponge or scumble thin bands of fog just above the water line, letting the far shore show through intermittently. Reflections should be softer and paler than the objects casting them.
Mountain Valleys
Valley fog often fills low ground while peaks rise above it. Paint mountains first, then glaze or scumble fog into the valleys between ridges, keeping the top edges of fog soft and slightly lumpy like clouds.
Foggy Streets
In urban scenes, streetlights glow through fog. Paint a soft halo of light around each lamp using glazes, and make distant buildings flat, pale silhouettes with almost no detail.
Acrylic Painting Techniques and Tips for Better Fog
- Use medium, not water, for glazes. Diluting acrylic with lots of water weakens the binder and can cause patchy, chalky results. Glazing or matte medium keeps veils even.
- Test on scrap first. Brush a glaze stripe across a dark test swatch and let it dry. Many glazes look stronger wet and weaker dry, or the reverse.
- Vary fog density. Real fog is uneven. Leave some areas clearer and some thicker.
- Keep the foreground sharp. Without a crisp, dark foreground, the whole painting looks washed out rather than foggy.
- Feather edges. After laying a glaze, run a clean, dry, soft brush along its edge to soften it.
- Work in a humid room or mist often. Slower drying gives you more blending time.
Fluid acrylics are especially good for glazes because they already have high pigment load at a thin consistency. Our Daler-Rowney fluid acrylic review explains how fluid paints handle thin layering compared with heavy body tubes.
Acrylic Underpainting Tips for Atmospheric Scenes
The underpainting sets the temperature of the whole fog scene. A warm underpainting in thin burnt sienna or yellow ochre, allowed to peek through cool gray fog glazes, creates a subtle glow that feels like early sunlight. A cool blue underpainting gives a colder, more somber mood.
Keep underpaintings thin and value-focused. Block in the major darks and lights so you know where the foreground contrast will sit and where the fog will be densest. Then build the fog in front of it rather than trying to paint every element at full strength first.
Fixing Fog That Went Too Far
It is easy to over-glaze and lose the scene. Because acrylic dries permanent, you cannot lift it, but you can rebuild. Mix a value slightly darker than the over-fogged area and repaint the key silhouettes, such as the tops of distant trees, then glaze again more lightly. If an entire area looks milky, a thin glaze of transparent color, like a little ultramarine and burnt umber in medium, can push it back into atmosphere without making it opaque. Small corrections over several layers look better than one heavy repaint.
Common Mistakes When Painting Mist
- Chalky fog. Too much opaque titanium white in a glaze turns misty areas pasty. Use less pigment and more medium, or switch to a more transparent white.
- Fog painted as a stripe. A uniform band of white across the middle reads as paint, not air. Break it up and vary its edges.
- Too much detail in the distance. Distant objects should be simple silhouettes.
- Equal contrast everywhere. Fog requires a contrast gradient from high in front to low in back.
- Pure gray fog. Slightly tinted fog, warm or cool, looks more natural than neutral gray mixed from black and white.
Acrylic Painting Tips for Beginners Trying Fog
Start with a two-value study: a light background and three rows of trees, each lighter than the one in front. No glazes, just mixing progressively more fog color into each row. This trains your eye to see atmospheric perspective before you add glazing techniques. Once that works, repeat it with glazes between the rows and compare the two versions side by side.
FAQs
What is the easiest way to paint fog with acrylic?
The easiest method is glazing: mix a small amount of white with glazing medium and brush thin layers over dry paint. Paint distant objects first, glaze over them, then paint closer objects on top.
What color is fog in a painting?
Fog is rarely pure white or neutral gray. It usually takes on the color of the light: pale blue-gray on overcast days, warm cream or gold in early morning sun, and pink or lavender near sunrise or sunset.
Can I use water instead of glazing medium for fog?
A little water is fine, but heavy dilution can weaken the acrylic binder and produce uneven, chalky or flaking layers. Glazing or matte medium creates more reliable transparent veils.
How do I stop my fog from looking chalky?
Use less white and more medium, build fog in several thin layers instead of one heavy one, and tint the fog slightly with blue, umber or ochre. A transparent white also helps.
Should fog be painted first or last?
Both. Paint the sky and most distant layers first in fog-influenced colors, then add fog glazes between each depth layer as you move forward. Final wisps of drifting mist can be scumbled on at the end.
How long should I wait between fog glazes?
Wait until each glaze is fully dry to the touch, typically 10 to 30 minutes for thin layers. Brushing a new glaze over a tacky one can lift and streak the layer underneath.
Final Thoughts
Painting fog with acrylic is mostly about patience and restraint. Choose a fog color, paint in depth layers, veil each layer with thin glazes, and keep the foreground dark and crisp. Once that structure is in place, a few scumbled wisps finish the effect.
Because glazes magnify differences in pigment and binder, the paint itself affects how clean your fog looks. To find tubes that glaze evenly and dry true to color, check our guide to top-rated acrylic paint brands for layering.




