
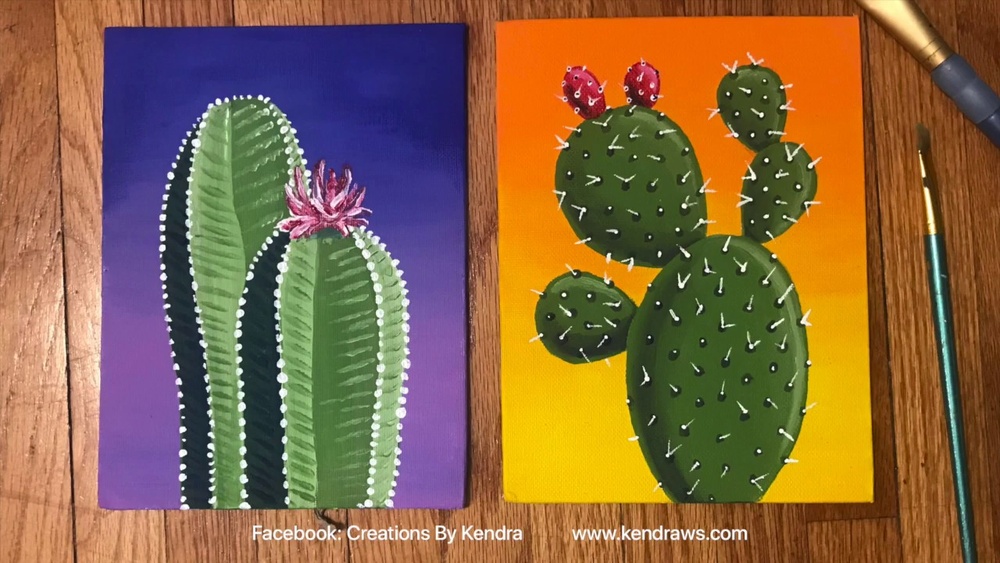
Quick answer: To paint a cactus with acrylic paint, block in the cactus shape in a mid-tone green, then paint vertical ribs by adding a darker green stripe in each groove and a lighter yellow-green stripe on each ridge. Add a shadow down the side facing away from the light, then dot in small areoles along the ridges and flick tiny white or cream spines out from each one. Finish with a bright flower on top or a terracotta pot, and keep the spines thin and sparse so they don’t overwhelm the form.
Cacti are one of the most satisfying beginner subjects in acrylic. Their shapes are simple, their colors are limited, and a few well-placed highlights and spines make them look surprisingly real. They also adapt to any style, from realistic desert landscapes to flat, graphic potted plants for a modern living room.
This guide on how to paint cactus with acrylic paint covers three popular projects: a single potted cactus, a saguaro desert scene and a stylized, decorative cactus arrangement. It also includes color mixes for cactus greens, which are trickier than they look, and a troubleshooting section for the most common problems.
Cactus Shapes You’ll Paint Most Often
Different cacti have very different structures, so it helps to pick a type before you start.
| Cactus type | Shape | Key painting features |
|---|---|---|
| Saguaro | Tall column with upward-curving arms | Vertical ribs, desert backdrop, big silhouette |
| Barrel cactus | Round to cylindrical, squat | Deep ribs, prominent curved spines, often yellow or red |
| Prickly pear (opuntia) | Flat, oval pads stacked on each other | Spots of tiny spines, often red or yellow fruit |
| Echeveria and succulents | Rosette of fleshy leaves | Soft color gradients, pink tips (not true cacti but often painted with them) |
| Bunny ear cactus | Small, rounded pads in pairs | Fuzzy dot clusters instead of long spines |
Supplies
- Canvas panel or canvas, 8×10 to 16×20 inches.
- Brushes: a 1-inch flat, a 1/2-inch flat, a size 6 and size 2 round, a liner, and a small fan brush for desert brush (optional).
- Paints: titanium white, sap green, phthalo green, yellow ochre, cadmium yellow light or hansa yellow, burnt sienna, burnt umber, ultramarine blue, a magenta or pink, and a red-orange.
- Dotting tool, toothpick or the handle end of a brush for areoles.
- Painter’s tape for a clean pot edge (optional).
Mixing cactus greens
Straight tube green looks artificial. Real cactus greens are often dusty, blue-gray or olive, because many species have a waxy coating that softens their color.
| Green type | Mix | Use |
|---|---|---|
| Dusty blue-green | Phthalo green + white + a touch of burnt umber | Saguaros, agave-like cacti |
| Olive green | Sap green + yellow ochre + a little burnt umber | Barrel cactus, prickly pear |
| Fresh green | Sap green + hansa yellow | Young growth, highlights |
| Shadow green | Phthalo green + burnt umber + ultramarine | Grooves, shadow side |
| Highlight green | Fresh green + white + a touch of yellow | Ridges facing the light |
Greens mixed from good-quality yellows and blues tend to be cleaner and more varied than greens from low-pigment sets. If your mixes keep looking flat or chalky, our guide to the best acrylic paint brands for clean green mixes explains which pigment qualities to look for.
How to Paint Cactus With Acrylic Paint: Potted Cactus Step by Step
Step 1: Background
Paint a simple background: a soft blush pink, a pale sage, a warm cream or a two-tone wall and tabletop. Muted backgrounds let the cactus greens stand out. For a two-tone setting, paint the wall in one color and a horizontal tabletop band below in a slightly darker or warmer color. Let it dry.
Step 2: Draw the cactus and pot
Sketch the pot first: a simple rectangle or tapered cylinder with an oval rim. Then draw the cactus coming out of the pot. For a columnar cactus, draw a tall, rounded-top shape, slightly wider at the base. Add a few vertical lines to mark where the ribs will go. They should curve slightly with the form, bowing outward in the middle like lines on a barrel.
Step 3: Paint the pot
For a terracotta pot, mix burnt sienna with a little white and red-orange. Paint the side away from the light darker (add burnt umber) and the side facing the light lighter (add white and ochre). Paint the rim slightly lighter than the body, with a thin dark line underneath where it overhangs. Use painter’s tape for a crisp top edge if you like.
Add a dark oval inside the rim for the soil, in burnt umber.
Step 4: Block in the cactus
Fill the cactus shape with your mid-tone green, using a flat brush and vertical strokes. Make the side away from the light a little darker as you paint.
Step 5: Paint the ribs
Ribs are what make a cactus look three-dimensional. With a size 2 round and shadow green, paint a thin, dark line in each groove, following your curved rib lines. Then, with highlight green, paint a thin, light line just beside each dark line on the ridge. Soften the inside edges slightly so each rib looks rounded.
Ribs near the center face you directly and look widest. Ribs near the edges are foreshortened and look narrower and closer together. Getting this spacing right is the key to a rounded, believable cactus.
Step 6: Add shading and highlights
Glaze a thin layer of shadow green down the entire shadow side of the cactus to unify the ribs. Add a brighter highlight along the ridges on the lit side. A small, soft highlight near the top of the dome suggests the waxy surface.
Step 7: Areoles and spines
Areoles are small, fuzzy bumps from which spines grow. Dot them along each ridge with a toothpick or a dotting tool in cream or light gray, spaced evenly.
For spines, thin white or cream paint with a little water and use a liner. Pull short, quick strokes outward from each areole in a small star or fan of three to five spines. Keep them very thin. Spines on the shadow side can be slightly darker or grayer.
Step 8: Flower (optional)
Many cacti bloom with bright flowers at the top. Paint a small cluster of petals in magenta, coral, yellow or white, with a darker center and light tips. A single flower adds a focal point and a pop of complementary color against the green.
Step 9: Shadow and grounding
Paint a soft cast shadow beside the pot on the tabletop, darkest right next to the base. Without it, the pot looks like it’s floating.
Painting Cactus Flowers in More Detail
A cactus flower can carry the whole painting if you give it a bit more attention. Many cactus blooms are cup-shaped with glossy, layered petals and a cluster of stamens in the center.
- Paint the overall flower shape as a soft cup or star in the mid-tone, such as magenta mixed with a little white.
- Darken the base of each petal and the center of the cup with a deeper version of the color.
- Paint the inner petals slightly lighter than the outer ones, since they catch light from above.
- Add a pale, crisp edge to the tip of each petal.
- Dot a yellow or cream cluster of stamens in the center, with a few tiny darker dots for texture.
Choose a flower color that complements the green. Magenta, coral and red-orange all sit opposite green on the color wheel and make the cactus look more vivid by contrast.
Painting a Saguaro Desert Scene
The saguaro, with its tall trunk and raised arms, is the iconic cactus of the American Southwest.
- Sky: paint a gradient sunset: deep blue-violet at the top fading through magenta and orange to pale yellow at the horizon. Blend while wet with a large flat.
- Distant mountains: paint low, layered mountain shapes in muted violet and blue-gray, lighter and cooler as they recede.
- Desert floor: paint the ground in warm ochres, siennas and pinks, with a few darker shrub shapes.
- Saguaro: paint the trunk and arms as a silhouette in dark green, or for a lit cactus, use the rib technique. Arms branch out horizontally from the trunk, then curve upward.
- Rim light: at sunset, add a thin warm orange or gold line along the edge of the cactus facing the sun.
- Details: add smaller cacti and desert shrubs in the middle distance, and a few rocks in the foreground.
For a silhouette version, paint the saguaro and foreground in near-black against the sunset. It’s a quick, dramatic project for beginners.
Prickly Pear and Barrel Cactus Tips
Prickly pear: paint each pad as a flat oval in olive green, with a darker edge and a lighter center. Add small dots in a diagonal grid pattern across each pad for areoles, with tiny tufts of spines. Paint pear-shaped fruit along the pad edges in magenta or red.
Barrel cactus: it’s round, so the ribs curve strongly around the form. Paint its spines longer and curved, often in yellow, red or reddish-brown, which gives this cactus its distinctive look.
Stylized Decorative Cacti
Flat, graphic cacti are popular in modern decor. To paint them:
- Paint simple cactus shapes in flat, solid greens, without shading.
- Add ribs as simple vertical lines in a darker green.
- Paint spines as small white “x” marks or dashes in a regular pattern.
- Paint pots in bright colors or patterns, like stripes, dots or zigzags.
- Group three cacti of different heights and shapes in a row.
Fluid or soft-body paint gives flat, even coverage for this style. Paint markers make fast, crisp spines and pot patterns.
Common Mistakes When Painting Cacti
| Mistake | Result | Fix |
|---|---|---|
| Straight, evenly spaced ribs | Flat, striped look | Curve ribs with the form; space them closer at the edges |
| Bright tube green | Artificial, plastic look | Mix dusty or olive greens with ochre, umber or white |
| Thick, heavy spines | Cactus looks hairy | Thin paint, liner brush, short quick strokes |
| Spines everywhere | Busy, cluttered surface | Group spines at areoles along the ridges |
| No cast shadow | Pot floats | Add a soft shadow beside and beneath the pot |
| Same value throughout | Cactus looks flat | Darken the shadow side and highlight the lit ridges |
Tips by Skill Level
Beginner: paint a single stylized cactus in a pot, or a saguaro silhouette against a sunset. Both are achievable in under an hour.
Intermediate: paint a group of three different cacti in pots, with realistic ribs, shading, spines and cast shadows.
Advanced: paint a detailed desert landscape with saguaros, prickly pear and barrel cacti in warm evening light, using rim lighting and atmospheric perspective in the distant hills.
Fine spines and fluid detail lines are easier with thinner paint. Our Daler-Rowney fluid acrylic paint review describes how a fluid acrylic handles this kind of liner work.
Related Reading
FAQs
What colors do you mix for cactus green?
For a dusty blue-green, mix phthalo green, white and a touch of burnt umber. For an olive green, mix sap green with yellow ochre and a little burnt umber. Add hansa yellow and white for highlights.
How do you paint cactus spines with acrylic paint?
Thin white or cream paint with water and use a liner brush. Pull short, quick strokes outward from small dots (areoles) along each ridge, in groups of three to five spines.
Is a cactus easy to paint for beginners?
Yes. Its simple shapes and limited colors make it one of the easiest plant subjects. A potted cactus or a saguaro silhouette is a great first painting.
How do you make a cactus look 3D?
Paint curved ribs with a dark line in each groove and a light line on each ridge, space ribs closer together at the edges, darken the shadow side and add a cast shadow.
What size canvas is best for a cactus painting?
An 8×10 or 11×14 inch canvas is ideal for a single potted cactus. Desert scenes with multiple cacti look best on 16×20 inches or larger.
How long does a cactus painting take?
A stylized cactus takes 30 to 60 minutes. A realistic potted cactus takes one to two hours. A detailed desert landscape can take four hours or more.
Final Thoughts
Cacti are proof that a simple shape can look rich with a few good decisions: mixed greens instead of tube green, curved ribs, sparse thin spines and a solid cast shadow. Start with a single potted cactus, then move on to a full desert scene.
Good greens and earthy pot colors depend on clean, well-pigmented paint. For help choosing a palette that mixes natural greens easily, see our comparison of acrylic paint brands for beginners and professionals.




