
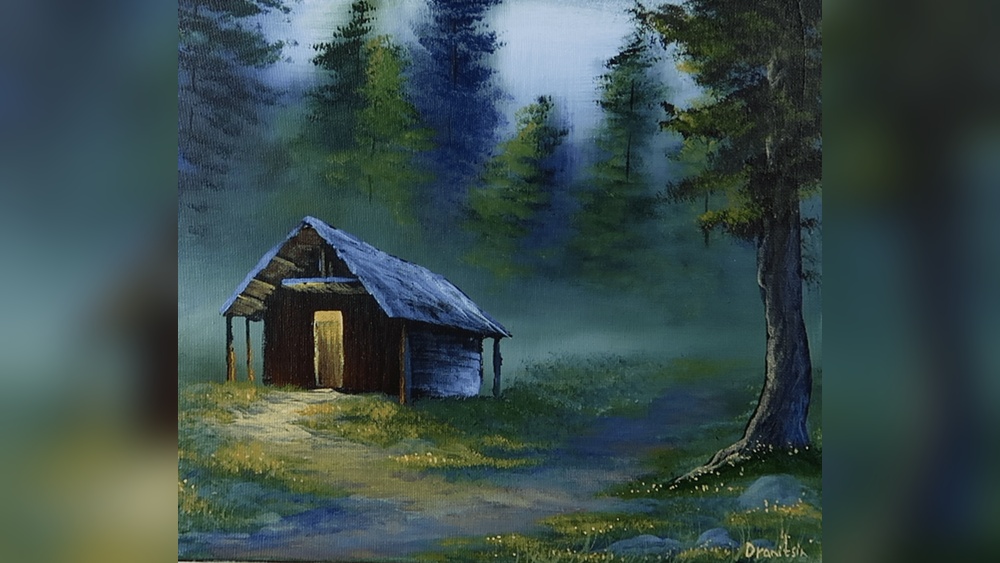
Quick answer: To paint a cabin in the woods with acrylics, prime a wood panel or canvas, block in a soft sky, then paint the forest from back to front: pale blue-gray distant trees, mid-value pines, and dark foreground trunks. Place the cabin in the middle ground with a simple box-and-roof shape, give it one warm lit window, and finish with snow or grass, a path and a few highlights. Seal the dry painting with a gloss or satin acrylic varnish.
A cabin in the woods looks like a complicated landscape, but it is really three simple ideas stacked together: a sky, a few layers of trees, and one small building with a glowing window. If you control the order of those layers, the scene almost paints itself. If you paint them out of order, you end up fixing edges for hours.
This guide shows how to paint a cabin in the woods with acrylics on either canvas or a wood panel, with mixing recipes, brush choices, a stage-by-stage plan and a section on finishing the piece so it lasts. Because many people paint this subject on wood boards, slices and plaques, the surface prep and varnish steps get extra attention.
Why This Scene Works So Well in Acrylic
Acrylic dries in minutes when applied thin. For a forest scene that is an advantage, not a problem. Each band of trees can dry before you paint the next band in front of it, so the layers stay clean and separate. Depth comes from value and color temperature rather than from blending, which suits a fast-drying paint.
The cabin itself is made of straight lines and flat planes. Flat planes are easy in acrylic because the paint levels well and covers in one or two coats. The warm window is a single small spot of yellow-orange against cool darks, and that contrast is what makes the whole painting feel cozy.
How to Paint With Acrylics on Wood vs Canvas
Both surfaces work. The choice changes your prep, not your painting steps.
| Surface | Prep needed | Feel when painting | Best for |
|---|---|---|---|
| Stretched canvas | Usually pre-primed; optional extra gesso coat | Slight bounce and weave texture | Larger pieces, gallery wrap display |
| Canvas panel | Pre-primed | Firm, light texture | Practice and small studies |
| Hardboard or cradled wood panel | Sand lightly, 2 to 3 coats of gesso | Smooth and rigid, crisp detail | Fine branches, sharp cabin edges |
| Raw wood slice or plaque | Sand, seal tannins, gesso the painting area | Natural grain, absorbent | Rustic gifts and signs |
Raw wood soaks up water from the paint and can push tannin stains up through light colors, especially on oak, cedar and redwood. A clear acrylic sealer or a couple of coats of gesso stops both problems. Our article on using acrylic paint on wood surfaces covers sealing in more depth.
Paint formulation also matters on wood. Craft acrylics are fine for a decorative sign, but artist-grade paints carry more pigment, so dark greens and warm window glows cover in fewer coats. If you are weighing options, see our comparison of the best acrylic paints for wood projects before you buy.
Wood Panels for Acrylic Painting: Prep in Four Steps
- Sand. Use 220-grit paper with the grain until the surface feels even. Wipe off dust with a barely damp cloth.
- Seal. On tannin-rich woods, brush on a clear acrylic sealer or a stain-blocking primer. Let it dry fully.
- Gesso. Apply two or three thin coats of acrylic gesso, alternating brush direction. Sand lightly with 320-grit between coats for a smoother surface.
- Tone (optional). A thin wash of light blue-gray or warm beige kills the bright white and makes values easier to judge.
Supplies for a Cabin in the Woods Acrylic Painting
You do not need a large kit. A limited palette keeps the greens natural and stops the painting from looking like a crayon box.
- Colors: Titanium white, ultramarine blue, phthalo blue (optional), burnt umber, burnt sienna, yellow ochre, cadmium yellow medium (or a hue), cadmium red light or a warm red, and sap or Hooker’s green (optional, since you can mix greens).
- Surface: An 11×14 inch canvas or a primed wood panel of similar size.
- Brushes: 1-inch flat, #8 and #4 flats, a #6 filbert, a fan brush, a #1 or #0 liner (rigger) and an old stiff brush for stippling.
- Extras: Palette or stay-wet palette, spray bottle of water, paper towels, painter’s tape, a ruler or straight edge, and a pencil or white charcoal.
Acrylic Paint Brushes for Wood and Fine Detail
Wood panels are smooth and slightly harder on bristles than canvas, but the bigger difference is control. Synthetic brushes with a good snap hold a sharp edge for cabin walls and roof lines. A liner brush with long hairs is the tool for branches, twigs and the fine lines of log ends. Keep one scruffy, worn brush for foliage texture so you are not wrecking your good ones.
Mixing Chart: Forest Greens, Wood Tones and Window Glow
Most forest paintings fail because every tree is the same green straight from the tube. Mix three or four greens and assign each one to a depth.
| Use | Mix | Notes |
|---|---|---|
| Distant trees | Ultramarine + white + touch of green + touch of burnt sienna | Should read as blue-gray, close to the sky value |
| Mid-ground pines | Ultramarine + yellow ochre + small amount of white | Muted, cooler green |
| Foreground pines | Phthalo or ultramarine + burnt umber + a little yellow | Near black-green; darkest value in the painting |
| Sunlit needles | Cadmium yellow + mid green + white | Use sparingly on the light side |
| Cabin logs | Burnt sienna + burnt umber; highlight with yellow ochre + white | Keep walls a step lighter than foreground trees |
| Roof (snow or shingle) | White + touch of ultramarine for shadow; or burnt umber + ultramarine for dark shingles | Roof value should contrast with the trees behind it |
| Window glow | Cadmium yellow + small dot of red + white center | Paint last; keep it small |
A useful rule: the farther something is, the lighter, bluer and less detailed it gets. That single idea, called atmospheric perspective, does most of the work of making the woods look deep.
How to Paint a Cabin in the Woods Acrylics: Step by Step
Plan on two to four hours for an 11×14 inch piece, including drying time. Let each stage dry to the touch before moving on, which usually takes 10 to 20 minutes for thin layers. A hair dryer on low speeds this up.
Step 1: Sketch the Big Shapes
Lightly draw the horizon or ground line about one-third up from the bottom. Place the cabin slightly off-center, following the rule of thirds, so it sits in the middle ground rather than at the very front. A simple cabin is a rectangle for the front wall, a parallelogram for the side wall and a triangle or trapezoid for the gable roof. Mark a path that curves from the bottom edge toward the door to pull the eye in.
Step 2: Paint the Sky
Using the 1-inch flat, paint the top of the sky with ultramarine and white, adding more white as you move down toward the tree line. For an evening scene, slip a band of pale peach (white, a touch of yellow and red) just above the trees and blend the edge while wet. Mist the canvas lightly if the paint starts to drag. Paint the sky lower than you think you need to, behind where the trees will go, so no gaps show later.
Step 3: Distant Tree Line
Mix the blue-gray distant green. With the corner of a flat brush or a fan brush held vertically, tap in a row of soft, small pine shapes along the horizon. Vary their heights. Keep the edges soft and the value close to the sky. These trees should almost disappear when you squint.
Step 4: Mid-Ground Trees
Switch to the mid green. Paint a second row of pines, taller and a bit more defined, overlapping the first row. A quick method for pines: draw a thin vertical trunk line with the liner, then use the fan brush or a small flat to tap short, downward-angled strokes from the top, getting wider toward the base. Leave some gaps so the distant trees show through.
Step 5: Block In the Cabin
Now paint the cabin flat, before adding details. Use painter’s tape or a ruler to keep walls vertical. Paint the front wall in a mid-brown and the side wall a value darker, so light reads as coming from one direction. Paint the roof. If you are adding snow, paint the roof white with a cool blue-gray shadow under the eave. Let it dry.
Step 6: Cabin Details
With the liner brush and a dark brown thinned to ink consistency, add horizontal lines for logs, spaced evenly but not perfectly. Add small circles or dots at the corners for log ends. Paint the door a deep brown, then the window frames. Fill the windows with dark blue-black first; the glow goes on top later. Add a chimney with a thin wisp of gray-white smoke drifting in the same direction as any wind in the trees.
Step 7: Ground, Snow or Grass
For a winter scene, paint the ground with white tinted slightly blue in the shadows and slightly warm where light falls. Add a shadow under the cabin and along the base of trees. For summer, scumble yellow ochre and green with the stippling brush, darker near the bottom of the canvas. Paint the path with a lighter, warmer tone that narrows as it approaches the cabin.
Step 8: Foreground Trees
Mix the darkest green. Paint one or two large pines at the edges of the canvas, letting them run off the top. These frame the scene and push the cabin back. Add a couple of bare trunks with the liner in burnt umber and ultramarine. Foreground trees get the most detail: visible branches, a few highlights of sunlit green on the side facing the light, and a bit of snow resting on branches if it is winter.
Step 9: The Window Glow and Final Highlights
Paint the windows with cadmium yellow, then add a tiny center of near-white. Soften a faint warm halo onto the snow or ground beneath the window with a dry brush. Add highlights along the roof edge and the lit side of the logs. Finish with a few stars or snowflakes using a spattered toothbrush if the scene suits it. Step back and check that the window is the brightest warm spot on the canvas.
Can You Use Acrylic Paint Markers on Wood for Details?
Yes. Acrylic paint markers work well on sealed or gessoed wood, and they are handy for log lines, window panes and small lettering on a sign version of this scene. Use them only after the base paint is fully dry, and shake and prime the nib on scrap first so it does not flood. Marker lines can look mechanical, so mix them with brushwork rather than relying on them for everything. Always varnish over marker work; some marker paints are less durable unsealed.
Common Problems and Fixes
| Problem | Likely cause | Fix |
|---|---|---|
| Forest looks flat | All trees the same value and green | Glaze distant trees with thin white-blue; darken foreground trees |
| Cabin floats | No contact shadow at base | Add a dark band where walls meet the ground |
| Cabin looks crooked | Walls not vertical | Repaint edges using tape or a ruler as a guide |
| Window does not glow | Surroundings too light | Darken the walls around the window; add a white center |
| Muddy greens | Too much burnt umber or overmixing | Mix fresh; add yellow to lift, blue to cool |
| Brown stains in white areas on wood | Tannin bleed | Seal with stain-blocking primer, then repaint |
How to Varnish Acrylic Painting on Wood
Varnish protects the surface from dust, UV and scuffs, and it evens out the patchy sheen that acrylic often has when dry. It matters more on wood pieces because they tend to get handled, hung in kitchens or given as gifts.
- Wait. Let the painting dry at least 24 hours for thin layers, and up to 72 hours for thick paint, so moisture can escape.
- Isolation coat (recommended). Brush on a thin layer of clear gloss medium thinned slightly with water. This seals the paint and makes later varnish removable without disturbing the image.
- Varnish. Apply a thin coat of acrylic varnish with a wide, soft brush in one direction. Work in good light so you can spot missed areas.
- Second coat. After the first coat dries (follow the label, often a few hours), apply a second coat at right angles to the first.
- Edges and back. On wood plaques, varnish the sides too. Sealing the back helps reduce warping on thin boards.
Best Finish for Acrylic Paint on Wood
Gloss deepens dark greens and makes the window glow pop, but it reflects light. Matte reduces glare but can slightly dull dark values. Satin sits between them and is a safe default for a cozy cabin scene. Many painters apply a gloss coat first, then a satin coat for the final sheen, which keeps darks rich without high shine. Avoid household polyurethane over light colors; oil-based types can yellow over time.
Tips by Skill Level
- First-timers: Skip side walls and paint the cabin straight-on as a simple front facade. Use only three tree values.
- Improvers: Add a second building such as a woodshed, or a frozen pond with reflections of the lit window.
- Confident painters: Try a night scene with moonlight casting blue shadows on snow, or paint directly onto a rustic wood plank and let some grain show in the sky.
FAQs
Is acrylic paint good for wood?
Acrylic paint works very well on wood once the surface is sanded and sealed or primed. It bonds strongly to gesso, dries quickly and stays flexible. Sealing first prevents the wood from absorbing too much paint and blocks tannin stains in light areas.
How long does a cabin in the woods painting take?
Most people finish an 11×14 inch version in two to four hours, including short drying breaks between layers. A small 8×10 study can be done in about an hour if you keep details simple.
What is the best varnish for acrylic painting on wood?
A water-based acrylic varnish, ideally one with UV protection, is the usual choice. Apply a clear isolation coat first, then two thin varnish coats. Satin is a good all-around finish for landscape scenes.
Do I need gesso before painting on wood?
It is strongly recommended. Gesso gives the paint something to grip, stops the wood from soaking up water, and gives you a white or toned base so colors look the way you mixed them.
How do I make trees look far away?
Paint distant trees lighter, bluer and with softer edges than nearby trees. Add less detail as distance increases, and overlap rows so each layer partly hides the one behind it.
How do I paint snow on the cabin roof?
Paint the roof white, then add a thin blue-gray shadow under the overhanging edge and on the side facing away from the light. A slightly warm white on the sunlit side adds realism.
Next Step
Once you have painted one cabin scene, try the same composition at a different time of day. A dawn version with pink light, or a snowy midnight version, teaches how color temperature changes mood. If you plan to paint more pieces on boards, plaques or wood slices, our roundup of acrylic paints that perform well on wood crafts will help you choose colors that cover in fewer coats and hold up after varnishing.




