Are you ready to bring the beauty of pine trees to life with acrylic paint? Whether you’re a beginner or looking to sharpen your skills, painting pine trees can be easier than you think.
With the right techniques and simple tools, you can create stunning, textured trees that add depth and realism to your artwork. In this guide, you’ll learn how to build your pine tree step-by-step—from sketching the slender trunk to layering rich greens and adding highlights that mimic sunlight.
By following easy brush strokes and color choices, you’ll soon be painting pine trees that feel alive and vibrant. Keep reading, and discover the secrets to mastering this classic nature subject with confidence and creativity!
Materials Needed
Before starting your pine tree painting, gather all necessary materials. Having the right supplies ensures smooth painting and better results. This section lists essential paints, brushes, and other tools you will need.
Essential Acrylic Paints
Choose high-quality acrylic paints for vibrant colors and good coverage. You will need various greens, such as sap green and forest green, to create depth. Brown shades like burnt sienna or raw umber work well for the trunk. White and black help with highlights and shadows. Mixing these colors will give your pine tree a natural look.
Brush Types And Sizes
Select brushes based on the painting techniques you plan to use. A stiff fan brush is great for creating pine needles and texture. Flat brushes help to block in larger shapes and branches. Small round brushes allow for adding fine details like twigs. Keep a variety of sizes on hand for flexibility. Clean brushes often for the best results.
Additional Supplies
Prepare a palette to mix your colors easily. Use a water container to rinse brushes between colors. Paper towels or cloth help blot excess paint or water. Canvas or acrylic paper provides a good surface for painting. Optional items include a pencil for sketching the tree outline and a palette knife for texture effects.
Preparing Your Canvas
Preparing your canvas is the first step to paint pine trees with acrylic paint. A well-prepared surface helps your paint last longer and look better. It creates a smooth base that allows colors to stand out clearly. Good preparation makes painting easier and more enjoyable.
Choosing the right surface and applying primer are key tasks. They set up your work for success. Follow these simple steps to get your canvas ready for a beautiful pine tree painting.
Choosing The Right Surface
Select a surface that suits acrylic paint well. Canvas boards, stretched canvases, and wood panels work great. Canvas boards are affordable and easy to handle. Stretched canvases offer a classic texture and durability. Wood panels provide a firm, smooth base that helps detail work.
Pick a size that fits your workspace and painting style. Make sure the surface is clean and free of dust. Avoid rough or damaged areas. These can affect your brush strokes and paint adhesion.
Applying Primer For Smooth Finish
Primer creates a smooth, even surface for your paint. It blocks any stains and prevents paint from soaking into the canvas. Gesso is the most common primer used for acrylic painting. Use a wide brush or roller to spread it evenly.
Apply one or two thin coats of gesso. Let each coat dry completely before adding the next. Sand lightly with fine sandpaper after the final coat. This step removes any bumps and creates a silky surface for your pine tree painting.
Primed surfaces help your colors stay bright and true. They also make blending easier and protect your artwork for years.
Sketching The Pine Tree
Sketching the pine tree is the first step in creating a beautiful acrylic painting. A clear sketch helps guide your brush and keeps your painting balanced. Start simple. Focus on the tree’s main shapes before adding details.
Sketching allows you to plan the trunk and branches. It helps you place the foliage correctly. Take your time to get the basic form right. A good sketch makes painting easier and more enjoyable.
Drawing The Trunk Outline
Begin by drawing a vertical line for the trunk. Make it slightly wider at the bottom. This gives the tree a strong base. Use light pencil strokes so you can erase if needed. The trunk should be straight but natural, not too perfect.
Keep the trunk narrow at the top. Pine trees have slender trunks that support the branches. Avoid thick or blocky shapes. This outline sets the tree’s height and position on your canvas.
Marking Branch Positions
Next, add branch lines extending from the trunk. Branches grow in a triangular shape, wider at the bottom. Draw them at different angles for a natural look. Use short, light lines to mark where branches will go.
Space the branches evenly but avoid symmetry. Pine trees have uneven, random branch patterns. These marks guide your brush strokes when painting needles and foliage. Keep the branch lines soft and simple at this stage.
Credit: www.craftsy.com
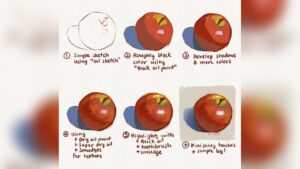
Painting The Trunk
Painting the trunk is a vital step in creating a realistic pine tree with acrylic paint. The trunk anchors the tree and shows its strength and texture. Focus on color and texture to bring the trunk to life.
Mixing Trunk Colors
Start by mixing a base color using burnt sienna and raw umber. These warm browns form a natural trunk color. Add a small amount of black for depth and shadow areas. For highlights, mix a lighter tone by adding white or yellow ochre. Test your colors on a palette to find a balanced look. Avoid pure black or pure white, as these can look unnatural. Layer the colors gently to create a rich, varied trunk color.
Adding Texture And Depth
Use a dry brush or fan brush to add texture to the trunk. Lightly drag the brush vertically to mimic bark patterns. Add darker lines and spots to show grooves and roughness. Apply highlights on the side where the light hits the trunk. Use short, uneven strokes to avoid a flat surface. Adding texture creates a three-dimensional effect that makes the trunk feel real and tactile.
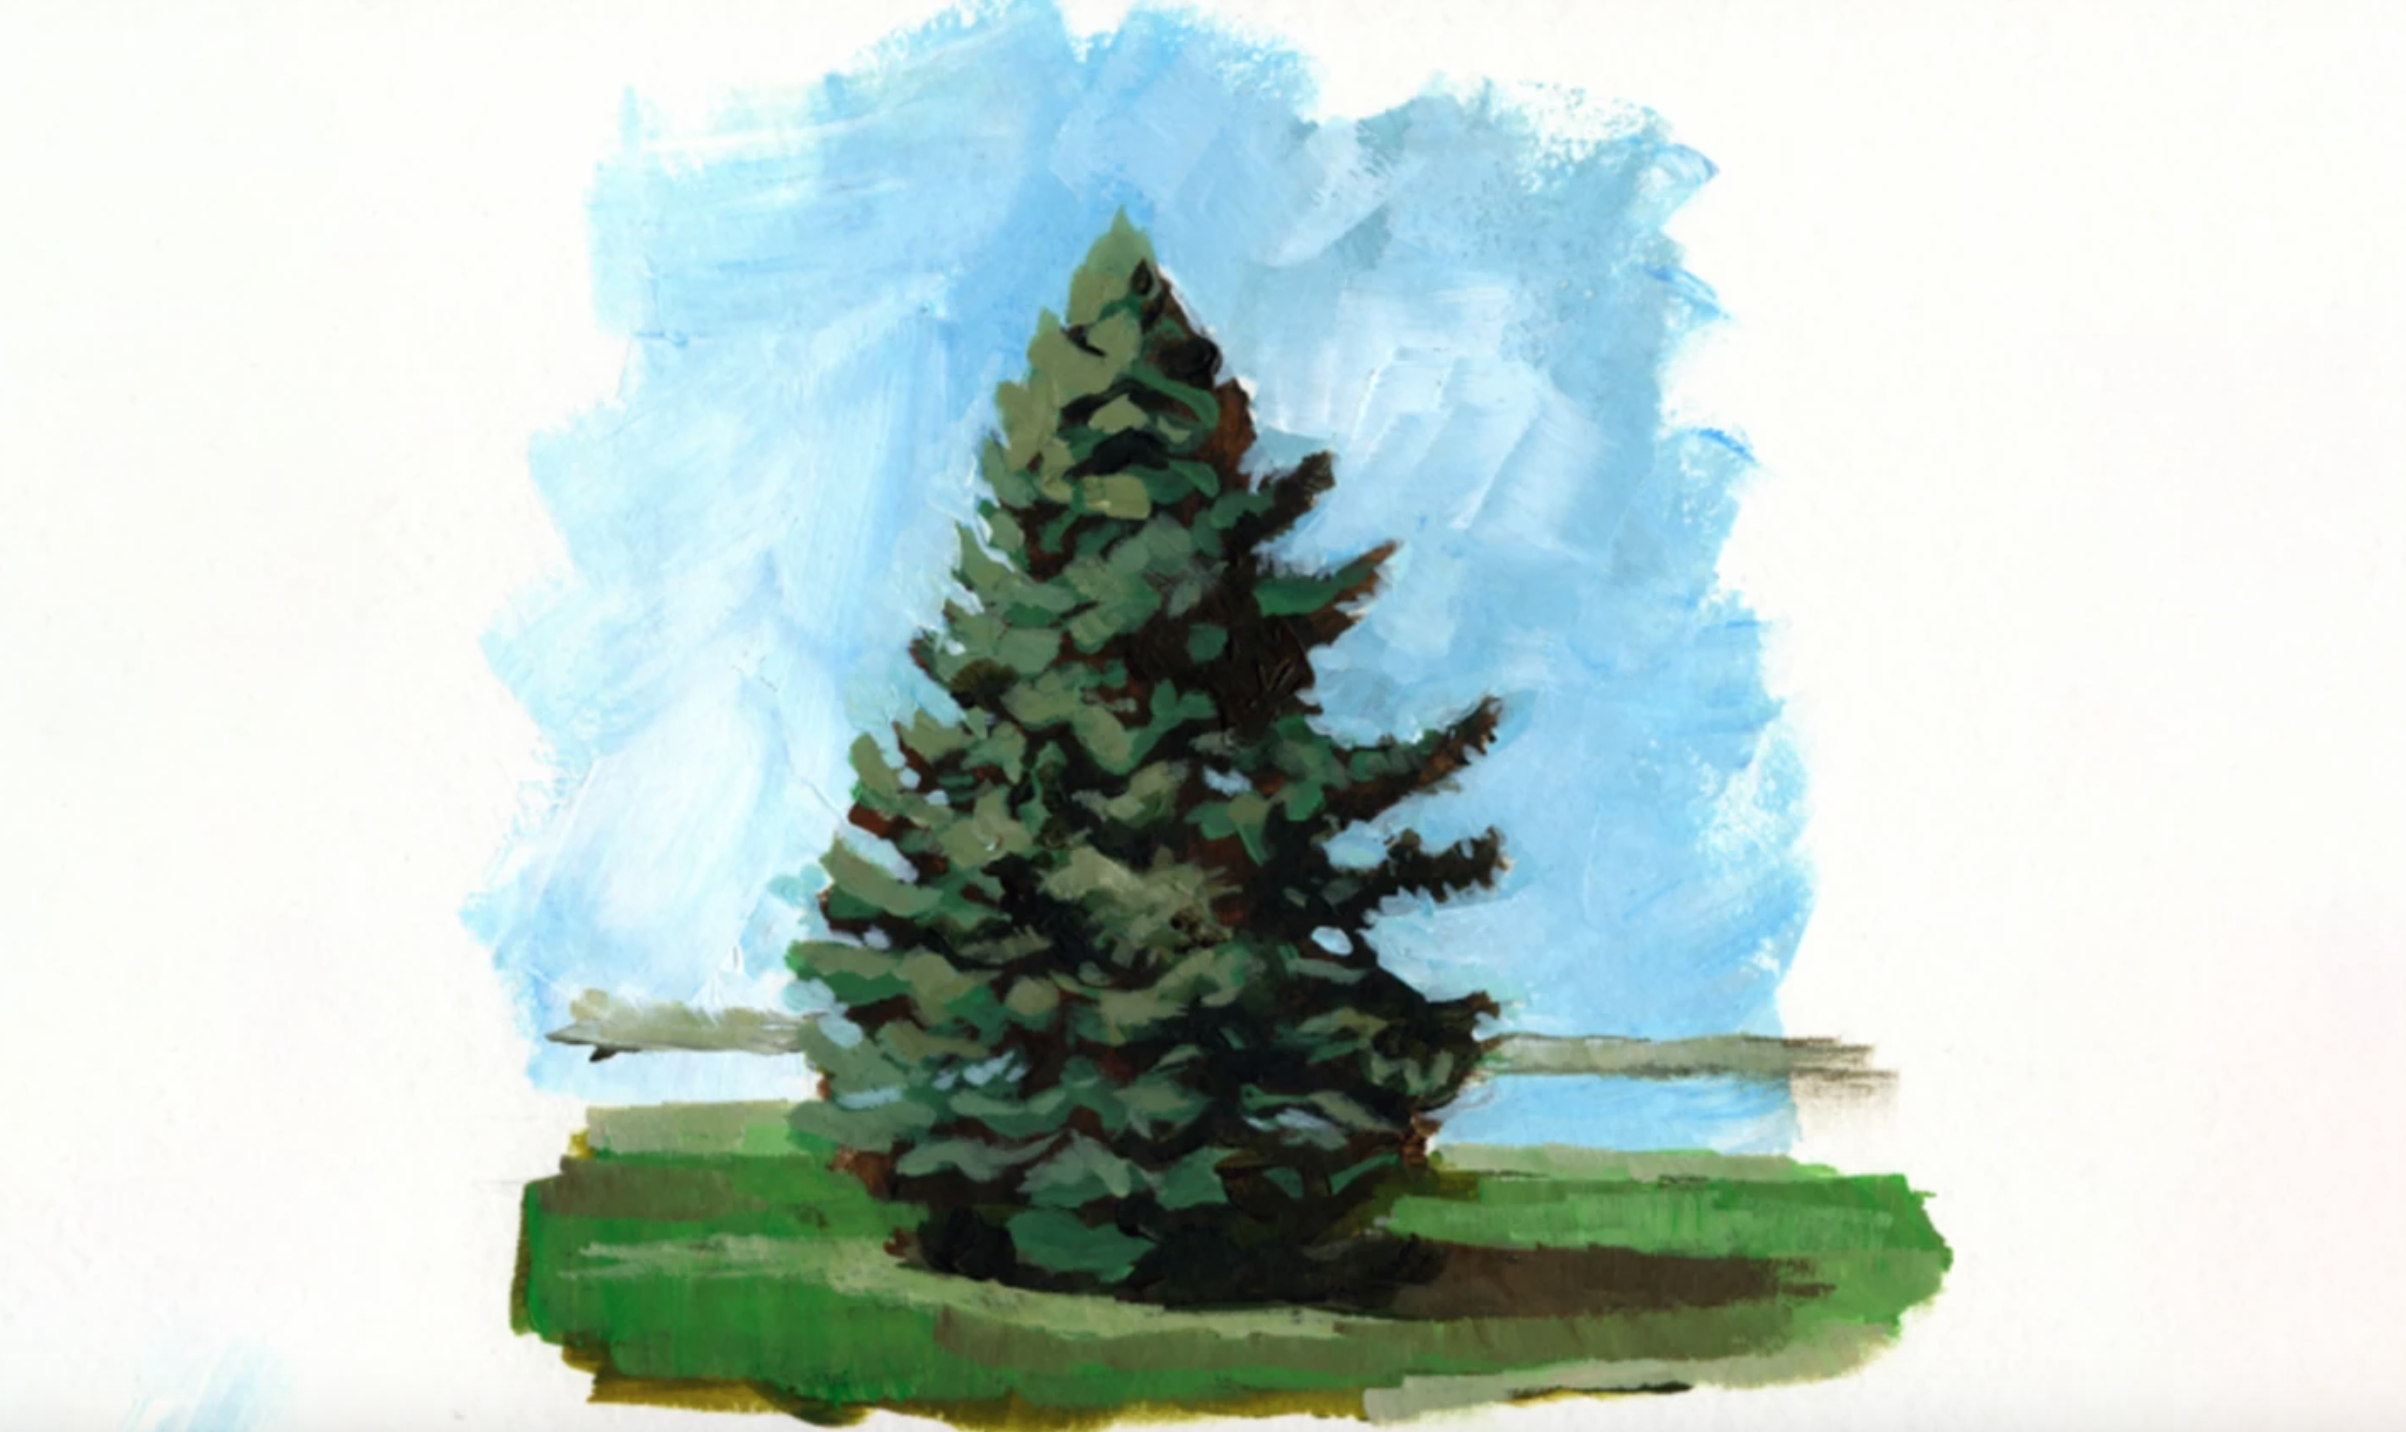
Creating Foliage Layers
Creating foliage layers is essential for painting realistic pine trees with acrylic paint. Layering builds depth and texture in the tree’s foliage. It helps to give the pine tree a natural look. Each layer uses different shades of green to show light and shadow. This step-by-step process makes your painting lively and three-dimensional.
Base Layer With Dark Greens
Start with a dark green base layer to form the tree’s shape. Use a stiff brush or fan brush to dab the paint. Focus on the areas where shadows fall. Cover the whole foliage area with this dark tone. Don’t worry about details yet. This layer creates the shadow and depth foundation for the pine tree.
Adding Mid-tone Highlights
Next, add mid-tone greens over the dark base. Use a lighter green shade and a smaller brush. Apply these highlights on branches and needles that catch some light. Use short, quick strokes to mimic pine needles. This step adds texture and dimension. It brings life to the foliage by showing mid-level lighting.
Final Light Highlights
Finish with the lightest green or yellow-green highlights. Use a fine brush for this delicate step. Paint small touches where sunlight hits the pine needles directly. Keep these highlights subtle to avoid harsh contrasts. This final layer gives your pine tree brightness and realism. It makes the foliage appear fresh and vibrant.

Credit: www.youtube.com
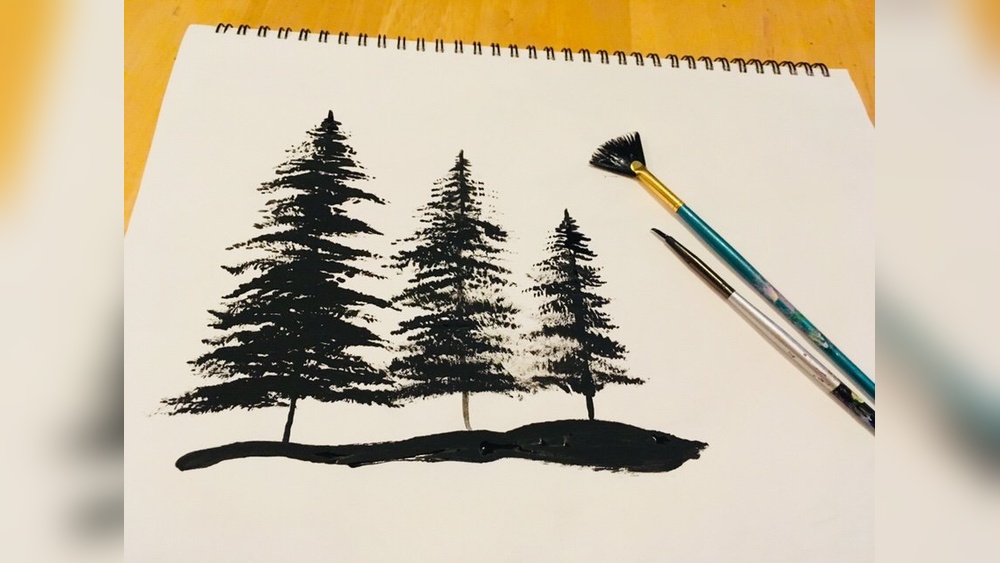
Brush Techniques
Brush techniques shape the texture and feel of your pine tree painting. Using different strokes creates depth and realism. Each method adds unique character to the needles and branches. Experimenting with these brush movements helps capture the natural look of pine trees.
Tapping And Stippling Motions
Tapping means gently pressing the brush onto the canvas. It creates small dots and rough textures. Stippling uses a similar motion but repeats it quickly to build clusters of dots. These techniques mimic pine needles’ dense, clustered look. Use a stiff fan or round brush for best results. Vary your tapping pressure to add shadow and light.
Short Upward Strokes
Short upward strokes imitate the shape of pine needles. Hold your brush near the base for control. Apply paint in quick, short lifts from the branch outward. This creates sharp, pointed foliage edges. Layer different green shades to enhance depth. Keep strokes close together to form thick needle groups.
Longer Drooping Strokes
Longer drooping strokes show hanging branches and needle clusters. Tilt your brush and pull it downward in a smooth motion. These strokes help paint the natural droop of pine branches. Use a slightly wet brush with thinner paint for softer edges. This technique adds flow and movement to your tree.
Shaping The Tree
Shaping the pine tree is a key step in creating a realistic acrylic painting. This stage helps define the tree’s overall form and structure. A well-shaped tree looks natural and balanced. It sets the foundation for adding details later. Focus on the basic shape first, then build depth and texture.
Forming A Conical Shape
Start by shaping the tree like a cone. Pine trees usually have a pointed top and wider base. Use broad brush strokes to outline this form. Keep the strokes loose and natural. Avoid making the edges too sharp. The cone shape guides the placement of branches and needles. It gives the tree a strong, clear silhouette.
Leaving Gaps For Depth
Do not fill the whole tree with paint at once. Leave small gaps between branches. These gaps create a sense of depth and space. Use a darker green for shadowed areas inside the tree. Paint lighter green or yellow-green on the outer edges. This contrast makes the tree look three-dimensional. Gaps also suggest light passing through the foliage.
Adding Final Details
Adding final details brings your pine tree painting to life. This stage refines the shapes and textures. It creates depth and realism by emphasizing light and natural effects. Small touches make your tree stand out and look complete.
Highlighting Sunlit Areas
Use a lighter green or yellow-green to show sunlit parts. Apply these highlights on the edges of branches facing the light source. Use a small brush for fine strokes. This adds brightness and makes the tree look three-dimensional. Blend softly into the darker greens for a natural glow.
Incorporating Snow Effects
Mix white paint with a tiny bit of blue for cold snow tones. Lightly dab the paint on branch tips and needle clusters. Use a dry brush or sponge for a soft texture. Snow effects add winter charm and contrast against the green. Keep snow patches uneven for a realistic look.
Common Mistakes To Avoid
Painting pine trees with acrylics can be rewarding but tricky. Avoiding common mistakes improves your final artwork and saves time. Many beginners rush the process or miss key steps. Understanding what to avoid helps create realistic, beautiful pine trees.
Skipping Large Shape Layers
Start with big shapes before details. These shapes form the tree’s main body and branches. Without them, the painting looks flat and confusing. Use a large brush to block in dark green and brown areas. Let these layers dry before adding smaller shapes.
This method builds depth and structure. It guides where the light and shadow go. Painting details too soon can ruin this effect. Take time to layer large shapes first for a strong base.
Overworking Details Too Early
Adding tiny needles or branches at the start causes frustration. Details need a solid foundation of colors underneath. Painting details too early can blend or smear previous work. Wait until the big shapes dry before working on fine lines.
Use a small brush for details, but only after large layers. This approach keeps the tree looking natural and clear. Patience helps your pine tree look lifelike without messy strokes.

Credit: stepbysteppainting.net
Tips For Realistic Pine Trees
Creating realistic pine trees with acrylic paint takes practice and careful technique. Small details make a big difference. Using the right approach helps your trees look natural and vibrant. These tips guide you through essential steps for lifelike results.
Focus on blending colors smoothly, using different green tones, and picking the correct brush. Each element adds depth and texture to your pine trees. Follow these tips to improve your painting skills.
Working Quickly For Color Blending
Acrylic paint dries fast, so work swiftly to blend colors. Apply wet paint over wet paint to create smooth transitions. This technique mimics the natural shading on pine needles. Avoid waiting too long between layers to keep edges soft.
Use quick, light strokes to mix greens on the canvas. This adds richness and depth to the tree’s foliage. Speed helps capture the subtle color changes found in real pine trees.
Using Multiple Green Shades
Use several green shades for a realistic effect. Mix dark greens for shadows and lighter greens for highlights. This contrast gives the tree a three-dimensional look. Add hints of yellow-green or blue-green for variety.
Layer these greens from dark to light to build texture. This layering imitates the way light hits pine branches. Avoid using a single green color; it makes the tree look flat and lifeless.
Selecting The Right Brush
Choose brushes that help create pine needle textures. A fan brush works well for fine, spread-out strokes. A flat brush helps block in larger shapes and branches. Small round brushes are good for adding details and highlights.
Brush choice affects the tree’s overall look. Using the correct brush makes painting faster and easier. Experiment with different brushes to find what suits your style best.
Frequently Asked Questions
Can You Paint Pine Wood With Acrylic Paint?
Yes, you can paint pine wood with acrylic paint. It adheres well and offers vibrant, durable finishes on pine surfaces.
What Are Common Tree Painting Mistakes?
Common tree painting mistakes include starting with details before shapes, ignoring light and shadow, using flat colors, and neglecting branch structure. Avoid overcrowding leaves and skipping texture for realism.
How To Make A Pine Tree In Painting?
Sketch a narrow trunk with dark brown paint. Use a stiff brush to dab dark green foliage from top down. Layer lighter greens for highlights. Create a triangular shape with gaps for depth. Add light green or yellow highlights to show sunlight.
Can I Paint Pine Wood Without Primer?
Yes, you can paint pine wood without primer, but applying primer improves paint adhesion and ensures a smooth, even finish.
Conclusion
Painting pine trees with acrylics can be simple and enjoyable. Start with basic shapes before adding details. Use layers of green to create depth and light. A stiff brush helps mimic pine needles well. Practice helps improve your strokes and color blending.
Keep your strokes short and natural for best results. Enjoy the process and watch your pine trees come alive on canvas. Painting this way builds skill and confidence over time.