
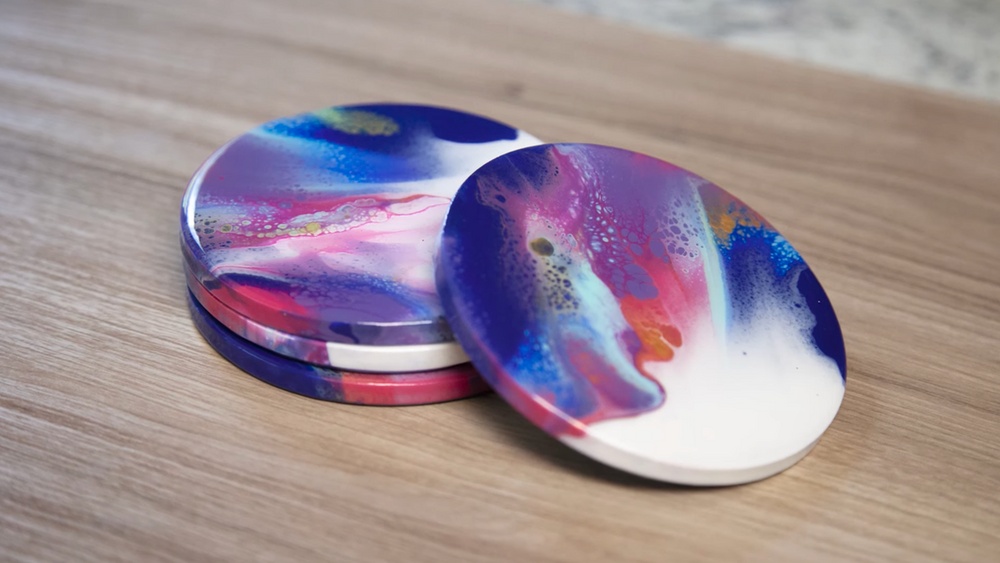
Quick answer: To make DIY acrylic pour coasters, seal clean ceramic tiles with a primer or gesso, mix fluid acrylics with a pouring medium to a warm-honey consistency, pour using a dirty cup or flip cup, then tilt to cover each tile and let it cure for at least 72 hours. Finish with a heat-resistant topcoat such as two-part epoxy resin or several coats of water-based polyurethane, and add cork or felt pads underneath so the coasters do not scratch furniture.
DIY acrylic pour coasters are one of the most forgiving fluid art projects you can try. A 4-inch tile is small enough that a single cup of paint covers four to six of them, and a failed pour costs a few cents of paint rather than a ruined canvas. The catch is that a coaster has a job to do: it sits under wet glasses and hot mugs. That means the prep and the sealing matter just as much as the pour itself.
This guide walks through the whole process in order, from choosing tiles to the final topcoat, with the mixing ratios, drying times and fixes that most short tutorials skip. If you are new to fluid art in general, our main guide to acrylic pour painting techniques covers the underlying methods in more depth.
What Is Acrylic Pour Painting (and Why It Suits Coasters)?
Acrylic pouring is a fluid art method where thinned acrylic paint is poured onto a surface instead of brushed. Each color is mixed with a pouring medium so it flows smoothly and levels itself, and the colors interact as they move. Cells, lacing and soft color blends appear because paints of slightly different densities push through one another.
Coasters suit this technique well for three reasons. First, the small surface lets you test color palettes quickly. Second, tiles are rigid, so they do not sag in the middle the way unbraced canvas can, which keeps paint from pooling. Third, ceramic, cork-backed and wood blanks are cheap and easy to find at hardware and craft stores.
If you are still wondering whether standard tube or craft acrylics will work at all, the short answer is yes, as long as you thin them correctly. Our explainer on whether you can do a paint pour with acrylic paint goes through which paint bodies behave best.
Materials Needed for Acrylic Pour Painting Coasters
Here is a complete materials list for a batch of six coasters. You can scale it up easily; the paint amounts roughly double for every additional six tiles.
| Item | What to look for | Why it matters |
|---|---|---|
| Ceramic tiles (4.25 in square is common) | Unglazed or matte-glazed bisque tiles, or glazed tiles you will scuff | Paint needs some tooth to grip; slick glazed tiles can peel |
| Fluid or soft-body acrylics | 3 to 5 colors plus white | Pre-thinned paints need less medium and mix faster |
| Pouring medium | Commercial pouring medium or a PVA glue mix | Keeps color strong while improving flow and reducing cracking |
| Silicone oil (optional) | Treadmill lubricant or pure silicone | Encourages cell formation |
| Cups and stir sticks | Plastic or paper cups, craft sticks | One cup per color plus one pour cup |
| Raised supports | Push pins, plastic cups or a cooling rack | Lets excess paint drip off the edges |
| Drop cloth and tray | Plastic sheeting, a baking sheet or a storage lid | Pours are messy; runoff can be scraped and reused |
| Kitchen torch or heat gun | Small butane torch or craft heat gun | Pops bubbles and helps cells rise |
| Topcoat | Two-part epoxy resin or water-based polyurethane | Waterproofs and protects against heat and moisture |
| Cork or felt backing | Self-adhesive cork sheets or felt dots | Protects tabletops and keeps tiles from sliding |
Gloves and a respirator are worth considering if you plan to use resin. Epoxy vapors and skin contact can cause sensitization over time, so follow the safety instructions on whatever product you buy and work in a ventilated room.
Fluid Art Coaster Kits vs. Building Your Own Supplies
Fluid art coaster kits bundle tiles, pre-mixed pouring paint and sometimes cork backing in one box. A ready-to-pour acrylic pouring paint set is convenient for a first attempt because the consistency is already correct, so you can focus on technique. The trade-off is fewer color choices and a higher cost per ounce than mixing your own.
Building your own setup gives you control over color and density, and it is cheaper once you pour regularly. A reasonable approach is to start with a pre-mixed set to learn what the right consistency looks and feels like, then replicate it yourself. Iridescent and metallic acrylic pour paint supplies are fun accents, but add them as one color among several rather than the whole palette, since metallic pigments can look muddy when they dominate.
Step 1: Prepare the Tiles
Preparation is the step most people rush, and it is the main reason coaster paint peels or chips later. Glazed tiles are designed to repel things, which is great for a bathroom wall and bad for paint adhesion.
- Wash and dry. Wipe each tile with warm, soapy water, rinse and dry completely. Follow with a wipe of rubbing alcohol to remove any oils from handling.
- Scuff glossy surfaces. If your tiles are glazed, lightly sand the face with 220-grit sandpaper until the shine dulls. You are not trying to remove the glaze, just give it texture.
- Prime. Brush on one or two thin coats of acrylic gesso or a bonding primer made for slick surfaces. Let it dry fully, usually a few hours.
- Tape the back. Cover the underside with painter’s tape. When you peel it off later, any drips go with it, leaving a clean base for cork.
- Elevate. Set each tile on a support so it sits at least an inch above your tray. Paint will run over the edges, and the tile should not sit in that runoff.
Unglazed bisque tiles are more absorbent. Prime them as well, because raw ceramic will soak water out of the paint unevenly and can cause dull patches.
Step 2: Mix Your Pouring Paint
The goal is a consistency often described as warm honey or melted ice cream. When you lift your stir stick, the paint should fall in a steady ribbon that briefly sits on the surface before sinking back in.
Pouring Medium for Acrylic Paint: DIY and Commercial Ratios
Ratios depend on how thick your paint starts out. These are well-established starting points, not exact rules, so adjust by eye.
| Paint type | Paint to pouring medium | Water |
|---|---|---|
| Heavy body acrylic | 1 : 2 | Small splashes until it flows |
| Soft body or craft acrylic | 1 : 1 to 1 : 1.5 | A little, as needed |
| Fluid acrylic | 1 : 1 | Usually none, or very little |
A common DIY pouring medium is PVA glue (white school or craft glue) thinned with water at roughly 60 percent glue to 40 percent water. It works for practice, but PVA can yellow over time and may not bond as reliably as an acrylic polymer medium. For coasters that will be used daily, an acrylic-based pouring medium is the safer choice.
Mix each color in its own cup. Stir slowly to avoid whipping air into the paint, then let the cups rest for 10 to 15 minutes so bubbles can rise. Many pourers mix the night before and stir gently again in the morning.
Adding Silicone for Cells
If you want cells, add one or two drops of silicone oil to each color except your base white, and fold it in with only two or three stirs. Over-stirring breaks the silicone into tiny droplets that make small, scattered cells instead of bold ones. Silicone is optional; many beautiful coasters have no cells at all.
What About Gel Medium or Paint Retarder?
Readers often ask how to use gel medium in an acrylic pour. Gel medium is thick and is better suited to texture work than pouring, because it slows flow. A small amount can thicken one color so it sits on top, but most pourers leave it out entirely.
Similarly, an acrylic paint retarder (or a DIY retarder made with a few drops of glycerin) extends working time. On a small coaster, longer open time is rarely needed and can make the paint more prone to crazing as it dries slowly. Skip it unless you are working in very hot, dry conditions.
Step 3: Choose a Pour Technique
All of the classic pour methods work on tiles. These three are the most reliable for a small surface.
Dirty Cup Pour
Layer your colors in a single cup, pouring each one down the side so they stack rather than mix. Fill the cup about two-thirds. Then pour the stacked paint slowly over the center of the tile, moving in a small circle. This is the best place for an acrylic paint pour beginner to start because it is predictable.
Flip Cup
Layer the colors the same way, place the tile face-down on the cup, and flip both together. Let the cup sit for 20 to 30 seconds so the paint settles, then lift it straight up. The paint floods out in a circle that you tilt to the edges. Flip cups tend to produce more cells on small surfaces.
Puddle Pour
Pour each color one at a time into the center, each new puddle landing inside the last, like a bullseye. Tilting stretches the rings into organic shapes. Puddle pours create soft, flowing bands that look elegant on a set of matching coasters.
Step 4: Pour and Tilt the Coaster
Here is the actual sequence for how to do an acrylic pour on a coaster:
- Coat the tile with a thin layer of white or base paint first. This “primer layer” helps the top colors glide to the edges.
- Pour your cup using whichever technique you picked, keeping the stream near the middle.
- Pick up the tile carefully and tilt it slowly in each direction until paint flows over all four edges. Tilt gently; jerky movements stretch cells into streaks.
- Use a gloved fingertip or a craft stick to coat the sides and corners. Uncovered edges look unfinished and give moisture a place to sneak under the topcoat.
- Pass a torch or heat gun quickly over the surface, about 4 to 6 inches away, to pop bubbles. Keep it moving and stop after a few seconds; overheating can scorch the paint.
- Set the tile back on its support and check it is level using a small bubble level.
Pour all of your coasters in one session if you want them to look like a set. Use the same cup recipe but expect each one to differ; that variation is part of the appeal.
How Long Does Acrylic Pour Paint Take to Dry?
Acrylic pour paint usually feels dry to the touch in 24 to 48 hours, but it is not fully cured until much later. The thick layer means water has to evaporate from deep inside, which takes time.
| Stage | Typical time | What you can do |
|---|---|---|
| Surface skin forms | 1 to 3 hours | Do not touch; dust will still stick |
| Touch dry | 24 to 48 hours | Move carefully, peel back tape |
| Ready for topcoat | About 72 hours minimum | Apply polyurethane or resin |
| Fully cured | Up to 2 to 4 weeks | Paint layer reaches full hardness |
Humidity, temperature and paint thickness change these numbers. Cool, damp rooms slow drying considerably. Avoid forcing it with a hair dryer on high heat, which can skin the top while the paint underneath stays soft, leading to cracks. Cover drying tiles loosely with a box to keep dust and pet hair off.
Step 5: Seal Your Coasters
An unsealed acrylic surface is water-resistant once dry but not waterproof enough for a sweating glass night after night, and it can soften under a hot mug. Sealing is not optional for coasters.
Option A: Epoxy Resin
Two-part epoxy resin gives the thick, glassy finish that most people picture. Mix the resin and hardener exactly as directed, usually 1:1 by volume, and stir for the full recommended time. Pour a small amount onto the center of each tile and spread it to the edges with a gloved finger or a craft stick. Torch briefly to remove bubbles.
Check the heat rating of the product you buy. Many general-purpose resins soften at temperatures around those of a fresh cup of coffee, so look for one marketed as heat resistant if the coasters will hold hot drinks. Resin also needs dust-free curing, usually 24 to 72 hours depending on the brand.
Option B: Water-Based Polyurethane
If resin feels like too much, three to four thin coats of water-based polyurethane or a clear acrylic varnish rated for furniture will protect the coasters well. Brush or spray each coat, let it dry according to the label, and lightly sand with very fine grit between coats for a smoother finish. This approach is less glossy and less heat resistant than good resin but is easier and lower in odor.
Avoid These Sealers
Spray sealers labeled for decorative crafts only, such as some matte fixatives, are not built for moisture and repeated handling. Oil-based polyurethane works but tends to yellow over white paint, which shows clearly on light pours.
Step 6: Finish the Back
Once the topcoat is fully cured, peel off the painter’s tape. Scrape any drips from the edges with a craft knife. Then cut cork sheet into squares slightly smaller than the tile and press it on, or add four felt dots at the corners. Cork has the advantage of soaking up a small amount of condensation that runs down the glass.
Troubleshooting Acrylic Pouring Tile Coasters
| Problem | Likely cause | Fix next time |
|---|---|---|
| Paint peels off the tile | Glazed surface not scuffed or primed | Sand and prime with gesso or a bonding primer |
| Cracks or crazing | Paint too thin, too much water, or forced drying | Use more medium and less water; dry at room temperature |
| Muddy colors | Too much stirring or too many similar mid-tones | Use contrasting values and pour without extra mixing |
| No cells forming | Paints too thick or all the same density | Thin slightly, add silicone, use a heavier white |
| Bare corners | Not enough paint or not tilted far enough | Pour a little extra; finish edges by hand |
| Sticky topcoat | Resin mixed off-ratio or room too cold | Measure precisely and cure in a warm room |
| White rings from mugs | Topcoat softening from heat | Choose a heat-rated resin or add more poly coats |
Common Mistakes Beginners Make
- Skipping the base layer. Without a thin coat of white first, top colors grab the tile and refuse to flow.
- Pouring on a non-level surface. Even a slight slope sends paint off one edge and leaves the opposite side thin.
- Using too many colors. Three colors plus white is usually more striking than six that blend into gray.
- Sealing too early. Trapping moisture under resin or poly can cause cloudiness or bubbling.
- Throwing away runoff. Leftover paint from the tray can be swiped onto spare tiles or let dry into “paint skins” for collage work.
Color Ideas That Work Well on Coasters
Small surfaces reward contrast. A few palettes that tend to read clearly at coaster size:
- Ocean: navy, turquoise, white and a touch of metallic gold.
- Desert: terracotta, sand, sage green and cream.
- Monochrome: black, gray, white and one pop color such as red.
- Jewel tones: emerald, deep purple, magenta and white.
- Soft pastels: blush, mint, pale blue and white with an iridescent accent.
Keep a notebook of each cup recipe, including colors, order and silicone use. When a coaster turns out perfectly, you will be able to make another set.
Storing Leftover Paint
Mixed pouring paint stays usable for several weeks if stored airtight. Small squeeze bottles or jars with tight lids work well. Label each with the color and date. Stir gently before reusing, and add a splash of pouring medium if it has thickened. If you see mold or a sour smell, discard it.
Related Reading
FAQs
What are the best supplies for acrylic pour painting coasters?
At minimum you need tiles, three to five acrylic colors, a pouring medium, cups, stir sticks, raised supports and a heat-resistant topcoat. A torch and silicone oil are helpful extras. For specific paint recommendations, see our acrylic pour painting guide.
Can I use regular craft acrylic paint for coasters?
Yes. Craft acrylics work well once mixed with a pouring medium at roughly a 1:1 ratio. They have less pigment than artist-grade paint, so colors may be slightly less intense, but they are a good, low-cost way to practice.
Are acrylic pour coasters waterproof?
Not on their own. Dried acrylic resists water briefly, but coasters need a sealing coat of epoxy resin or several coats of polyurethane to stand up to condensation and spills over time.
Can I put hot mugs on acrylic pour coasters?
Only if the topcoat can handle heat. Many standard resins soften around hot-drink temperatures, so choose a resin labeled heat resistant, or use the coasters mainly for cold drinks.
Why did my acrylic pour coaster crack?
Cracking usually comes from paint that was thinned with too much water, layers that were very thick, or drying that was sped up with heat. Use more pouring medium and less water, and let tiles dry slowly at room temperature.
Do acrylic pour coasters need to be food safe?
Coasters do not contact food directly, so food-safe certification is not usually required. If you want extra reassurance, some resins are marketed as food-contact safe once fully cured; check the manufacturer’s documentation.
Next Step
Once you have poured a set of coasters, you have practiced the core skills behind almost every fluid art project: mixing to the right consistency, layering colors, tilting and sealing. Those same skills scale up to canvases, trays and wall panels. To explore cells, swipes, string pulls and other methods in depth, head to our complete guide on transforming your art with acrylic pour painting, which also covers the paint and medium choices that give the cleanest results.



One Comment