
Imagine capturing the beauty of a sky that feels alive—vibrant clouds, glowing light, and the perfect atmosphere all coming together in your digital painting. You might think painting skies and atmospheres is tricky, but with the right techniques, you can create stunning scenes that draw viewers in every time.
In this guide, you’ll learn how to paint digital skies and atmospheres step-by-step, using simple methods that anyone can master. Ready to transform your artwork and make your skies truly unforgettable? Let’s dive in and bring your digital skies to life!

Credit: www.vecteezy.com
Color Choices For Digital Skies
Choosing the right colors is key to painting digital skies that feel real and alive. Colors set the mood and show the time of day or type of weather. Thoughtful color choices create a deep, believable atmosphere that draws viewers in. Understanding how colors work together helps you craft skies that tell a story.
Selecting Base Colors
Start with simple base colors. Blue is the most common for clear skies. Use lighter blues for daytime and darker blues for twilight. Add soft whites or pale yellows for clouds or sunlight. Pick colors that feel natural but also fit the mood you want. Keep your base colors soft to allow smooth blending later.
Using Color To Convey Time And Weather
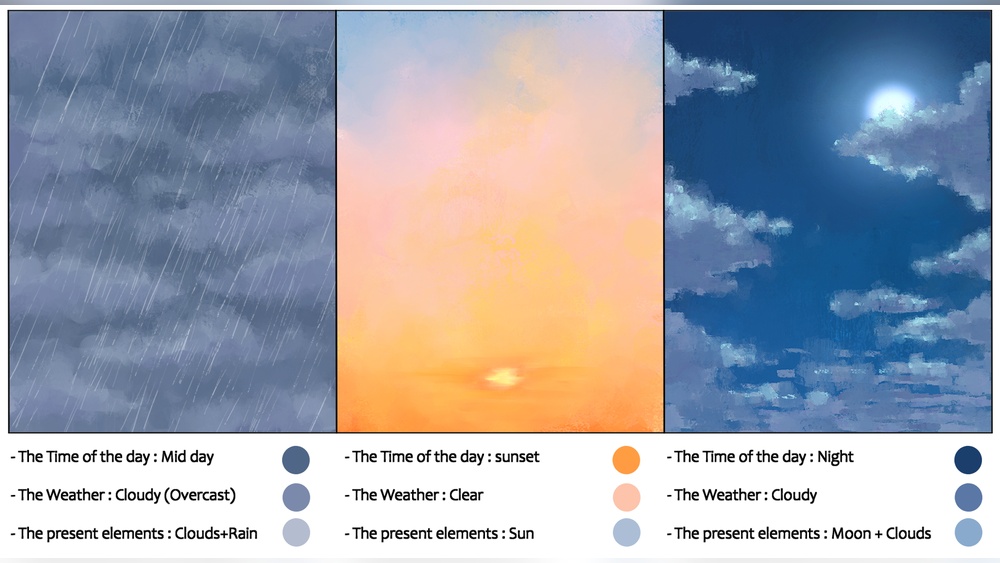
Colors change with time and weather. Warm oranges and reds show sunrise or sunset. Cool grays and muted blues suggest cloudy or rainy skies. Bright, clear colors work for midday. Use gentle color shifts to hint at fog or haze. Think about how light changes the sky’s color throughout the day.
Mixing For Atmospheric Depth
Mix colors to add depth and dimension. Blend your base colors with lighter tints near the horizon. Use more saturated colors up high and softer shades down low. Add subtle gradients to mimic light scattering in the atmosphere. This layering creates a sense of distance and space in your digital sky.

Credit: www.dreamstime.com
Building Sky Layers
Building sky layers is essential for a realistic digital sky and atmosphere. It creates depth and mood in your artwork. Layering helps to simulate the vastness and softness of the sky. Each layer adds different tones and effects. These steps guide you through the process clearly.
Starting With A Dark Base
Begin your sky with a dark base layer. Use deep blues or dark grays depending on your scene. This sets the mood and contrast for lighter layers. It also helps to define the overall shape and depth of the sky. Paint smoothly to avoid harsh edges at this stage.
Creating Smooth Gradients
Next, add smooth gradients to transition colors naturally. Blend from dark to lighter tones upwards or sideways. This mimics the natural light scattering in the atmosphere. Use a soft brush or gradient tool for seamless blending. Gradients give the sky a soft, glowing look.
Layering For Depth And Glow
Apply multiple layers with varying opacity for depth and glow. Add light colors near the horizon or where the sun hits. Use soft brushes to create glowing effects and subtle highlights. Layer clouds or mist with lighter tones on top. This layering technique makes the sky feel alive and three-dimensional.
Painting Clouds Digitally
Painting clouds digitally creates depth and mood in your sky scenes. It brings life and realism to your digital skies. Clouds vary in shape, texture, and light. Capturing these details makes your artwork stand out. Focus on shape, light, and texture to paint convincing clouds.
Cloud Shapes And Forms
Start by sketching basic cloud shapes. Use soft, rounded forms for fluffy clouds. Layer multiple shapes to add volume. Avoid perfect circles; clouds have irregular edges. Observe real clouds to capture natural forms. Use brushes with soft edges to blend shapes smoothly.
Adding Highlights And Shadows
Light gives clouds their 3D look. Add highlights where light hits the cloud. Use a bright color with a soft brush for highlights. Shadows create depth and contrast. Use cooler or darker tones for shadows. Blend shadows gently into the midtones for realism. Keep light direction consistent across the scene.
Using Textures For Realism
Texture adds detail and interest to clouds. Use textured brushes to mimic fluff and wisps. Vary brush size and opacity for natural variation. Add small details like soft edges and thin streaks. Avoid over-texturing to keep clouds soft. Layer textures to build complexity and richness.
Techniques For Atmospheric Effects
Creating atmospheric effects in digital sky painting adds depth and mood. These effects make scenes feel alive and believable. Understanding simple techniques can help you paint skies that look natural and dynamic.
Focus on how light interacts with air, moisture, and particles. Use layers and colors to suggest distance and weather changes. This section explains key methods to achieve these effects.
Simulating Mist And Haze
Mist and haze soften the horizon and distant objects. Use low-opacity brushes with light gray or pale blue tones. Apply multiple thin layers to build a gradual fade. Blur edges gently to avoid hard lines. This creates a sense of depth and atmosphere.
Adjust opacity to control the density of the mist. Adding subtle color shifts helps simulate light passing through moisture. Keep the foreground clear and the background hazy to show distance.
Incorporating Light Scattering
Light scattering makes the sky glow and colors blend naturally. Paint soft gradients from warm near the sun to cool tones away from it. Use radial gradients and airbrush tools to mimic sunlight diffusion. Add faint glows around bright areas.
Include subtle color shifts in clouds and sky to reflect scattered light. This technique gives a realistic glow and enhances mood. Avoid harsh contrasts in these areas for smooth transitions.
Adding Rain And Weather Elements
Rain and weather add drama and realism to your sky. Paint thin, diagonal lines or streaks with a low-opacity brush for rain. Use motion blur to show falling drops. Darken clouds with cool gray and blue tones for stormy weather.
Include reflections or wet surfaces if visible. Lighten areas where lightning or sun breaks through clouds. Small details like raindrops and raindrop splashes increase realism.
Lighting And Mood In Skies
Lighting and mood are key in painting digital skies and atmospheres. They set the tone of the scene and affect how viewers feel. Proper use of light can bring depth and realism. Mood shapes the story behind the sky, whether calm or dramatic. Understanding these elements helps create more engaging and believable skies.
Using Light To Define Atmosphere
Light defines the atmosphere by showing time of day and weather. Soft, diffused light suggests fog or mist. Sharp, bright light indicates clear skies. Positioning the light source creates shadows and highlights on clouds. This contrast adds depth and volume. Use light intensity to show the atmosphere’s density.
Color Shifts With Different Lighting
Colors shift as lighting changes throughout the day. Morning light has warm oranges and pinks. Midday light is bright with cool blues. Evening light turns skies into deep reds and purples. Cloud colors also change with light angle and strength. Use gradients to blend these shifts smoothly. This makes the sky look natural and alive.
Creating Dramatic Or Calm Moods
Lighting affects the mood of the sky strongly. Bright, warm light creates a peaceful and calm scene. Dark, heavy clouds with scattered light form a dramatic atmosphere. Use contrasts between light and shadow for tension. Soft light and pastel colors bring a gentle, quiet mood. Choose lighting based on the emotion you want to evoke.

Credit: pngtree.com
Tools And Brushes For Sky Painting
Painting a digital sky and atmosphere requires the right tools and brushes to achieve natural, beautiful effects. The sky is vast and subtle, so your brushes must help create smooth gradients, soft clouds, and dynamic lighting. Choosing suitable brushes improves workflow and brings life to your digital skies.
Experimenting with brush types and settings opens more creative possibilities. Each brush plays a role in shaping different parts of the sky, from soft hazes to sharp edges. Understanding how to use these tools effectively makes your sky paintings more realistic and vivid.
Recommended Digital Brushes
Soft round brushes are perfect for smooth gradients and blending sky colors. Use textured brushes to add cloud details and atmospheric effects. Airbrushes help create gentle light glows and subtle shifts in hue. Some artists prefer scatter brushes to mimic random cloud patterns. A mix of these brushes covers most sky painting needs.
Using Opacity And Blending Modes
Adjusting brush opacity allows smooth layering of colors, creating depth in the sky. Lower opacity helps build soft transitions without harsh lines. Blending modes like Multiply or Screen change how colors mix, adding richness or brightness. Experiment with these modes to enhance atmosphere and light effects naturally.
Custom Brush Tips
Create custom brushes with unique shapes to paint clouds and atmospheric textures faster. Use brush settings like spacing and jitter for varied strokes. Save brushes with specific opacity and flow for quick access. Custom brushes reduce repetitive work and help capture the sky’s organic look easily.
Composition Tips For Sky Scenes
Creating a stunning digital sky and atmosphere depends heavily on good composition. The way you arrange elements guides the viewer’s eye and sets the mood. Thoughtful composition makes your sky scenes feel balanced and immersive. Simple rules can help you place the sky and landscape in harmony. It also helps define clear focal points and realistic perspectives. Use these tips to improve your sky paintings and create strong, engaging artwork.
Balancing Sky And Landscape
Balance between sky and landscape keeps the scene natural. Avoid letting the sky dominate or feel too empty. Try dividing your canvas using the rule of thirds. Place the horizon line on the lower or upper third to give space for the sky or land. Use colors and contrast to balance the lightness and darkness. This creates a sense of harmony and depth in your painting.
Focal Points In Atmospheric Paintings
Focal points attract attention and add interest to your sky scenes. Use elements like bright clouds, sun rays, or birds to create these points. Position focal points away from the center for a dynamic look. Use color contrast and sharp details to make them stand out. A clear focal point guides the viewer and strengthens the composition.
Planning Horizon And Perspective
The horizon line anchors your scene and sets perspective. Place it carefully to control the viewer’s eye level. A low horizon emphasizes the sky’s vastness. A high horizon focuses more on the landscape. Use perspective lines to add depth and scale. Adding atmospheric haze near the horizon enhances realism and distance. Planning these elements creates a believable and inviting sky.
Frequently Asked Questions
How To Paint Atmospheric Skies?
Start with a gradient base using blues and whites. Add soft, blended clouds with varied opacity. Use warm tones near the horizon for depth. Layer colors to create light diffusion. Finish by highlighting edges where light hits, enhancing realism and atmosphere.
What Is The 80/20 Rule In Painting?
The 80/20 rule in painting means focusing 80% effort on preparation and 20% on actual painting to improve quality efficiently.
What Is The 70 30 Rule In Art?
The 70 30 rule in art suggests dedicating 70% of a composition to the main subject and 30% to the background. This balance enhances focus and visual appeal in artworks.
How To Create An Atmosphere In Painting?
Create atmosphere in painting by using gradual value shifts, softer edges, and muted colors for depth. Layer colors to mimic light and air effects. Add haze or mist to distant objects. Use contrasts and lighting to enhance mood and realism.
Conclusion
Painting a digital sky and atmosphere can bring your artwork to life. Focus on simple color blends and light effects. Use soft brushes to create smooth transitions in the sky. Add layers to build depth and mood. Study real skies to understand light and shadow.
Keep practicing to improve your skills over time. Enjoy the process and watch your digital scenes become more vivid and real.


