

If you want to take your Procreate artwork from good to stunning, mastering adjustment layers is a game-changer. Imagine being able to tweak colors, brightness, and contrast without permanently changing your original drawing.
Sounds useful, right? In this guide, you’ll discover exactly how to use adjustment layers in Procreate to enhance your art with ease and flexibility. Whether you’re a beginner or looking to sharpen your skills, learning these simple steps will help you create vibrant, polished pieces that stand out.
Ready to unlock new creative possibilities? Let’s dive in!

Credit: www.youtube.com
Adjustment Tools In Procreate
Adjustment tools in Procreate help you change colors and effects easily. They let you tweak your artwork without changing the original layers. Using these tools gives you control over the look of your design. This way, you can fix or improve colors, brightness, and other details quickly.
Procreate offers many adjustment options. Each tool serves a different purpose. You can find tools for simple color fixes or more advanced effects. Learning to use them will improve your digital art skills.
Hue, Saturation, And Brightness
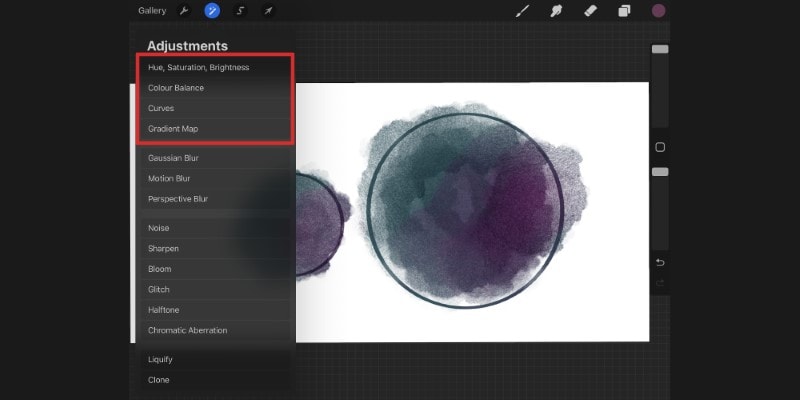
The Hue, Saturation, and Brightness tool lets you change color tones. Hue shifts colors to different shades. Saturation controls how strong or weak colors appear. Brightness adjusts the light or dark levels of your image. This tool is perfect for quick color corrections. It helps you create the mood you want in your artwork.
Color Balance And Curves
Color Balance changes the colors in shadows, midtones, and highlights. It helps fix color casts or set a color mood. Curves allow precise control over brightness and contrast. You adjust points on the curve to lighten or darken parts of the image. Both tools work well for detailed color grading and enhancing depth.
Gaussian Blur And Other Effects
Gaussian Blur softens edges and smooths details. It helps create focus by blurring backgrounds or parts of your art. Other effects include sharpening, noise reduction, and bloom. These effects add texture or clarity to your artwork. Use them carefully to improve your piece without overdoing it.
Credit: doncorgi.com
Creating Adjustment Layers
Creating adjustment layers in Procreate is a smart way to edit your artwork without changing the original image. Procreate does not have true adjustment layers like some other software. But you can simulate them using simple techniques. These methods help keep your edits flexible and easy to change.
This section explains how to simulate adjustment layers and use layer groups for non-destructive edits. Both techniques help you maintain control over your work and make changes anytime.
Simulating Adjustment Layers
Procreate lacks built-in adjustment layers, but you can create similar effects. Start by duplicating your artwork layer. Apply adjustments to the duplicate instead of the original. Use blending modes and opacity sliders to blend the changes smoothly.
This way, you keep the original layer safe. You can toggle visibility or delete the adjustment layer anytime. It gives you freedom to experiment without permanent changes.
Using Layer Groups For Non-destructive Edits
Organize your adjustment layers inside layer groups. Group all related layers to keep your workspace clean. This helps manage complex edits by keeping adjustment layers separate from your base artwork.
Layer groups let you apply changes to multiple layers at once. You can move, resize, or adjust the entire group without affecting individual layers. This method keeps your edits flexible and reversible.
Applying Adjustments Non-destructively
Applying adjustments non-destructively keeps your original artwork safe. You can experiment without losing any detail or color. This method allows easy changes anytime during your creative process. Procreate does not have true adjustment layers like some programs. But you can mimic this effect by using smart techniques.
Duplicating Layers Before Adjustments
Always duplicate your layer before applying any adjustment. This step creates a backup of your original image. Work on the copied layer to protect your base art. If you do not like the result, simply hide or delete the duplicate. It keeps your project flexible and safe from mistakes.
To duplicate a layer in Procreate, swipe left on the layer and tap “Duplicate.” Use the duplicate for all color or effect changes. Your original layer stays untouched below.
Blending Modes And Opacity Control
Use blending modes to control how adjustments affect your art. Modes like Multiply, Screen, or Overlay change colors differently. Experiment with these to find the best effect for your piece. Adjust the opacity of the layer to make changes subtle or strong.
Lowering opacity softens the adjustment effect, keeping details clear. You can combine blending modes and opacity for precise control. This way, your edits stay flexible and easy to tweak anytime.
Credit: doncorgi.com
Adjusting Colors Efficiently
Adjusting colors efficiently in Procreate helps create stunning artwork faster. Using adjustment layers allows you to change colors without damaging your original image. You can tweak hues, saturation, brightness, and more while keeping your work flexible. This method saves time and keeps your edits clean.
Adjustment layers offer control over specific parts of your drawing. They let you experiment with color changes and easily undo or modify them. This non-destructive approach is perfect for artists at all skill levels.
Selective Color Correction
Selective color correction targets only certain colors in your artwork. Instead of changing everything, you can adjust reds, blues, or greens separately. This helps fix color imbalances or create mood effects.
In Procreate, use the Selective Color tool inside adjustment layers. Move sliders to increase or decrease each color’s intensity. This lets you fine-tune your palette with precision and ease.
Using Masks With Adjustments
Masks control where your adjustment layers apply. You can limit color changes to specific parts of your drawing. This keeps other areas unchanged for a cleaner look.
Create a mask on your adjustment layer and paint black on areas to hide the effect. Paint white to reveal it again. This technique helps blend colors smoothly and adds depth to your artwork.
Managing Multiple Layers
Managing multiple layers in Procreate is essential for keeping your artwork organized and flexible. Working with many layers lets you edit parts of your drawing without affecting others. This control helps you adjust colors, add details, or fix mistakes easily. Understanding how to handle these layers improves your workflow and keeps your project neat.
Merging Layers Safely
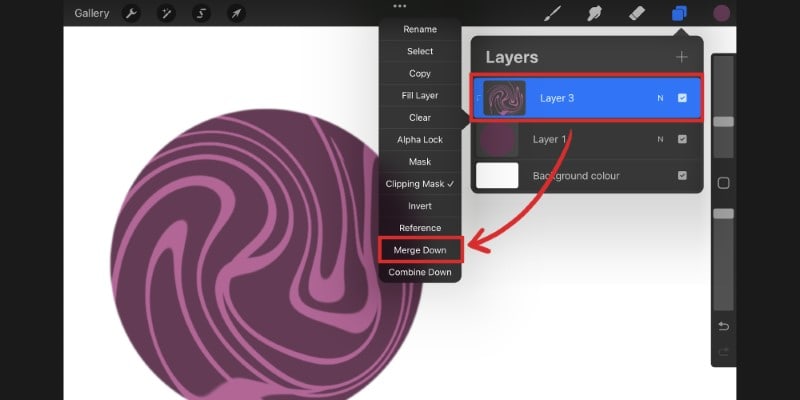
Merging layers combines them into one. This saves space and simplifies your layer panel. Before merging, check if you need to keep the layers separate for future edits. Use the “Group” feature to test how layers look together without merging. When ready, select the layers and tap “Merge Down” to join them. This action cannot be undone easily, so save a copy first.
Resizing And Transforming Groups
Resizing layers one by one can be slow. Group layers to resize multiple layers at once. Select the layers and tap “Group.” Now use the transform tool to move, resize, or rotate the whole group. Hold the corner handles to keep proportions while resizing. This method keeps your layers organized and makes adjustments faster. You can always ungroup layers if needed.
Tips For Mastering Adjustments
Using adjustment layers in Procreate can change your artwork quickly. Learning some tips helps you work faster and better. These tips focus on saving time and keeping your adjustments consistent. They improve your workflow and let you focus on creativity.
Here are two key tips to help you with adjustment layers in Procreate.
Saving Adjustment Presets
Adjustment presets save your favorite settings for future use. After you create an effect, save it as a preset. This saves time on repeated work. To save, adjust the sliders and tap “Save Preset.” Name it clearly for easy finding later. Use presets to keep your style consistent across projects. You can update or delete presets anytime. This tool keeps your workflow smooth and efficient.
Quick Keyboard Shortcuts
Procreate supports keyboard shortcuts to speed up your work. Learn shortcuts for common adjustments like brightness or color balance. For example, pressing certain keys can open adjustment menus fast. Using shortcuts reduces the need to tap many buttons. This means less interruption to your creative flow. Practice these shortcuts to remember them quickly. Shortcuts help you edit images without breaking your focus.
Frequently Asked Questions
Are There Adjustment Layers In Procreate?
Procreate does not have traditional adjustment layers like Photoshop. It offers non-destructive adjustments via its Adjustment tools. Use these tools directly on layers to tweak colors, brightness, and saturation without permanent changes. This approach keeps edits flexible but differs from true adjustment layers.
How Do I Resize A Part Of A Drawing In Procreate?
Select the area using the Selection tool, tap Transform, then drag the bounding box handles to resize the part precisely.
How Do I Resize All Layers?
Link all layers you want to resize, then press Command-T (Mac) or Control-T (Windows). Hold Shift, drag bounding box handles to resize uniformly.
How Do I Adjust Things In Procreate?
Tap the Adjustments icon (magic wand) to access tools like Hue, Saturation, and Brightness. Use sliders for precise control.
Conclusion
Using adjustment layers in Procreate lets you edit your art easily and safely. You can change colors, brightness, and effects without altering the original image. This helps you try new ideas and fix mistakes quickly. Keep experimenting with these layers to improve your digital art skills.
Practice often, and you will feel more confident using Procreate’s tools. Adjustment layers save time and make your workflow smoother. Start adding them to your projects today and see the difference. Simple steps lead to better art results.


