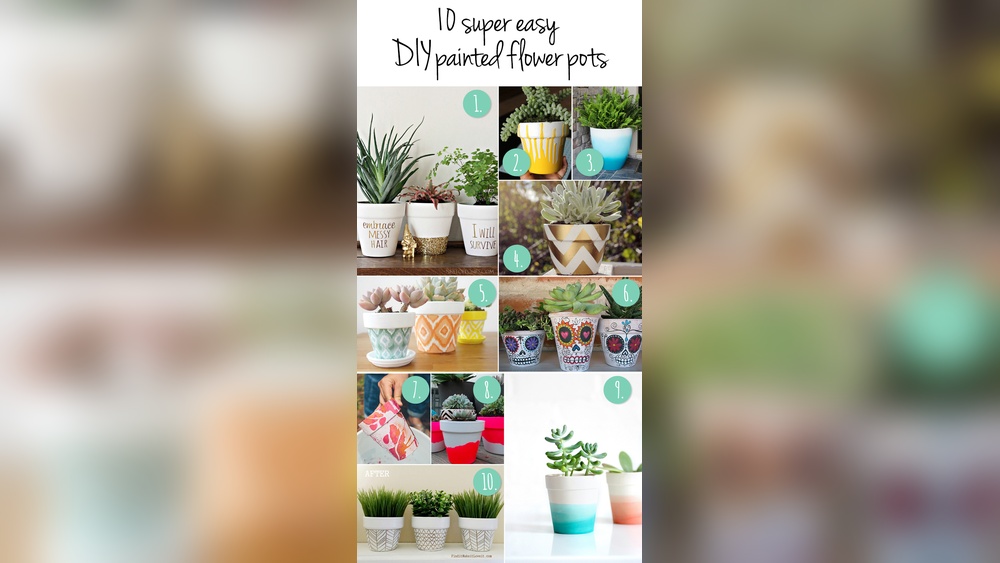
Quick answer: The best DIY plant pot painting ideas for beginners are color-dipped bases, taped geometric blocks, polka dots, terrazzo speckles, simple faces and leaf motifs, because each looks polished with basic brush skills. Whatever design you pick, paint on a clean, dry, primed pot, seal the inside of terra-cotta, use thin coats of outdoor-rated acrylic, and finish with a clear sealer so the design survives watering.
A plain pot is a small, curved canvas that sits in plain view every day. That makes it a perfect place to try a pattern you would never commit to on a wall. The challenge is choosing a design that suits the shape of the pot, the plant inside it and your skill level.
Below are DIY plant pot painting ideas grouped by style, each with a short method, the colors that tend to work, and how long it takes. A short prep section at the end keeps the paint from peeling. If you are painting with kids, our list of kid-friendly paint kits for craft days can help you stock the table.
How to Pick the Right Design for Your Pot
Before choosing a pattern, consider three things:
- Pot shape. Straight-sided cylinders take tape lines and stripes cleanly. Tapered pots distort horizontal lines, so dots, free-hand shapes and speckles look better on them.
- The plant. Busy foliage like ferns or trailing pothos competes with busy patterns. Pair them with solid colors or simple two-tone designs. Sculptural plants like snake plants and cacti can handle bolder patterns.
- The room. Pull one or two colors from cushions, art or tiles nearby so the pot looks planned instead of random.
Simple Plant Pot Painting Ideas (Under 30 Minutes)
1. Color-dipped base
Paint the bottom third of the pot in a bold color and leave the top natural terra-cotta. Use a strip of tape to get a crisp line, or angle it for a tilted “dip” effect. It looks especially good in coral, mustard, cobalt or black.
Time: 15 minutes plus drying. Skill: beginner.
2. Painted rim only
Many terra-cotta pots have a thick rolled rim. Paint just that band in a contrasting color. It frames the plant like a collar and takes almost no time.
3. Polka dots
Use a round sponge dauber, a pencil eraser or the handle end of a brush. Space dots irregularly for a playful look or in offset rows for a tidy one. White dots on a blush or navy base are classic.
4. Two-tone vertical split
Run a piece of tape vertically from rim to base and paint each half a different color. On a round pot this creates a surprisingly modern look from every angle.
Geometric and Modern Pot Ideas
5. Color-block triangles
Tape off overlapping triangles around the pot. Paint each section a different shade from the same color family, such as three greens, then peel the tape while the last coat is still slightly tacky for clean edges.
6. Terrazzo speckles
Paint a pale base like warm white or light gray. Using a small round brush, add irregular chips of two or three colors (terracotta, sage, charcoal, mustard). Vary the size and rotate the shapes. The effect imitates the stone-chip flooring and hides scuffs well.
7. Thin-line minimalism
Use a fine paint pen or liner brush to draw single wavy lines, arches or a simple continuous line face around a solid-color pot. Black on white or white on black looks sharp.
8. Checkerboard
Lightly mark a grid with pencil on a straight-sided pot, then fill alternate squares. Small checks look cottagecore; large checks look retro. Squares never align perfectly around a tapered pot, so embrace a wonky, hand-painted feel.
9. Ombre fade
Mix three or four shades between a dark and light color. Paint the darkest band at the base and blend upward. Dusty rose to cream or deep teal to mint both suit greenery.
Nature-Inspired Plant Pot Ideas
10. Leaf print stamping
Brush green paint on the back of a real leaf, press it onto the pot and peel it away. Overlap a few prints in two shades. Herbs like mint, sage and rosemary leave especially detailed prints.
11. Painted botanicals
Simple monstera leaves, lemons, daisies or tulips. Block in the shape, let it dry, then add a darker shade on one side and a thin highlight on the other for dimension.
12. Night sky pot
Blend navy, purple and black for the base. Flick white paint off a toothbrush for stars, then add a crescent moon with a small brush. Great for kids’ rooms.
13. Faux stone or concrete
Sponge layers of gray, white and taupe over a darker base for a stone look. Add a light dry-brush of white to the rim to imitate weathering.
Fun and Playful Ideas (Great for Kids)
14. Plant-pot faces
Paint big eyes, rosy cheeks and a smile. The plant becomes the “hair.” Spiky succulents, grasses and string-of-pearls give the funniest results.
15. Animal pots
A pink pot becomes a pig with a snout and ears; a green pot turns into a frog; orange with black stripes becomes a tiger. Add details with paint pens.
16. Fruit pots
Paint pots to look like watermelons (green rim, pink body, black seeds), strawberries or oranges. Simple shapes, bright colors, big impact.
17. Handprint pots
Kids press painted handprints around a pot and sign and date the bottom. These make great gifts for grandparents or teachers.
Kids who enjoy painting pots often enjoy decorating candles next; our tips for painting candles at home show how to make the paint stick to wax.
Textured and Advanced Pot Ideas
18. Raised dot mandalas
Build a mandala from concentric rings of dots, increasing or decreasing the dot size in each ring. Use thick paint so the dots stand up slightly. This takes patience but looks impressive.
19. Faux verdigris or aged bronze
Paint the pot a bronze or brown metallic. Dry-brush teal and pale green unevenly, concentrating in recessed areas and near the rim, then dab a little white. The result imitates weathered copper.
20. Sgraffito scratch designs
Paint one color, let it dry, apply a second color, and while that top coat is still wet, scratch a design through it with a toothpick or wooden skewer to reveal the base color.
21. Textured plaster finish
Mix a little baking soda into acrylic paint for a gritty, stone-like texture. Dab it on with a brush or palette knife. Once dry, dry-brush a lighter color over the high points.
Ideas for Specific Pot Types
Tiny 2- to 3-inch pots
Small pots suit single bold motifs: one big flower, a face, a strawberry or a monogram letter. Fine patterns crowd a small surface. These make good party favors and succulent gifts.
Large floor planters
Big pots can carry wide stripes, large color blocks or a sweeping wave around the whole circumference. Use a small foam roller for the base coats to save time and avoid brush marks.
Hanging planters
People see hanging planters from below, so put the most interest on the lower half and bottom. Bands of color or a dripping-paint effect near the base work well.
Self-watering and plastic pots
Scuff the plastic lightly, use a plastic bonding primer, and stick to simple designs. Avoid painting areas that get gripped frequently, such as water reservoir openings.
Turning Pot Ideas Into a Matching Set
Several painted pots grouped together look more striking than one. To make a set feel cohesive:
- Use the same base color on every pot and vary only the pattern.
- Or use the same pattern on every pot and vary the colors within one palette.
- Repeat one accent color, like gold rims or black dots, across all pots.
- Group odd numbers (three or five) at different heights for a natural arrangement.
Planning a set also makes it easier to mix paint once and use it across several pots, which keeps colors consistent.
Color Palette Ideas
| Mood | Colors | Works well with |
|---|---|---|
| Earthy and calm | Terracotta, sage, cream, olive | Herbs, olive trees, succulents |
| Bold and modern | Black, white, cobalt, mustard | Snake plants, cacti, rubber plants |
| Soft and pastel | Blush, lavender, mint, butter yellow | Flowering plants, kids’ rooms |
| Coastal | Navy, sand, sky blue, white | Grasses, air plants |
| Retro | Orange, avocado green, brown, cream | Pothos, spider plants |
Quick Prep So Your Design Lasts
Every idea above depends on the paint staying put. Follow this short routine:
- Wash and dry. Scrub the pot and let terra-cotta dry for at least 24 hours.
- Seal the inside. Brush a clear waterproof sealer on the inside walls and rim of terra-cotta so moisture does not push paint off from behind.
- Prime the outside. A coat of white gesso or exterior primer makes colors bright and helps paint grip.
- Paint thin coats. Two or three thin coats of outdoor-rated acrylic give better coverage than one heavy coat.
- Cure and seal. Wait 24 to 48 hours, then apply two coats of clear sealer. Let it cure before planting.
Glazed ceramic and plastic pots need a light sanding and a bonding primer first. Without it, paint tends to scratch off easily.
DIY Craft Paint Storage Ideas for Pot Painting Projects
If you paint several pots at once, keeping supplies organized saves time:
- Store craft paint bottles upside down in a shallow tray or shoe organizer so paint flows toward the nozzle.
- Use a muffin tin as a palette; each cup holds one color and it washes easily.
- Keep custom mixed colors in small lidded jars labeled with the pot they belong to, so touch-ups match.
- Repurpose a plastic caddy for tape, brushes, pens and sponges so everything moves outdoors with you.
Seasonal Plant Pot Ideas
Pots are small enough to repaint or swap with the seasons, and they make easy holiday gifts with a cutting or bulb inside.
- Spring: pastel gingham, tulip outlines, or a bunny face on a small pot of grass.
- Summer: watermelon pots, lemon prints, bright stripes or a beachy sand-and-navy dip.
- Fall: pumpkin-orange pots with green rims, plaid patterns in rust and mustard, or leaf stamps in warm tones.
- Winter: snowman faces, red and white candy stripes, or a deep green pot with gold dots for a holiday amaryllis.
Common Design Mistakes
- Too many colors. Three or four colors per pot usually look more deliberate than eight.
- Patterns that ignore the taper. Long horizontal stripes look crooked on strongly tapered pots.
- Fine details at the base. The base sits in water and wears first. Keep delicate work higher up.
- Skipping a test. Try new techniques on the bottom of a spare pot before committing.
FAQs
What are easy plant pot painting ideas for beginners?
Color-dipped bases, painted rims, polka dots, two-tone splits and leaf stamping are all easy and look polished. They need only one or two colors and basic brush control.
What paint should I use on terra-cotta plant pots?
Outdoor or multi-surface acrylic paint is the most common choice. Prime the pot first and seal the finished design with a clear coat to protect it from water and sun.
How do I paint clean lines on a pot?
Use painter’s tape pressed down firmly, paint thin coats, and peel the tape while the last coat is slightly tacky. On tapered pots, thin tape bends more easily around the curve.
Can kids paint plant pots?
Yes. Small pots, non-toxic craft paint and paint pens work well. Let adults handle priming and spray sealing, then let kids paint faces, animals, handprints or dots.
How do I stop paint from peeling on plant pots?
Make sure the pot is fully dry before painting, seal the inside of terra-cotta, prime the outside, and finish with a clear sealer. Most peeling comes from moisture moving through the clay.
Should I paint pots with plants already in them?
It is better to paint empty pots. Soil moisture keeps the clay damp, which weakens adhesion, and it is hard to paint neatly around foliage.
Next Step
The best DIY plant pot designs match the pot’s shape and the plant inside it, use a small, focused color palette, and sit on top of good prep. Start with one simple idea, then work up to terrazzo, mandalas or faux finishes as your confidence grows.
For family pot-painting days, good supplies save a lot of frustration. Our guide to the best DIY paint kits for kids covers sets with enough colors and brushes for a whole table of little painters.