If you want to learn how to paint DIY birdhouse ideas that look like tiny buildings rather than plain painted boxes, the secret is to treat the birdhouse as a miniature canvas with a theme. A cottage with shingle roof and window boxes, a red barn, a striped lighthouse or a mushroom house all start as the same unfinished wooden shape. What turns them into something worth hanging is the design plan and a handful of simple brush techniques.
This version of the guide is about design: choosing a theme, laying it out on small flat surfaces, painting the details so they read from a distance and finishing the piece so it lasts. It assumes you already have an unfinished wooden birdhouse or a kit. If you are looking for advice focused on which paint types and colours are safest for birds, use the general guide to paint selection instead. Here the emphasis is on ideas and technique.
How to Paint DIY Birdhouse Ideas Starting With the Purpose
Before opening a paint pot, decide what the birdhouse is for, because it changes what you can do.
Decorative display birdhouses
Many craft-store birdhouses are meant as garden ornaments, porch decor, shelf pieces or gifts. Birds may never nest in them. Because of that you can go as bold and detailed as you like, using paint pens, glitter-free sealers, small embellishments and elaborate scenes on every wall.
Working nest boxes
If birds are expected to use the house, keep the design simple and the finish conservative. Common bird-conservation advice is to leave the inside bare, avoid paint around the entrance hole and perch, and choose water-based paint on the outside only, allowing it to dry and air out thoroughly before hanging. Pale, muted colours are generally better than very dark ones, which can absorb heat in sun.
If you are not sure, paint it as a decorative piece and display it, rather than as a nest box. That keeps the design freedom and avoids any risk to wildlife.
Gathering Supplies for a Themed Birdhouse
You do not need a big kit. A short list is enough for most of the ideas below.
- Unfinished wooden birdhouse, sanded smooth
- A primer or a white base coat, which makes colours brighter on bare wood
- Acrylic craft paints in your theme colours, plus white and black
- Two or three brushes: a flat about half an inch wide, a small round and a fine liner
- A pencil, a ruler and a small piece of tracing paper
- Painter’s tape for stripes and clean edges
- Optional paint pens for outlines, and a stencil or two
- A clear sealer suited to the location (indoor or outdoor)
Sand any rough edges first and wipe away the dust. Painting on wood that is clean and smooth means every detail you add sits crisply.
Preparing and Laying Out the Design
Good-looking birdhouses are usually planned, not improvised.
Break the house into surfaces
A birdhouse has a front, a back, two sides, two roof panels and a base. Decide which wall is the focus, often the front with the entrance hole, and keep the other walls simpler. Make a quick thumbnail sketch of each surface on paper before you paint.
Draw guide lines in pencil
Lightly pencil the horizon line, window positions, door and roof edges. A ruler helps with straight lines on the walls. Mark a centre line so the entrance hole and any decorative features stay balanced.
Transfer artwork cleanly
If you want a flower, bird or lettering, draw it on tracing paper, rub the back with a soft pencil and trace it onto the wood. A stencil is faster for repeated shapes such as hearts or leaves. Chalk pencil works on dark base coats.
How to Paint DIY Birdhouse Ideas in Six Stages
Use the same order for any theme and the project stays manageable.
1. Base coat. Paint the whole house in its main colour. Two thin coats beat one thick one. Let each dry before the next. 2. Large shapes. Block in the roof, door, window frames and any big areas in their colours. 3. Mid-tone details. Add shingles, bricks, shutters or trim. 4. Fine detail. Use the liner or paint pen for window panes, door handles, outlines and lettering. 5. Highlights and shadows. A light line on one edge and a darker line on the other makes shapes pop. 6. Seal. Once everything is completely dry, apply a clear sealer.
Theme Ideas You Can Paint on a Birdhouse
The cottage
A cottage birdhouse works well because the shape already looks like a small house. Use a soft cream or pale yellow for the walls, a darker roof, and add painted shutters, a door with a small arch, and a window box of tiny flowers. For shingles, paint the roof one base colour, then use the edge of a flat brush or a pen to draw offset rows of scallops or small rectangles in a slightly darker tone.
The red barn
A barn is one of the easiest themes. Paint the walls barn red, paint white trim around the door and a big white X across the double doors, and give the roof a grey or dark brown base with simple lines. Add small hay-colored rectangles at the loft opening. Keep the colours flat and graphic so it reads clearly from across a garden.
The lighthouse
If your birdhouse is tall and narrow, a lighthouse suits it. Wrap bands of red and white using painter’s tape, remove it carefully when dry, then paint a small window with a pale blue sky and a dark roof cap. A simple wave pattern on the base in blues and white adds a coastal feel.
The mushroom house
For a fantasy garden look, paint the roof like a red mushroom cap with white dots made with the end of a brush handle, then give the body a warm cream colour and a tiny arched door. Soft brown tones for the base keep it natural.
The floral cottage
Cover the walls with a repeating pattern of simple flowers. A dot of colour with five small petals around it, plus a pair of leaves, is enough. Space them evenly in rows and alternate colours. This is a good project for painting with a round brush.
The folk pattern house
Use geometric shapes, hearts, stripes and stylised flowers in a limited palette of three or four colours, such as navy, red, cream and gold. Repetition does the work, so tape off bands and fill them with patterns. Scandinavian-inspired designs sit comfortably in this category.
The seasonal house
Pick a season and keep to its palette: pastels and blossoms for spring, bright blues and yellows for summer, rust and gold for autumn, and white, grey and deep blue for winter. You can repaint or add small features over time.
The whimsical character house
Use the entrance hole as a mouth or a door, add eyes or a roof like a hat. Characters need bold outlines and exaggerated shapes, so use a paint pen to keep lines consistent.
Brush Techniques That Make Small Details Look Professional
Dry brushing for texture
Load a flat brush, wipe most of the paint onto a towel and drag the brush lightly over the surface. The paint catches the raised wood grain, which looks like weathered boards, thatch or stone.
Stippling for foliage
Dab the tip of a stiff brush straight down to create leafy texture, bushes or flowers around the base. Use two or three greens for depth.
Taping for crisp lines
Press painter’s tape down firmly, paint over the edge with a thin coat of the base colour to seal the tape, then apply the new colour. Remove the tape when the paint is just dry to the touch, pulling it away at a low angle.
Liner work for windows and outlines
Thin the paint with a drop of water until it flows, rest your hand on the table and draw in one steady motion. Practise on paper first.
Using the handle end for dots
A round brush handle dipped in paint makes perfect dots for mushrooms, flowers and decorative borders.
Choosing Colour Palettes by Theme
- Cottage: cream, sage green, dusty rose, slate grey
- Barn: barn red, white, charcoal, hay yellow
- Lighthouse: white, red, navy, sky blue
- Mushroom house: red, cream, warm brown, moss green
- Folk pattern: navy, red, cream, gold
- Seasonal: choose one four-colour palette per season
Keep to three or four main colours and use the rest as accents. Too many colours make a small surface look busy.
Three Ways to Paint the Roof
The roof is the largest single area and sets the character of the whole piece, so it deserves a decision of its own.
- Painted shingles. Base coat in a mid-tone, then rows of small scallops or rectangles in a slightly darker colour, starting at the bottom edge and working up so each row overlaps the last.
- Weathered wood. Thin brown or grey paint, wiped back with a cloth so the grain still shows, then dry brushed with a lighter shade. This suits cabin and barn themes.
- Solid colour with a trim line. One flat colour with a contrasting line along the edge. It is the fastest option and works for lighthouse, folk and seasonal designs.
Whatever you choose, paint along the length of the roof panels and take extra care at the ridge, where the two panels meet. Keep the underside edges neat, because they are visible from below when the house is hung.
Painting Lettering, Names and Numbers
A small name plate or house number adds charm, particularly on gifts. Pencil the letters first, using a ruler for a baseline, and space them by eye before committing. A paint pen or a fine liner brush works best, and a stencil helps if your handwriting is shaky. Keep words short, keep the lettering in one colour and leave a margin so it does not crowd the door.
Painting a Matching Set or a Birdhouse Village
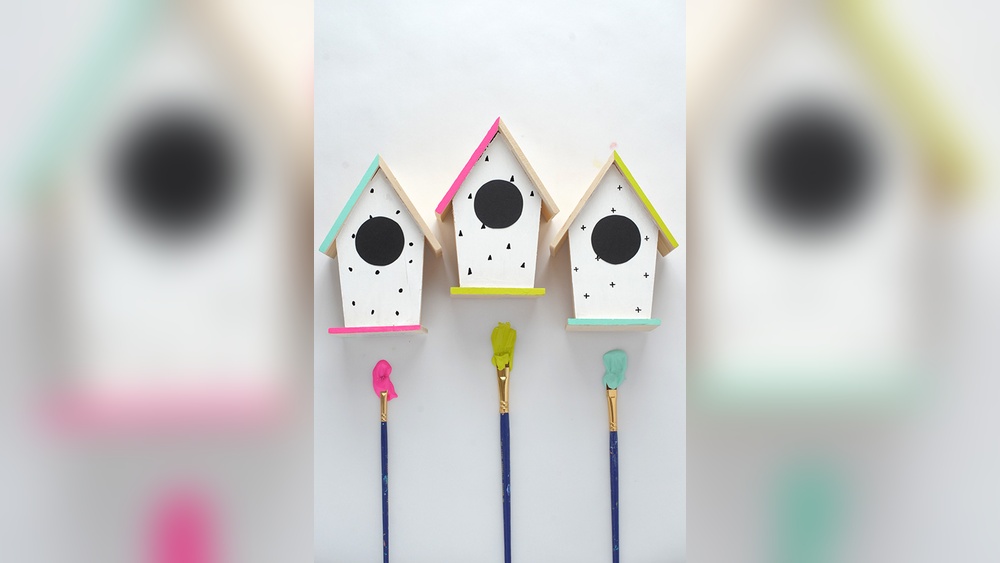
If you plan to paint several houses, give them a shared element, such as a common roof colour, a repeating trim colour or the same style of door. Vary the wall colours, window shapes and decorative details. When displayed in a row on a shelf or hung together on a fence, the group looks like a street. Paint the same step on all the houses at once, such as all base coats and then all roofs, which keeps colours consistent and speeds the work.
Choosing the Right Location for a Decorative Birdhouse
Where the piece will sit influences how detailed it can be. On a porch or covered patio, fine detail and lighter colours survive well. In an open garden, favour bolder shapes, higher contrast and a stronger sealer, since sun and rain will wear away delicate work. Indoors on a shelf or windowsill, almost anything goes, though direct sun through glass can still fade some pigments over time.
Finishing, Sealing and Hanging Your Painted Birdhouse
Allow each coat to dry fully, then apply a clear sealer in thin coats, following the label for indoor or outdoor use. Seal the roof edges especially, since they take the most weather. Let the sealer cure before hanging. If the piece is outside, mount it under an overhang or in partial shade, and check the paint every season for chips. Touch up or reseal as needed. If you are painting a house meant for nesting, keep the sealer to the exterior and leave the interior untouched.
Painting Birdhouses With Kids or for Gifts
Birdhouses are a popular family project because the shapes are simple and mistakes are easy to cover. For children, choose washable, non-toxic paints, protect the table, and let them paint big areas while an adult handles tape and fine lines. For gifts, add a name or date in small lettering on the back or base, and sign your work.
Common Problems and Quick Fixes
- Colours look dull. Use a white base coat or primer before the colour.
- Paint peels. The wood was dusty or the coats were too thick. Sand lightly and repaint in thin layers.
- Tape bleeds. Seal the tape edge with a thin layer of the base colour first.
- Streaky roof. Paint in the direction of the boards and add a second thin coat.
- Details smudge. Wait until the layer underneath is fully dry before adding fine lines.
Frequently Asked Questions
How do I paint a birdhouse so it looks like a tiny house?
Start with a base colour, add large roof and door shapes, then add shingles, windows and trim. Pencil guide lines make the details even.
Should I paint the inside of a birdhouse?
For a working nest box, leave the interior bare. For a purely decorative birdhouse, the inside is your choice.
What is the easiest birdhouse theme for beginners?
A barn or a simple striped design is easy, because they rely on flat colours and straight lines.
How do I get straight stripes and clean edges?
Use painter’s tape, press it down firmly and seal the edge with a thin coat of the base colour before adding the new colour.
How do I keep a painted birdhouse from fading outdoors?
Use a clear sealer suited to outdoor use, hang the piece in partial shade or under an overhang and refresh the sealer when it looks worn.
Conclusion
A painted birdhouse looks best when it has a theme, a limited palette and clear steps. Plan each surface, apply thin coats, add details last and seal the finished piece. Whether you choose a cottage, barn, lighthouse or folk pattern, a little planning transforms a plain wooden box into a charming garden feature.