
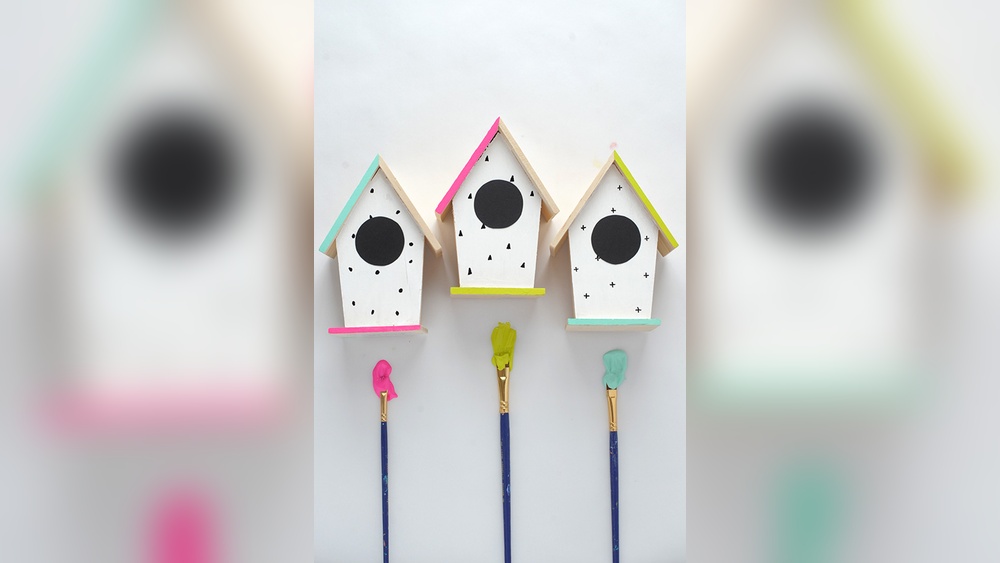
If you want to paint a DIY birdhouse that looks like a small piece of garden art, the hardest part is not the brushwork. It is choosing a design that looks good and stays safe for the birds that may move in. This guide is organised around ideas rather than basics: themes, patterns, color schemes and finishing touches, with the safety rules that decide which ideas are actually workable on a real nesting box.
Think of the birdhouse as a tiny building with four walls, a roof and a doorway. Each of those parts invites a different decorative treatment, and each comes with limits. Roofs take the sun and rain. The entrance hole must stay clear. The inside must stay natural. Everything else is open to your imagination.
Decide First: Decorative Display or a Working Nest Box
Before you pick a design, decide what the birdhouse is for. A purely decorative piece can hang on a porch wall, sit on a shelf or be a gift, and you can use richer colors and fine detail. A working nest box has to be comfortable and safe for wild birds, which narrows the palette and the finishes. Many people want both, and that is possible if you treat the outside as your canvas and leave the entry and interior alone.
If the box will be used by birds, use pale or medium natural tones on the roof and sides, keep any dark colors to small accents, and paint only the exterior. If it is display only, go as bold as you like, but still seal it so it survives weather.
Theme Ideas to Paint a DIY Birdhouse Around
Miniature cottage
Treat the front as a tiny house. Paint a door shape beneath the real entrance hole, add shutters either side of a painted window, and draw a thin line of roof shingles in a slightly darker shade. Soft cream, sage and dusty blue suit this look and also keep the box visually calm in a garden.
Woodland and leaf motifs
Use a muted green base and paint leaves in two or three tones, with a few small mushrooms or acorns near the base. This is a forgiving theme because leaf shapes do not need to be perfect, and the earthy colors blend into trees and hedges.
Folk-style florals
Bold, simple flowers with thick stems and round petals work well on wood. Limit yourself to three or four colors and repeat them around the box. Dots, hearts and scalloped borders add charm without detailed drawing skills.
Geometric and color-block designs
Paint bands, triangles or checks in coordinated shades. Masking tape gives crisp edges, and you can build a modern look with just two or three colors plus the natural wood. Keep the lightest shade on the roof.
Seaside and weathered looks
A faded white-wash, pale aqua trim and a rope-style painted line suit a coastal garden. Light paint reflects heat, which is a sensible choice for exposed spots.
Seasonal and gift designs
Autumn leaves, snowy roofs or spring blossoms make good seasonal pieces for display. For gifts, a name or date painted discreetly on the side turns a simple box into a keepsake.

Credit: inmyownstyle.com
Pick a Color Scheme Before You Paint a DIY Birdhouse
Color decisions are easier when you work from a small palette. Choose one main color for the walls, one lighter or darker partner for the roof, and one accent for trim. Test the combination by painting a scrap of wood and viewing it outdoors, because colors look stronger in daylight than indoors.
Many birdhouse designers favor soft greens, tans, grays, blues and whites. These tones sit comfortably in a garden and tend to avoid the heat build-up that very dark colors can cause in direct sun. Bright accents are fine in small amounts, such as a red door shape or yellow flower centers, provided they do not dominate the box.
Safe Paint Choices for a Painted Birdhouse
For anything outdoors, use water-based, non-toxic acrylic paint made for exterior or craft use. Check the label for a non-toxic statement and avoid oil-based or solvent-heavy products, which have strong fumes and are harder to air out. The outdoor acrylic paint page explains what to look for in weather-resistant formulas.
Apply paint to the outside only. Leave the interior bare, and leave the area immediately around the entrance hole unpainted or lightly coated so that birds are not exposed to fresh paint where they touch most. Let the paint dry and air out completely, ideally for several days, before the box goes outside.
Prepare the Wood So Your Design Lasts
Good preparation is what separates a design that lasts a season from one that peels. Sand rough spots and splinters lightly, wipe away the dust with a dry cloth and, if the wood is knotty or very absorbent, apply a thin coat of water-based primer to the outside. Primer helps the topcoat look even and stops resin or stain from showing through light colors.

If you plan to use masking tape for stripes or checks, wait until the base coat has dried completely and press the tape edge down firmly. Peel it slowly at an angle to avoid lifting the base color.
Painting Techniques for Birdhouse Ideas
Base coats and layering
Apply thin coats rather than one heavy coat. Two thin layers dry faster, cover better and are less likely to crack than a single thick one. Let each coat dry before adding the next.
Stenciling and stamping
Stencils are the quickest route to a neat pattern. Hold the stencil flat, use a nearly dry brush or sponge and dab rather than brush. Foam stamps or a cut potato can create repeating dots or leaves on the roof edges.
Dry brushing for a weathered finish
Load a flat brush, wipe most of the paint off, and drag it lightly over the wood. This leaves a soft, worn texture that suits cottage and seaside looks.
Fine details
Use a small round or liner brush for window frames, flower stems and lettering. Draw light pencil guidelines first if you want straight lines, and paint details last so they stay crisp.
Paint pens and markers
Water-based acrylic paint pens give you precise lines and are good for outlining shingles or adding small dots. Apply them only after the base paint is dry and check the label for non-toxic wording.
Details That Make a Painted Birdhouse Feel Finished
- Painted roof edges: a contrasting line along the eaves frames the whole design.
- Window and door outlines: simple dark outlines make small shapes read clearly from a distance.
- Repeating motifs: using the same flower, leaf or dot on every side ties the design together.
- A signature or date: small, discreet and on the back or underside.
- Natural wood showing through: leaving the base or sides partly unpainted gives a rustic contrast.
Avoid attaching perches or glued-on decorations near the entrance. Perches can give predators and competing birds a foothold, and small stuck-on items can come loose or injure birds.
Sealing and Weatherproofing Your Painted Birdhouse
A clear, water-based exterior sealer protects the design from rain and sun. Apply it in thin coats on the outside surfaces, let it cure thoroughly and keep it away from the interior and the entrance. Roofs benefit from an extra coat since they take the heaviest weather. Check that ventilation and drainage holes are still open after painting and sealing, because clogged holes can leave the box damp or too hot.

Placement Tips After You Paint a DIY Birdhouse
Where you hang the box affects how long the finish lasts and how comfortable it is for any occupants. Choose a spot with some shade in the afternoon, shelter from the strongest winds, and a clear flight path to the entrance. Fix it securely to a post, fence or tree. Different species prefer different hole sizes and heights, so match the box design to the birds in your area rather than to the paint scheme.
Check the box each season. Touch up chipped paint with the same exterior paint, remove old nesting material when the season is over, and reseal the roof if the finish looks worn. Do not paint over used nests or disturb a box while birds are nesting.
A Simple Weekend Plan to Paint a DIY Birdhouse
- Day one, morning: sand, wipe down and prime the exterior.
- Day one, afternoon: apply the base coat to walls and roof in thin layers.
- Day two, morning: add stencils, stripes or hand-painted motifs once the base is dry.
- Day two, afternoon: add small details, then let everything dry.
- After the weekend: apply a clear exterior sealer, cure it for several days and then hang the finished birdhouse.
Mistakes to Avoid
- Painting the inside of the box or the entrance edge.
- Choosing very dark colors for an exposed, sunny site.
- Using strong-smelling oil-based or solvent paints.
- Skipping sealer, so rain lifts the design in a single season.
- Covering ventilation or drainage holes with paint.
- Rushing the drying time before putting the box outdoors.
Tools and Materials for Birdhouse Painting Ideas
You do not need much. A small flat brush for base coats, a round brush for motifs, and a liner for lettering or thin lines cover nearly every idea above. Add fine sandpaper, a dry cloth, masking tape, a pencil, a small cup of water and a paper plate for a palette. If you want repeating patterns, stencils or foam stamps save time and keep the design even.
Work on newspaper or a drop cloth, wear old clothes and keep the paint capped when you pause. Water-based acrylic is easy to wash from brushes while it is wet, so rinse as you go and avoid letting paint harden in the bristles.
Matching the Design to the Birdhouse Style
Different birdhouse shapes suit different ideas. A classic gabled box with a steep roof is ideal for cottage and shingle designs. A flat-roofed box suits geometric and color-block patterns. A rounded or gourd-style house suits swirls, dots and nature motifs. A tall, narrow design works well for a vertical stripe, a climbing vine or a stack of repeating shapes.
Keep the scale of the design proportional to the box. Large flowers on a small box can look crowded, while tiny details on a large surface can disappear when seen from across the garden. A good rule is to sketch the design on paper at the same size first, then transfer it lightly with pencil.
Painting a Birdhouse With Kids or Groups
A birdhouse is a good family project because each person can take a side. Plan the overall palette together, give everyone washable, non-toxic paint, and assign each wall or the roof to one painter. Younger children can do large color blocks and dots, while older children can handle stencils and fine lines. Adults should handle sanding, tape and the final sealing step in a ventilated space.
For a group, decide on a single connecting element, such as a repeated border or a shared color, so the sides still look like one design. Allow plenty of drying time between stages, and keep finished pieces somewhere flat and out of the way.
Planning Your Design on Paper First
A quick sketch saves a lot of repainting. Trace the front, side and roof of the birdhouse on paper, then try two or three layouts in colored pencil. Look at where the entrance hole falls, since it will become the focal point of the front, and plan around it: a painted wreath of leaves, a ring of dots or a simple border can frame the hole without touching it. Photograph your favorite sketch and keep it nearby while you work.
When the design uses several colors, number them on the sketch and mix enough of each in advance. Running out halfway through a wall and trying to match the shade later is one of the most common reasons painted pieces look patchy. Store leftover paint in small labelled containers so you can touch up chips at the end of the season.
Care Through the Year
A painted birdhouse needs light attention after it goes up. Look it over in early spring before nesting begins, and again in autumn after birds have left. Brush away cobwebs and debris, check that the roof is sealed and the ventilation holes are open, and touch up small chips right away so water cannot get under the paint. In very wet or very sunny climates you may want to refresh the sealer every year or two. If the paint peels badly, sand the area, repaint it with the same exterior paint and reseal.
Bring display-only birdhouses indoors or under cover in harsh winters if you want the colors to last longer, and keep a spare coat of sealer for the roof, which always weathers first.
Fixing Common Problems
- Paint looks streaky: apply a second thin coat after the first dries, and avoid overworking wet paint.
- Tape pulled up paint: the base was not dry enough. Touch up with a small brush and use a gentler tape next time.
- Colors look dull outdoors: sunlight and shadow change how colors read. Choose slightly brighter tones than you think you need for display pieces.
- Sealer turned cloudy: it was probably applied too thickly or in humid conditions. Use thin coats and let each dry fully.
- Design wears away at the edges: roof edges and corners take the most wear, so add an extra coat of sealer there.
Birdhouse Painting Questions
What colors are best for a painted birdhouse?
Soft greens, tans, grays, blues and whites are common choices because they blend into gardens and avoid excess heat. Use bright colors as small accents on display pieces.
What paint should I use on a birdhouse?
Use non-toxic, water-based acrylic paint suited to outdoor use, and finish with a water-based clear sealer. Avoid oil-based and strongly scented products.
Should I paint the inside of a birdhouse?
No. Paint only the exterior and leave the inside natural, with the entrance area kept clear of heavy paint.
How long should the paint dry before I hang it?
Allow several days for paint and sealer to dry and air out completely, longer in cool or humid weather.
Can I add a perch to my painted design?
It is better not to. Perches are not needed by most cavity-nesting birds and can help predators.
Final Thoughts
The best way to paint a DIY birdhouse is to pick one clear idea, keep the palette small and respect the limits that protect the birds. A tidy cottage, a leafy woodland or a bold folk-style pattern will all look good once they are sealed and hung. Take your time with preparation and drying, and the finished box will reward you for many seasons.




One Comment