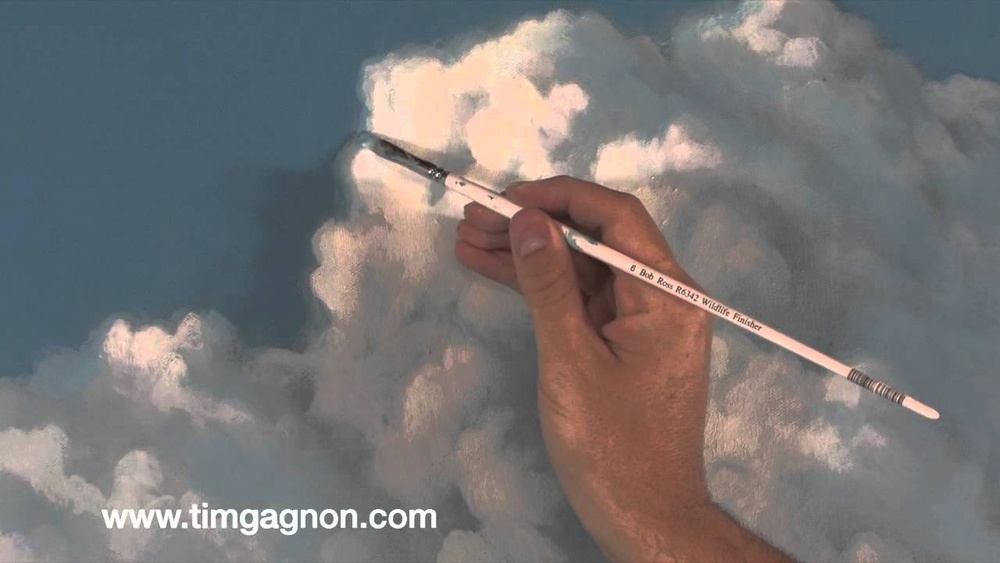
Quick answer: To paint clouds in oil painting, lay in the sky gradient first, darker blue at the top and lighter and warmer near the horizon. Block each cloud in as a simple mass with a clear light side and a gray-violet shadow side, then soften most edges into the sky with a clean, dry brush while keeping a few sunlit edges crisp. Clouds get smaller, flatter, lower in contrast and closer to the horizon as they recede. Save the thickest, brightest paint for the sunlit tops only.
Clouds are the part of a landscape painting that most often goes wrong. They end up looking like cotton balls, smoke, or flat white cutouts pasted on a blue background. The reason is usually not a lack of skill with the brush. It is a misunderstanding of what clouds actually are: three-dimensional forms lit by the sun, sitting in perspective, with soft edges and surprisingly colorful shadows.
This guide offers practical tips on how to paint clouds in oil painting, including the sky gradient, cloud perspective, light and shadow, edge control, different cloud types and backlit clouds. For broader context on oil techniques and styles, the guide to oil painting styles and tips is a helpful reference.
What Makes Clouds Look Real
Before reaching for a brush, it helps to know what you are trying to describe. Realistic clouds share several characteristics.
- They have volume. Cumulus clouds in particular are lit like any other solid form, with a light side, a shadow side and a shadowed base.
- They follow perspective. Clouds overhead look large and show their undersides. Clouds near the horizon look smaller, flatter and more tightly packed.
- Their shadows are colored. Cloud shadows are not gray from tube black. They are blue-gray, violet-gray or warm gray, influenced by the sky and the light.
- Their edges vary. Some edges are crisp where sunlight hits a billowing top; most edges are soft where the cloud thins or dissolves into the sky.
- The sky behind them is a gradient. The blue sky is deepest overhead and paler, often slightly warmer or greener, near the horizon.
Oil Painting Tips for Beginners: Supplies for Clouds
| Item | Suggestion |
|---|---|
| Brushes | 1 inch flat for the sky, size 8 to 12 filberts for cloud masses, a soft blending brush or fan, an old bristle brush for scumbling |
| Colors | Titanium white, ultramarine blue, cerulean or phthalo blue, alizarin crimson, cadmium yellow light, yellow ochre, burnt sienna |
| Medium | A little odorless mineral spirits for the block-in; a small amount of medium for later, softer passages |
| Surface | Primed canvas or panel; smooth or medium texture both work |
Titanium white is essential for clouds because it is opaque and has strong tinting power. You will use a lot of it, so squeeze out a generous amount.
How to Paint Clouds in Oil Paint: Step-by-Step
Step 1: Plan the sky and light direction
Decide where the sun is, even if it is outside the painting. The light side of every cloud should face it. Sketch the main cloud shapes lightly with thin paint, varying their sizes and spacing. Avoid lining clouds up evenly or making them all the same shape.
Step 2: Paint the sky gradient
Mix three or four values of sky blue. At the top, use ultramarine with white and perhaps a touch of alizarin. Toward the middle, shift to cerulean or phthalo blue with more white. Near the horizon, use a pale, slightly warm color: white with a touch of yellow ochre or cadmium yellow and a hint of the blue. Blend the bands gently with horizontal strokes. Paint the sky slightly into the cloud areas so the clouds can be painted into wet sky.
Step 3: Block in the cloud shadows
Mix a cloud shadow color: white with ultramarine and a touch of alizarin crimson or burnt sienna to gray it. Paint the shadow side and underside of each cloud as a single shape. Clouds near the horizon will have lighter, less contrasting shadows.
Step 4: Paint the lit sides
Mix a warm white, white with a speck of yellow ochre or cadmium yellow light, and paint the sunlit tops and sides of the clouds. Use thicker paint here. Apply it with short, rounded strokes that follow the billowing shape, not with long, smooth strokes.
Step 5: Add halftones
Between light and shadow, mix a mid-value, often a slightly warm gray or lavender. Paint this transition band, then gently blend it into the light and shadow with a clean brush. This step gives the cloud volume.
Step 6: Soften the edges
With a clean, dry soft brush, lightly drag along the outer edges where the cloud thins out, blending it into the sky. Keep some edges, especially sunlit edges against blue sky, crisper. Varying edges is one of the most important steps; uniform edges make clouds look like cutouts.
Step 7: Add wisps and detail
For thin, wispy areas, scumble a small amount of white, thinly and lightly, over the sky with an old bristle brush. Add small, distant clouds near the horizon as thin horizontal strokes.
Step 8: Final highlights
Finish with the brightest touches: the sunlit edges of the tallest cloud tops in thick, warm white. Keep these small and selective so they carry real punch.
Cloud Perspective: Make the Sky Recede
Many cloud paintings look flat because every cloud is the same size. The sky is a ceiling that stretches away toward the horizon, and clouds on that ceiling obey perspective.
- Overhead clouds: larger, with visible undersides and stronger contrast.
- Middle-distance clouds: smaller, with flatter bases that line up roughly horizontally.
- Distant clouds: small, compressed, thin, and close to the color of the horizon sky.
The bases of cumulus clouds often sit at a similar altitude, so as they recede, their flat bottoms line up toward the horizon. Painting those bases as subtle horizontal lines that get closer together greatly strengthens the illusion of depth.
Painting Different Cloud Types
| Cloud type | Look | How to paint it |
|---|---|---|
| Cumulus | Puffy, billowing tops, flat bases | Strong light and shadow sides, crisp sunlit tops, soft shadowed bases |
| Stratus | Flat, layered gray sheets | Broad horizontal strokes, low contrast, subtle value shifts |
| Cirrus | Thin, wispy streaks high in the sky | Scumbled, light strokes with a dry brush or the side of a filbert |
| Cumulonimbus (storm) | Towering, dark-based, dramatic | Bright tops, very dark blue-gray or violet undersides, strong contrast |
| Sunset clouds | Lit from below or the side in warm colors | Warm oranges and pinks on lit edges, cool violet shadows |
Tips to Paint Backlit Clouds
When the sun sits behind clouds, the effect changes completely. Backlit clouds have dark, cool bodies with brilliant edges, sometimes called silver linings. Five practical tips help:
- Paint the cloud body darker than you expect. A cloud between you and the sun is mostly in shadow. Use a blue-gray or violet-gray mid-value.
- Keep the brightest edge thin. The glowing rim is where sunlight passes through the thinnest part of the cloud. Paint it as a narrow, broken line, not a thick outline.
- Warm the rim. A rim of white with a touch of cadmium yellow light glows more convincingly than pure white.
- Soften the inner edge of the rim. Blend the inside of the bright edge into the cloud body while keeping the outer edge sharper against the sky.
- Make the sky near the sun brighter. The sky around a backlit cloud is often lighter and warmer than the rest of the sky, which increases the glow.
Painting Clouds With Oil Paint at Sunrise and Sunset
Low sun changes cloud color dramatically, and it is easy to overdo. The light travels through more atmosphere near the horizon, which filters out blue and leaves warm yellows, oranges and reds. A few guidelines keep sunset skies believable:
- Warmest color sits closest to the sun. Clouds near the sun glow yellow or gold; farther away they shift to orange, pink and then violet.
- Undersides catch the light. When the sun is below the clouds, their bases light up while their tops stay cool and dark. That reverses the usual daytime pattern.
- Keep the sky behind them related. A sunset sky often runs from pale yellow-green near the horizon to deeper blue overhead. Unrelated pinks against a saturated blue tend to look artificial.
- Contrast the warm and cool. Cool gray-violet cloud shadows make the warm lit edges look even more luminous.
- Limit saturation. Use the most intense color in only a few small areas. A whole sky of full-strength orange reads as poster paint.
| Sunset element | Suggested mix |
|---|---|
| Glowing edge near the sun | White + cadmium yellow light + a speck of cadmium red light |
| Pink lit undersides | White + alizarin crimson + a touch of cadmium yellow |
| Cloud bodies in shadow | White + ultramarine + alizarin, mid-value violet-gray |
| Horizon sky | White + cadmium yellow light + a speck of cerulean |
Practice With Quick Sky Studies
Clouds change minute by minute, which makes them perfect for short, focused studies. Set a timer for 15 or 20 minutes and paint the sky only, on a small panel around 5 by 7 inches. Commit to the shapes you see in the first few minutes, since they will shift as you work. A series of these studies, done at different times of day and in different weather, builds a personal reference library of sky color that is more reliable than photographs, which often exaggerate blue and turn cloud shadows gray.
Oil Painting Tips, Tricks and Techniques for Better Skies
- Paint the sky in one session if possible. Wet-into-wet blending is easiest when the whole sky is still workable.
- Do not overblend. Too much blending turns clouds into fog. Leave some brushstrokes visible.
- Use the sky color in the landscape. A little of the sky mix in distant hills and water ties the painting together.
- Keep clouds lighter than the brightest land. In most daylight scenes the sky, including clouds, is the lightest value area. Check with a squint.
- Study from life. Quick 15-minute sky studies outdoors teach more about color and shape than any reference photo.
Low clouds and mist blend into fog at ground level. For that softer, lower-contrast atmosphere, the guide to painting fog in oil covers how to compress values and lose edges.
Common Mistakes When Painting Clouds
- Pure white clouds with gray shadows. Real clouds have warm lights and colored shadows.
- Cotton-ball shapes. Uniform rounded blobs look artificial. Vary shapes, sizes and edges.
- All clouds the same size. Ignoring perspective flattens the sky.
- Hard outlines everywhere. Most cloud edges are soft.
- Flat sky behind. A uniform blue background with no gradient looks like a backdrop.
- Overworking. Constant blending muddies the colors and kills the freshness.
Related Reading
FAQs
How do you paint clouds in oil for beginners?
Paint a sky gradient first, block in each cloud’s shadow side with a gray-violet, add warm white on the sunlit side, then blend the transitions and soften most outer edges. Keep clouds near the horizon smaller and lower in contrast.
What colors do you use to paint clouds in oil?
Titanium white, ultramarine blue, alizarin crimson, cadmium yellow light, yellow ochre and burnt sienna cover most clouds. Mix shadows from white, ultramarine and a touch of alizarin or burnt sienna rather than black.
Can you paint clouds with Q-tips?
Cotton swabs can lift or soften small areas of wet paint, which can help with wispy edges or small corrections. They tend to leave fibers and a uniform texture, though, so brushes and rags usually give more natural results for larger cloud masses.
How do you make clouds look fluffy in oil paint?
Give them clear light and shadow sides, use short, rounded strokes that follow the billowing forms, keep sunlit edges crisp and soften the rest into the sky.
Should clouds be painted wet-into-wet?
For soft, natural edges, painting clouds into a wet sky works well. You can also add clouds over a dry sky with scumbling, which gives more control but slightly firmer edges.
Why do my clouds look flat?
Usually because the light and shadow sides are too similar in value, every cloud is the same size, or the edges are uniformly hard. Strengthen the shadow, apply perspective and vary edges.
Final Thoughts
Convincing clouds come from treating them as lit, three-dimensional forms in perspective: a graded sky behind, colored shadows, warm lights and a mix of soft and crisp edges. Practice small sky studies often and they quickly become one of the most enjoyable parts of a landscape. For more subjects and techniques, along with advice on styles and materials, explore our oil paintings guide with expert tips.