
Painting a bird can be a magical and fun experience for kids. It’s more than just putting colors on paper—it’s a way to learn about nature, practice focus, and use imagination. Sometimes, kids (and even adults) worry that art is “too hard.
” But with the right steps, painting a bird becomes simple, relaxing, and joyful. This guide will walk you through easy tips, practical advice, and common mistakes to avoid when teaching kids how to paint a bird. Whether you’re a parent, teacher, or someone who loves helping children explore art, you’ll find everything you need here.
Why Painting Birds Is Perfect For Kids
Birds are colorful, have simple shapes, and are familiar to most children. Kids see birds in parks, backyards, or storybooks. Because birds have basic forms—an oval body, a round head, a beak, and wings—they are much easier to paint than complicated animals like horses or dogs. Birds also let kids play with bright colors and fun backgrounds. Learning to paint birds helps develop fine motor skills and builds confidence in young artists.
What You’ll Need: Essential Painting Supplies
You don’t need fancy materials to get started. Most of the supplies can be found at home or in any school art kit.
| Item | Why It’s Needed | Beginner Tip |
|---|---|---|
| Paper | Surface for painting | Thicker paper (like 120gsm+) works best |
| Paints (watercolor, poster, or acrylic) | Main medium for color | Start with watercolors—they’re easy to clean |
| Brushes (small & medium) | For painting details and filling shapes | Round brush for body, thin brush for details |
| Pencil & Eraser | Sketch before painting | Use light lines so they erase easily |
| Water Cup | To clean brushes | Change water if it gets dirty |
| Paper Towel | For drying brushes or fixing mistakes | Blot brush gently, don’t rub |
| Old Shirt or Apron | Protects clothes | Always wear when painting |
One non-obvious tip: Use a plastic placemat or newspaper under the painting area. It saves time cleaning up and lets kids paint freely.

Credit: www.youtube.com
Choosing A Bird: Simple Types For Beginners
Not all birds are easy for kids to paint. Some are better for early practice because of their simple shapes and bold colors. Here are three great choices:
- Robin – Round red body, gray wings, and a small beak.
- Duck – Oval body, yellow color, orange beak, and webbed feet.
- Parrot – Curved beak, bright colors, and a long tail.
If possible, show kids a photo of the bird before starting. This helps with color choice and makes the painting more real.
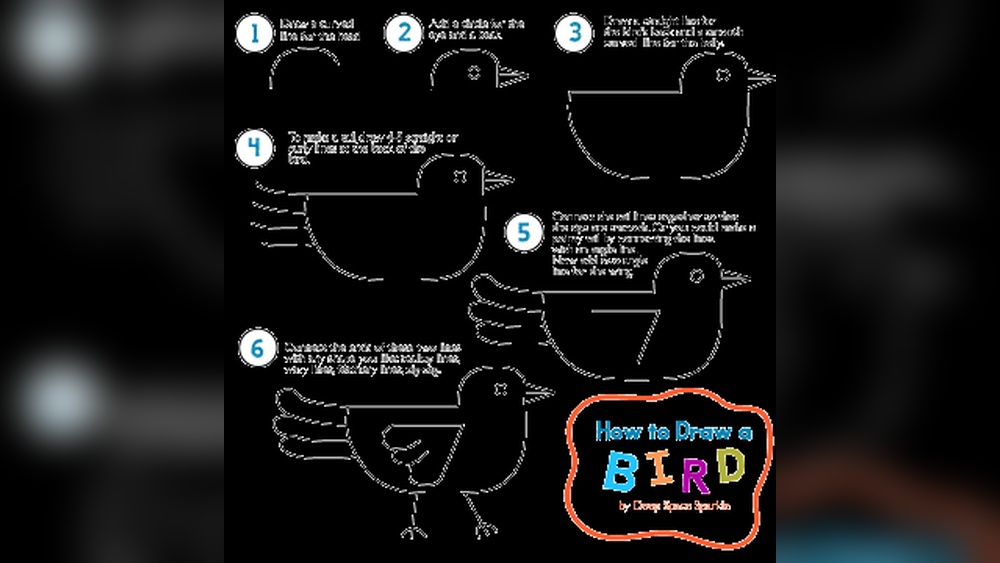
Step-by-step Guide: How To Paint A Bird For Kids
1. Start With A Simple Sketch
Begin by drawing very lightly with a pencil. Encourage kids to use simple shapes—an oval for the body, a circle for the head, triangles for the beak and tail. Don’t worry about perfection. The sketch is just a map for painting.
Pro tip: If the child presses too hard with the pencil, the lines will show through the paint. Practice making “invisible” lines.
2. Add Basic Features
Once the main shapes are done, lightly draw the wings, tail feathers, and legs. For most birds, the wings are just a curved line on the side of the oval. Legs can be two straight lines with little “V” shapes for feet.
3. Pick And Mix Colors
Let kids choose their favorite colors—even if they’re not “realistic. ” Some will want a blue duck or a rainbow-colored robin, and that’s okay. Show them how to mix paints to create new colors. This step builds creativity and teaches about color blending.
4. Paint The Main Body
Dip the medium brush in water, pick up paint, and gently fill in the body and head shapes. Encourage kids to use even strokes and cover all the white spaces. If using watercolor, remind them that less water makes brighter colors.
5. Add Details
After the first layer dries, use a smaller brush for details like the beak, eyes, and wing patterns. Let the kids add dots or stripes if they want. Details make the bird look lively.
6. Paint The Background
A simple background can be blue sky, green grass, or tree branches. Use big, loose strokes. The background should not take too much attention away from the bird.
7. Let It Dry And Sign
Always let the painting dry flat. When finished, encourage the child to sign their name. This gives a sense of pride and ownership.
Credit: artprojectsforkids.org
Easy Tips For Success
Helping kids enjoy painting is more important than getting a “perfect” bird. Here are some useful tips:
- Encourage mistakes. Turn them into new ideas.
- Use reference images from books or the internet for inspiration.
- Keep sessions short (20–30 minutes). Kids focus better in small bursts.
- Praise effort, not just the final result.
- Play soft music or nature sounds to set a calm mood.
Many beginners forget to clean brushes between colors. This leads to muddy, brownish colors. Teach kids to rinse the brush every time they switch paints.
Common Mistakes And How To Fix Them
Painting is a learning process, and mistakes will happen. Here’s how to handle some frequent problems:
- Paint Bleeding: If colors run together, wait for the first area to dry before painting next to it. Watercolor especially needs patience.
- Overworking the Paper: Too much brushing tears thin paper. Use thicker paper, and don’t scrub.
- Painting Over Wet Pencil Lines: Wet paint can “lock in” pencil lines. Erase hard lines before painting.
- Using Too Much Water: Too much water can make colors pale and make the paper buckle. Show kids how to control water with a practice sheet.
One trick many miss: If a mistake happens, quickly blot with a dry brush or paper towel. This can “erase” wet paint before it dries.
Making Bird Painting Even More Fun
Kids love variety and surprises. Here are a few ways to add excitement:
- Use different tools: Try painting with cotton swabs, sponges, or even fingers for feathers and textures.
- Add glitter or stickers for special effects.
- Paint in groups: Turn it into a family or class project.
- Combine with nature walks: Look for real birds, then paint what you saw.
For kids who finish quickly, challenge them to paint a bird family or invent a fantasy bird.
Comparing Paint Types For Kids
Different paints create different looks and have different levels of messiness. Here’s a quick comparison:
| Paint Type | Good For | Drying Time | Easy to Clean? |
|---|---|---|---|
| Watercolor | Soft colors, easy blending | Fast | Yes |
| Poster Paint | Bright, bold colors | Medium | Yes |
| Acrylic | Strong color, lasts long | Slow | No |
Watercolor is usually best for young kids because it’s easy to clean and gentle on paper. Older kids may enjoy acrylic for more vivid effects.
Encouraging Creativity Over Perfection
One important insight: Many children worry about their art “not looking right.” Remind them that birds come in all shapes and colors. Famous artists often paint in unusual ways. The goal is to enjoy the process, not to copy a photo exactly.
Let kids ask questions like, “What if my bird has purple wings? ” or “Can I make a flying bird? ” Say yes! Creative choices help children develop confidence and a love for art.
Displaying And Sharing Kids’ Bird Paintings
Showing off finished work is a great way to boost confidence. Here are some ideas:
- Hang paintings on the wall or fridge.
- Make a mini art show for friends and family.
- Create greeting cards with bird paintings.
- Send photos to relatives far away.
If you want to share your child’s art online, always check privacy settings and use safe sites. For more about safe sharing, visit the Common Sense Media website.
Credit: artprojectsforkids.org
Example: Painting A Robin With Kids
Let’s walk through a real example for painting a robin. This is a bird most children recognize.
Materials Needed
- Thick paper
- Watercolor paints (red, brown, gray, black)
- Two brushes (medium and small)
- Pencil and eraser
- Water cup
- Paper towel
Steps
- Draw a medium oval for the body.
- Add a small circle on top for the head.
- Draw a triangle for the beak and a fan shape for the tail.
- Sketch a wing as a curved shape on one side.
- Paint the body red, the wing and tail gray, and the head brown.
- Use a small brush to add a black dot for the eye and orange for the beak.
- Paint simple brown lines for legs.
- Add a blue background or green grass, if desired.
- Let dry, erase visible pencil lines, and sign the painting.
Most kids finish this in 20–30 minutes. The robin’s simple color blocks and shapes are perfect for young artists.
Table: Quick Troubleshooting For Kids’ Bird Paintings
Problems happen even with the best instructions. Here’s a fast guide for common issues and easy solutions.
| Problem | What Happened | How to Fix |
|---|---|---|
| Colors look muddy | Didn’t clean brush between colors | Rinse brush in water, use fresh paint |
| Paint soaks through paper | Paper too thin | Use thicker paper next time |
| Shapes look uneven | Sketch was too fast | Practice drawing slowly first |
| Paint dries too light | Too much water | Use less water or add another layer |
Frequently Asked Questions
How Do I Help My Child Choose Colors For Their Bird Painting?
Let your child experiment with any colors they like. Real birds are colorful, but fantasy birds are fun too. Show pictures of real birds for ideas, but don’t force them to copy.
What If My Child Makes A Mistake While Painting?
Mistakes are normal. Teach your child to blot wet paint gently with a paper towel or dry brush. Turn mistakes into new parts of the painting (like making a bigger wing).
What Age Is Best For Starting To Paint Birds?
Kids as young as 3–4 years can start with simple shapes and finger-painting. By age 6–7, many can use brushes and follow more steps.
How Do I Keep My Child’s Painting Area Clean?
Use a plastic mat, wear old clothes or an apron, and keep paper towels handy. Always clean brushes and put paints away after finishing.
Where Can I Find Easy Bird Painting Ideas For Kids?
Children’s art books, education websites, and nature magazines have good ideas. You can also search “easy bird painting for kids” online for step-by-step guides.
Painting a bird is an adventure every child can enjoy. With easy steps, a few supplies, and lots of encouragement, kids will create art that is bright, bold, and uniquely their own. Remember, the most important part is to have fun and celebrate every finished bird—no matter how it looks!


