Creating a mood board is a fun and helpful way to plan your painting projects. It helps you gather your ideas and inspirations in one place. This guide will teach you how to create an amazing mood board for your painting projects.

Credit: www.greenhousestudio.co
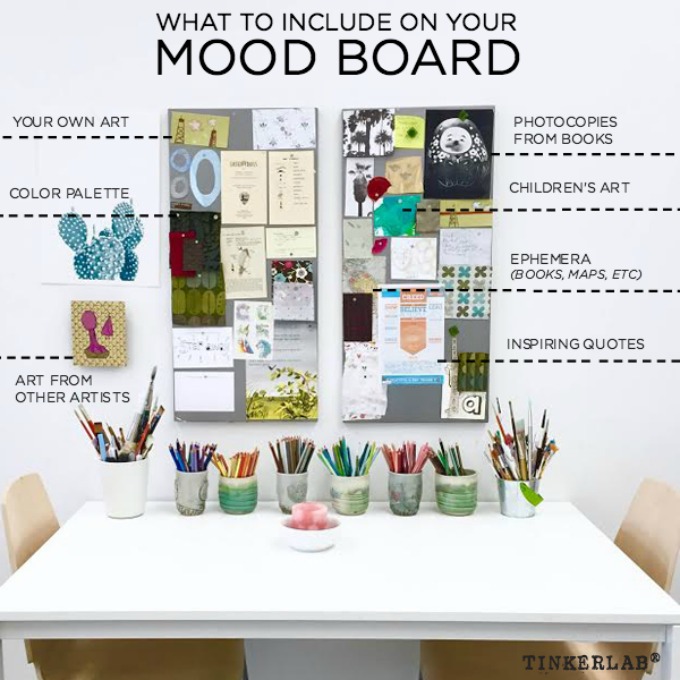
Credit: tinkerlab.com
What is a Mood Board?
A mood board is a collection of images, colors, and textures. It helps you visualize your ideas and feelings. Artists and designers use mood boards to plan their projects. They are very useful for organizing your thoughts.
Why Use a Mood Board?
- Organize Your Ideas: A mood board helps you keep all your ideas together.
- Find Your Style: It helps you discover your unique style.
- Stay Focused: It keeps you on track with your painting project.
- Get Inspired: A mood board can inspire you with new ideas.
Materials You Need
To create a mood board, you will need a few materials:
- A large piece of paper or a poster board
- Magazines, photos, and printouts
- Glue or tape
- Scissors
- Markers or pens
Steps to Create a Mood Board
Step 1: Gather Your Inspiration
The first step is to gather your inspiration. Look for images and colors that you like. You can find these in magazines, online, or from your own photos.
Think about what you want your painting project to look like. Do you want it to be bright and colorful? Or do you prefer soft and calm colors? Gather images that match your vision.
Step 2: Choose A Theme
Next, choose a theme for your mood board. A theme will help you stay focused. It can be a color palette, a season, or a specific subject. For example, you might choose a beach theme, with sandy colors and ocean images.
Step 3: Arrange Your Images
Now, it’s time to arrange your images on your board. Place the largest images first. Then, fill in the gaps with smaller images. Make sure to leave some space between the images. This will make your mood board look neat and organized.
Step 4: Add Textures And Colors
Next, add some textures and colors to your mood board. You can use fabric swatches, paint samples, or colored paper. This will give your mood board more depth and interest.
Step 5: Finalize Your Mood Board
Finally, glue or tape your images and textures onto your board. Make sure everything is secure. You can also add some notes or labels with markers or pens. This will help you remember your ideas.
Tips for a Great Mood Board
Here are some tips to help you create a great mood board:
- Keep It Simple: Don’t overcrowd your mood board. Less is more.
- Stay True to Your Vision: Stick to your theme and color palette.
- Be Open to Change: Your mood board is a work in progress. Feel free to make changes as you go.
- Have Fun: Enjoy the process of creating your mood board. It’s a chance to explore your creativity.
Examples of Mood Boards
Here are some examples of mood boards for different painting projects:
| Project | Theme | Color Palette |
|---|---|---|
| Beach Scene | Beach | Blue, Sand, White |
| Forest Landscape | Nature | Green, Brown, Sky Blue |
| Abstract Art | Modern | Bright Colors |
Frequently Asked Questions
What Is A Mood Board?
A mood board is a visual tool that compiles images, colors, and textures to inspire and guide creative projects.
Why Create A Mood Board?
Creating a mood board helps organize your ideas, clarifies your vision, and enhances creativity for your painting projects.
How To Start A Mood Board?
Begin by gathering images, colors, and textures that reflect your painting project’s theme or emotion.
What Materials To Use For A Mood Board?
Use magazines, fabric swatches, paint samples, and digital images to create a diverse and inspiring mood board.
Conclusion
Creating a mood board is a fantastic way to plan your painting projects. It helps you gather your ideas and stay focused. Follow these steps and tips to create your own amazing mood board. Happy painting!