Decoupage is an art technique that lets anyone create beautiful, personalized objects using paper, glue, and paint. It’s simple enough for beginners but can look as professional as store-bought decor. Whether you want to upcycle a plain box, decorate a flowerpot, or refresh your old furniture, decoupage with paint opens endless creative possibilities. Many people think it’s just “glue and paper,” but knowing how to use paint with decoupage takes your results to a much higher level. In this guide, you’ll learn everything you need—from materials and step-by-step methods to advanced paint tips and common mistakes. Along the way, you’ll discover smart tricks that most beginners miss, so you can craft with confidence and style.
What Is Decoupage?
Decoupage comes from a French word meaning “to cut out.” It’s an art form where you glue cut-out paper or fabric pieces onto an object and seal them with layers of varnish or glue. The result is a flat, painted-on look—almost like the design was printed on the surface. You can use decoupage on wood, glass, metal, plastic, or even canvas.
Most people think decoupage is only about gluing paper. But when you combine it with paint, you can add dimension, color, and unique effects that paper alone can’t offer. Paint helps blend edges, create backgrounds, and add highlights or shading.
Essential Materials For Decoupage With Paint
To get the best results, you need the right materials. Don’t worry—there’s nothing expensive or hard to find. Here’s what you’ll need:
- Surface: Wood, glass, plastic, metal, or canvas. Smooth and clean works best.
- Paper or Napkins: Thin paper, tissue paper, or special decoupage napkins. Thinner paper blends better.
- Adhesive/Sealer: Mod Podge, white craft glue (diluted with water), or acrylic gel medium.
- Acrylic Paints: Water-based paints in your chosen colors.
- Brushes: Flat brush for glue, soft brush for paint, and a small detail brush.
- Scissors or Craft Knife: For cutting out shapes.
- Sponge or Foam Brush: For dabbing paint or glue.
- Sandpaper: Fine grit (220–320) to smooth surfaces.
- Clear Varnish or Polyurethane: For the final protective coat.
- Palette and Water Cup: For mixing and cleaning brushes.
- Paper Towels and Gloves: To keep things tidy.
A tip most beginners miss: Test your paint and glue on scrap material first. Some paints can react with glue or make paper wrinkle.
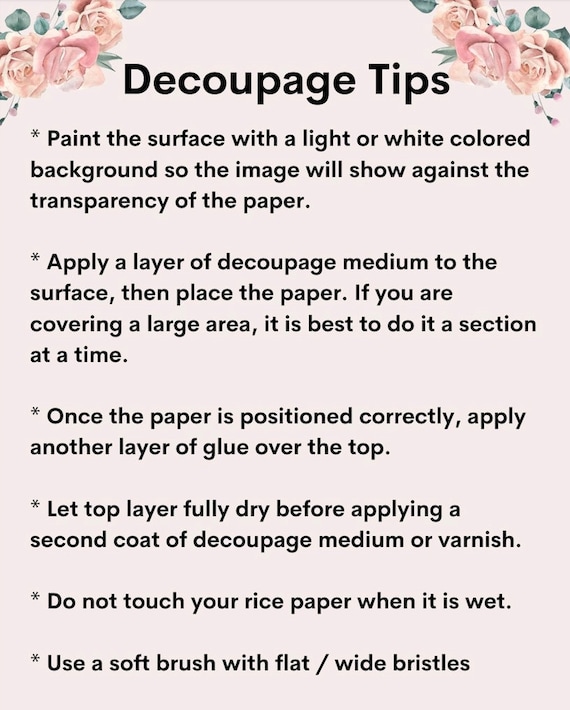
Step-by-step: How To Decoupage With Paint
Decoupage with paint isn’t complicated, but each step matters. Let’s walk through a complete project.
1. Prepare Your Surface
Make sure your object is clean and dry. If it’s wood, sand it gently until smooth. Wipe away dust with a damp cloth. For glass or metal, wash with soap and dry well.
2. Paint The Base
Apply a base coat of acrylic paint in your chosen color. A light color (like white, cream, or pastel) helps paper designs look brighter. Let the paint dry completely. If you want a more solid color, add a second coat.
Pro tip: If your object is dark, always use a white base coat under light-colored paper. This prevents colors from looking dull.
3. Cut Out Your Design
Carefully cut your paper or napkin design. For a softer look, tear the edges instead of cutting straight lines. Torn edges blend better with the background.
4. Arrange And Test
Lay out your cut pieces on the painted surface. Move them around until you like the arrangement. Take a quick photo so you remember the layout.
5. Glue Down The Paper
Brush a thin layer of glue or Mod Podge onto the back of your paper. Place it gently onto the surface. Smooth from the center out, pressing out air bubbles. Use a soft brush or your finger (with gloves).
Avoid using too much glue. This is a common beginner mistake that causes wrinkling and tears.
6. Seal And Dry
Brush another thin layer of glue or Mod Podge over the top of the paper. Cover the edges well. Let it dry for at least 30 minutes.
For a smoother finish, lightly sand after it dries and add a second layer of sealer.
7. Add Painted Details
Now the fun part: use acrylic paint to add shadows, highlights, borders, or backgrounds. This step is what makes your decoupage look professional.
- Outline or shade around paper edges to blend them
- Paint small flowers, dots, or patterns between paper pieces
- Add gold or silver highlights with a detail brush
Let each painted layer dry before adding more.
8. Final Varnish
After your paint and glue are fully dry (wait at least 12 hours), seal everything with a clear varnish or polyurethane. Apply 2–3 thin coats, letting each dry in between. This protects your design and gives a smooth, finished look.
How Paint Transforms Decoupage
Many people think decoupage is just about paper and glue, but paint is what makes it look artistic. Here’s how paint can take your project to the next level:
- Base color: Sets the mood and makes paper colors pop
- Blending edges: Paint helps hide the “sticker” look of cut paper
- Highlights and shadows: Create depth and realism
- Backgrounds: Paint simple patterns or textures behind your paper design
- Metallic effects: Gold, silver, or copper paint add elegance
It’s easy to overlook the power of paint in decoupage. When you use it well, people often can’t tell where the paper ends and the paint begins.

Credit: www.youtube.com
Popular Surfaces For Painted Decoupage
Almost anything can be decoupaged with paint. Here are some popular choices, with their pros and cons:
| Surface | Pros | Cons |
|---|---|---|
| Wood | Easy to sand; holds paint/glue well | Needs sealing for moisture resistance |
| Glass | Modern look; easy to clean | Requires special primer for paint to stick |
| Metal | Durable; can create vintage look | May need sanding or priming first |
| Plastic | Lightweight; many shapes | Paint may peel without proper prep |
| Canvas | Perfect for wall art; easy to hang | Needs a firm base to prevent sagging |
Non-obvious tip: For glass or metal, use a spray primer to help paint stick. Many beginners skip this and find their paint scratches off easily.
Choosing The Right Paint For Decoupage
Not all paints are created equal. Here’s a quick guide to help you choose:
| Paint Type | Best For | Drying Time | Notes |
|---|---|---|---|
| Acrylic | Wood, canvas, plastic, metal, glass | 30 min–1 hour | Water-based, easy to blend, non-toxic |
| Chalk Paint | Furniture, vintage looks | 30 min–2 hours | Matte finish, needs wax or varnish sealer |
| Spray Paint | Large surfaces, even coverage | 10–30 min | Use outdoors, protect from drips |
| Oil Paint | Advanced effects | 6–24 hours | Not recommended for beginners |
Most crafters use acrylic paint for its quick drying and easy cleanup.
Paint Techniques That Enhance Decoupage
Knowing a few painting tricks can make your decoupage look much more professional. Here are some effective techniques:
- Dry Brushing: Use a nearly dry brush to add soft color or highlights around paper edges.
- Sponging: Dab paint with a sponge for a soft, textured background.
- Stippling: Tap the brush tip to create dotted patterns or blend colors.
- Glazing: Thin paint with water to create a transparent layer over paper, blending it into the background.
- Detail Lining: Use a fine brush to add outlines, borders, or veins on leaves and petals.
Example: After decoupaging a flower onto a box, use dry brushing to add light green shading around the petals. This makes the flower look like it’s part of the box, not just glued on.
Common Mistakes And How To Avoid Them
Even experienced crafters make mistakes. Here are some common problems, with solutions:
- Wrinkled Paper: Usually too much glue or paper that’s too thin. Use less glue and press gently.
- Bubbles: Not smoothing from the center out. Use a soft brush or plastic card to press air out.
- Peeling Paint: Skipping primer on slick surfaces like glass or plastic. Always prep your surface.
- Visible Edges: Not blending with paint. Use a small brush to paint softly over and around the edges.
- Cloudy Finish: Sealer applied too thick or before glue dries. Wait at least 12 hours and use thin coats.
Non-obvious insight: Cheap brushes can leave streaks or shed bristles. Invest in a good soft brush for a smoother finish.

Credit: decoupagenapkins.com
Creative Project Ideas
If you need inspiration, here are some simple yet impressive decoupage projects:
- Keepsake box: Paint a wooden box, decoupage floral napkins, and add gold highlights.
- Flowerpot: Use bright paint for the base, decoupage geometric paper, and add painted dots.
- Wall art: Paint a canvas, decoupage vintage maps or quotes, and finish with metallic paint accents.
- Tray or coaster: Use chalk paint, decoupage pretty napkins, then seal with waterproof varnish.
- Furniture upcycle: Paint an old chair, decoupage seat, and add painted patterns on the legs.
Remember: The best decoupage projects mix paint and paper creatively. Don’t be afraid to experiment.
How To Care For Your Decoupage Creations
With proper care, your decoupage art can last for years. Here’s how to keep it looking fresh:
- Wipe gently with a dry or damp cloth—don’t soak
- Keep away from direct sunlight to prevent fading
- Reapply a thin varnish coat every 1–2 years for extra protection
- For items like trays or coasters, use a waterproof sealant
If you want to learn more about preserving your crafts, check out this detailed overview.
Credit: www.etsy.com
Frequently Asked Questions
What Kind Of Paper Works Best For Decoupage?
Thin paper like napkins, tissue paper, or even magazine cutouts work well. Thicker paper can wrinkle or peel. Special decoupage napkins and rice paper are easy to use because they blend into the background.
Can I Use Regular Glue Instead Of Mod Podge?
Yes, you can use white craft glue mixed with a little water. However, Mod Podge is specially made for decoupage and acts as both glue and sealer. It dries clear and is less likely to yellow over time.
How Do I Prevent Bubbles And Wrinkles?
Use less glue, and always smooth paper from the center out. For large pieces, try dampening the paper slightly before gluing. Use a soft brush or plastic card to press out air bubbles.
Is It Safe To Decoupage Items Used For Food?
No. Even with non-toxic glue and paint, it’s best to avoid decoupaging anything that will touch food directly. If you want to decorate plates or cups, decoupage the outside only and use a food-safe sealer.
Can I Decoupage Over Painted Furniture?
Absolutely! Just make sure the paint is fully cured (dried for several days). Sand lightly for a smoother surface, then glue your paper as usual.
Decoupage with paint lets you create stunning, one-of-a-kind pieces at home. With the right materials, a little practice, and the paint tips you’ve learned here, you’ll be amazed at what you can make. Happy crafting!