Are you ready to turn your blank canvas into a vibrant masterpiece without needing years of art training? DIY acrylic pour art is the perfect way to unleash your creativity with simple steps and stunning results.
Imagine watching colorful paints swirl and blend effortlessly, creating unique patterns that no one else has. In this guide, you’ll learn exactly how to do acrylic pour art on canvas, using easy techniques and materials you can find right at home.
Whether you want to decorate your space or gift a personalized piece, this method makes art fun and accessible for you. Keep reading to discover the secrets that will help you create eye-catching acrylic pour paintings that truly stand out.
Materials Needed
Creating beautiful DIY acrylic pour art starts with gathering the right materials. Each item plays a key role in achieving smooth, vibrant results. Prepare all supplies before starting to avoid interruptions during your project. This section breaks down the essential materials you need for acrylic pour painting on canvas.
Acrylic Paints
Choose high-quality acrylic paints for bright, lasting colors. Select several shades to mix and create unique patterns. Fluid acrylics or heavy body paints work well, depending on your pouring technique. Avoid cheap paints as they may crack or fade over time.
Pouring Medium
A pouring medium helps thin the paint without losing color or adhesion. It improves flow and prevents cracking as the paint dries. Common options include Floetrol, Liquitex Pouring Medium, and homemade mixtures. Mixing paint with a pouring medium creates the perfect consistency for pouring.
Canvas Selection
Pick a canvas that suits your project size and style. Stretched canvases on wooden frames are ideal for acrylic pouring. Look for primed or pre-gessoed canvases to protect the fabric and enhance paint adhesion. Thicker canvases hold paint better and reduce warping.
Additional Supplies
Besides paints and canvas, gather some extra tools. Use disposable cups and stir sticks for mixing paint and medium. Plastic gloves protect your hands from stains. A plastic sheet or newspaper covers your workspace. Also, have a level surface and a drying rack ready to avoid paint drips and damage.
Preparing Your Workspace
Preparing your workspace is the first step to a successful acrylic pour art project. A clean and organized area helps you focus on creativity without distractions. Setting up properly keeps your tools handy and your workspace safe from spills. Follow these simple steps to get ready for your acrylic pour painting.
Protecting Surfaces
Cover your table or floor with plastic sheets or newspapers. This prevents paint from staining your furniture. Use painter’s tape to secure the covers in place. Wear old clothes or an apron to avoid ruining your outfit. Keep paper towels or wipes nearby for quick cleanups.
Setting Up Canvas
Place your canvas on a flat, level surface for even paint flow. Elevate the canvas using small cups or blocks to let excess paint drip off. Make sure the canvas is clean and dry before starting. Position it in a space where it can dry undisturbed after pouring.
Organizing Materials
Arrange your paints, cups, and mixing sticks within easy reach. Use separate containers for each color to avoid mixing. Keep your pouring medium and water nearby for quick adjustments. Having everything organized saves time and keeps the process smooth.
Mixing Paints
Mixing paints is a key step in creating stunning acrylic pour art on canvas. The way you blend colors and adjust paint consistency impacts the final look. Proper mixing ensures smooth flow and vibrant colors. Follow simple tips for better results in your DIY project.
Choosing Colors
Select colors that complement each other well. Bright colors bring energy, while pastels create soft effects. Limit your palette to three to five colors. This helps avoid muddy mixes and keeps the design clean. Test color combinations on paper before pouring.
Combining Paint And Medium
Use acrylic paint mixed with a pouring medium for best flow. The pouring medium thins paint without losing color strength. Pour medium into paint slowly and stir gently. Avoid shaking to prevent air bubbles. Proper mixing creates smooth, even layers on the canvas.
Achieving Right Consistency
The paint should flow easily but not be too runny. A good consistency is like warm honey or syrup. Add water little by little to thin thick paint. Mix well after each addition. Test the paint by letting it drip from a stick. It should flow slowly and smoothly.
Pouring Techniques
Pouring techniques shape the look of your acrylic pour art. Each method offers unique patterns and textures. Experimenting helps find the style you enjoy most. Use simple tools and colors to start. Here are three popular pouring methods for canvas art.
Dirty Pour Method
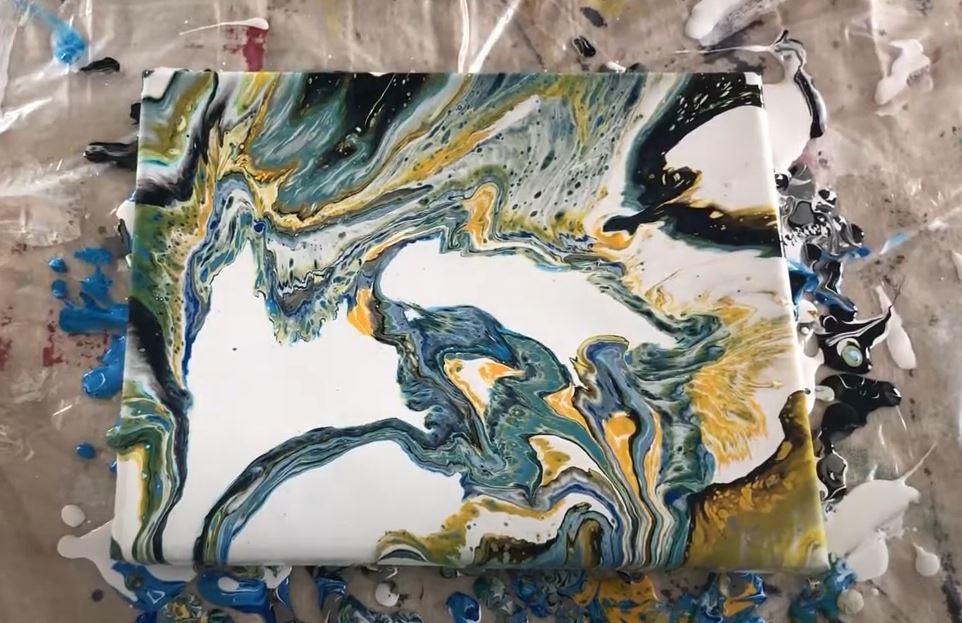
Mix different paint colors together in one cup. Do not stir the colors too much. Pour the mixed cup slowly onto the canvas. The colors will flow and blend naturally. This method creates interesting swirls and cells. It is easy and fun for beginners.
Flip Cup Technique
Fill a cup with layers of paint colors. Place the cup upside down on the canvas. Lift the cup carefully to let the paint flow out. The paint spreads in a unique way. This technique makes bold and colorful designs. It works well for large canvases.
Puddle Pour Approach
Pour one color at a time directly onto the canvas. Create puddles of paint in different spots. Use a stick or tool to move the paint gently. The colors mix but keep some separation. This method gives control over the design. It is great for detailed and soft effects.
Manipulating The Canvas
Manipulating the canvas is a vital step in acrylic pour art. It helps control how the paint moves and mixes. This step creates unique patterns and textures. Learning to move the canvas gently can change the entire look. Each tilt and turn guides the paint flow. This part is exciting because you see your artwork come alive.
Tilting For Flow
Tilt the canvas slowly to spread paint evenly. Move it side to side and up and down. Watch the paint flow to cover the surface. Tilting controls the thickness of paint in each area. It forms beautiful waves and soft blends. Stop tilting when the paint covers the edges.
Creating Cells
Cells are small, round shapes that appear in the paint. They add texture and depth to your art. To create cells, add silicone oil to your paint mixture. After pouring, tilt the canvas gently. Use a heat gun or torch to pop bubbles and bring out cells. The heat helps paint separate and form unique patterns.
Using Tools For Effects
Tools like sticks, brushes, or combs can add special effects. Drag a stick through the paint to make lines or swirls. A brush can create feathered or textured looks. Experiment with different tools to see how the paint reacts. These effects make your artwork more interesting and personal.

Credit: www.youtube.com
Finishing Touches
Finishing touches bring your acrylic pour art to life. They refine the look and add depth. Small steps here make a big difference in the final piece.
Removing Excess Paint
Use a clean cloth or paper towel to gently wipe off extra paint. Focus on the edges and drips. This helps keep the canvas neat and prevents paint buildup. Be careful not to disturb the design on the surface. Light dabbing works best.
Adding Details Like Gold Foil
Gold foil adds shine and a luxurious feel to your artwork. Apply small pieces on dry paint using a soft brush. Press gently so it sticks well. You can place foil on certain areas to highlight shapes or patterns. This step makes your canvas stand out.
Drying And Curing Tips
Let your canvas dry on a flat surface in a dust-free area. Avoid moving it to keep the paint from shifting. Drying usually takes 24 to 48 hours. For full curing, wait up to two weeks. Keep the room temperature steady and avoid humidity. Proper drying ensures your art stays vibrant and lasts long.
Common Mistakes To Avoid
Creating acrylic pour art on canvas is exciting and fun. Yet, some common mistakes can spoil your work. Avoiding these errors helps you get better results and enjoy the process more. Here are key mistakes to watch out for.
Paint Consistency Issues
Paint that is too thick will not flow smoothly. It may create unwanted clumps and uneven patterns. Too thin paint can lose color intensity and run off the canvas. Always test your paint mixture first. Aim for a smooth, pourable consistency that moves easily but holds color well.
Overworking The Canvas
Tilting or spreading the paint too much can mix the colors too much. This causes muddy colors and loses the distinct layers. Pour your paint and tilt gently to let it flow naturally. Stop moving the canvas once you like the pattern. Overworking can ruin the beautiful cells and effects.
Ignoring Safety Precautions
Acrylic paints and additives can irritate skin and lungs. Work in a well-ventilated area to avoid inhaling fumes. Wear gloves to protect your hands from stains and chemicals. Cover your work surface to catch spills and drips. Keep your space clean and safe for a better painting experience.

Credit: www.gathered.how
Cleaning Up
Cleaning up after a DIY acrylic pour art session is important. It keeps your tools ready for next time. It also protects your workspace and the environment. Follow simple steps to dispose of paint safely and clean your brushes well.
Disposing Of Excess Paint
Pour leftover paint into a disposable container. Let it dry completely before throwing it away. Avoid washing large amounts of paint down the drain. This helps protect water systems from pollution.
Use newspaper or cardboard to catch spills. Collect dried paint chips and dispose of them in the trash. Check local rules for hazardous waste disposal if needed.
Cleaning Brushes And Tools
Rinse brushes in warm water right after use. Use mild soap to remove any paint residue. Avoid soaking brushes for too long to prevent damage.
For stubborn paint, gently scrub with a brush cleaner. Dry brushes by reshaping bristles and laying them flat. Clean other tools like cups and stir sticks the same way.
Maintaining Workspace
Cover your work area with plastic or old sheets before painting. After finishing, wipe surfaces with a damp cloth. Remove any paint spills to avoid stains.
Organize your supplies and store them properly. Keep your workspace tidy for easier setup next time. Good habits protect your art space and tools.
Tips For Beginners
Starting acrylic pour art can feel tricky. Simple tips help beginners enjoy the process and improve results. Focus on small projects, try different colors, and be patient with drying. These steps build confidence and create beautiful art.
Starting Small
Begin with a small canvas to practice pouring techniques. Small sizes use less paint and dry faster. It is easier to control paint flow on smaller surfaces. Starting small lowers the chance of wasting materials. This helps you learn without pressure.
Experimenting With Colors
Choose a few colors to mix and pour together. Try light and dark shades to see how they blend. Use colors you like to keep the process fun. Mixing too many colors at once can create muddy results. Keep it simple and test different combinations.
Patience During Drying
Let your canvas dry fully before touching it. Drying time varies but usually takes 24 to 48 hours. Rushing can smudge your work or cause cracks. Place the canvas in a dust-free area with good air flow. Patience ensures your art stays smooth and bright.
Credit: www.artsupplies.co.uk
Frequently Asked Questions
What Materials Do I Need For Acrylic Pour Art?
You need acrylic paints, pouring medium, canvas, cups, and stir sticks. Optional items include silicone oil and a heat gun for special effects. Preparing your workspace with a plastic cover is also helpful to catch drips.
How Do I Prepare The Paint For Pouring?
Mix acrylic paint with a pouring medium to create a fluid consistency. The ratio is usually 1:1 but adjust as needed for flow. Stir gently to avoid bubbles, and add water if the mix is too thick.
Can I Use Any Canvas For Acrylic Pouring?
Yes, most pre-primed canvases work well for acrylic pouring. Primed canvases prevent paint from soaking in and help colors stay vibrant. You can use stretched canvas or canvas boards depending on your preference.
How Do I Create Cells In Acrylic Pour Painting?
Add silicone oil to your paint mixture before pouring to create cells. After pouring, use a heat gun or torch to bring out the cell patterns. Cells add texture and visual interest to your artwork.
Conclusion
Creating DIY acrylic pour art on canvas is fun and rewarding. You only need a few supplies and some patience. Experiment with colors and pouring techniques to find your style. Each pour is unique—no two pieces look the same. Clean your workspace quickly to avoid stains.
Let your canvas dry completely before touching it. Enjoy the process and embrace happy accidents. Your creativity will grow with every pour you try. Keep practicing to improve your skills and confidence. Acrylic pouring is a simple way to make beautiful art at home.