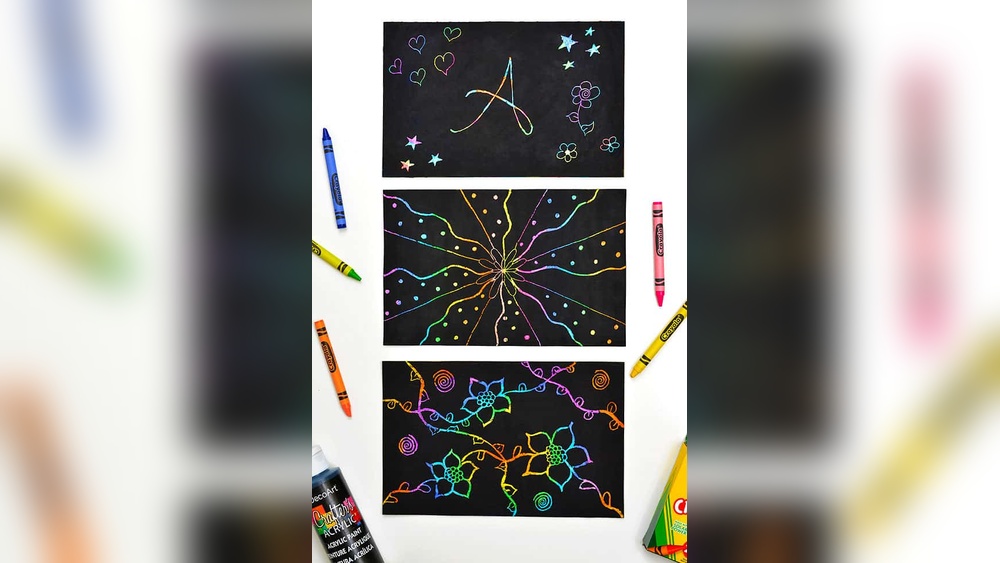
Scratch art hides color under a dark top layer and lets you reveal it line by line with a pointed tool. Every stroke uncovers a sliver of rainbow underneath, which makes even a simple doodle look dramatic. You can buy ready-made scratch paper, but making your own with paint is cheaper, lets you choose the colors, and turns the prep itself into part of the craft.
Quick answer: To do scratch art painting crafts, color heavy card stock completely with bright oil pastels or crayons pressed on hard, then mix black acrylic paint with a few drops of dish soap (about 2 tablespoons paint to 1/2 teaspoon soap) and brush two even coats over the top. Let it dry completely, then scratch a design with a wooden skewer, toothpick or paper clip to reveal the colors underneath.
Below you will find the supplies, the exact paint mix, step-by-step instructions, design ideas from beginner to advanced, and fixes for paint that will not scratch off cleanly. If you are stocking up on colors for this and other projects, our guide to the best craft paint sets covers versatile palettes for home crafts.
How Scratch Art Works
Scratch art relies on a layer that does not stick well to what is underneath. Crayon and oil pastel are waxy or oily, so paint grips them only weakly. Adding dish soap to the paint helps it spread over that waxy surface instead of beading up, while keeping the bond weak enough to scratch away. When you drag a sharp tool through the dry top coat, the paint flakes off and the color shows through.
This is the same principle as the classic sgraffito technique, where artists scratch through one layer of plaster, glaze or paint to reveal another. Scratchboard illustration, used for detailed engravings and wildlife art, takes the idea further with a clay-coated board and a black ink top layer.
Art Supplies Best for Crafts Like Scratch Art
- Base: Heavy card stock, poster board, or watercolor paper. Thin paper tears when you scratch.
- Color layer: Oil pastels (smoother, more vivid) or wax crayons (cheaper, very common).
- Top layer: Black acrylic craft paint, or black tempera paint for a kid-friendly option.
- Additive: Liquid dish soap.
- Brushes: A 1-inch flat brush or foam brush for smooth coverage.
- Scratching tools: Wooden skewers, toothpicks, unfolded paper clips, the end of a paintbrush, an old ballpoint pen with no ink, or plastic scratch styluses.
- Optional: White pencil or chalk for sketching on the black surface, painter’s tape to secure paper, a stencil, and clear spray sealer.
Cheap art and craft supplies that work just as well
Scratch art is one of the most budget-friendly crafts around. Leftover crayon stubs, a single bottle of black craft paint, cereal-box cardboard (for practice pieces), and household skewers are enough. Old gift cards cut into wedges make great tools for wide scraping lines.
Step-by-Step: Homemade Scratch Art Paper
- Tape the paper. Tape your card stock to the table along the edges to keep it still and give you a clean border.
- Color the surface. Fill the whole page with bright colors using oil pastels or crayons. Press hard to build a thick, waxy layer. Leave no white gaps; white areas will reveal plain paper later. Blocks, stripes, rainbow bands and random patches all work.
- Buff the color. Rub the surface lightly with a tissue to smooth the wax and remove crumbs.
- Mix the paint. Combine about 2 tablespoons of black acrylic or tempera paint with about 1/2 teaspoon of dish soap. Stir until smooth.
- Paint the first coat. Brush the mixture over the entire colored surface in one direction. It may look streaky at first; that is normal.
- Dry. Let the first coat dry for 20 to 30 minutes.
- Second coat. Brush on a second coat in the opposite direction to fill streaks and hide all color.
- Dry completely. Wait at least an hour, ideally longer. The surface should feel dry and not tacky.
- Scratch. Remove the tape, sketch lightly with white pencil if you want guides, and start scratching.
Oil Pastel vs. Crayon Base
| Base | Color vibrancy | Ease of scratching | Cost | Notes |
|---|---|---|---|---|
| Oil pastels | Very bright | Very easy; smooth lines | Moderate | Can smear; buff gently before painting |
| Wax crayons | Good | Easy if applied thickly | Low | Press hard; light coverage scratches poorly |
| Markers | Bright | Difficult; paint sticks to paper | Low | Needs a crayon layer on top |
| Watercolor plus crayon | Soft | Moderate | Low | Paint watercolor first, then a clear crayon layer |
Scratch Art Painting Techniques
Line work
Use a fine point for outlines and details. Hold the tool like a pencil and use light pressure; you only need to remove the paint, not dig into the color.
Hatching and cross-hatching
Draw closely spaced parallel lines to create tone. More lines reveal more color and create lighter areas. Crossing lines at an angle builds shading and texture, especially useful for animals and landscapes.
Stippling
Tap the point repeatedly to create dots. Dense dots look lighter; sparse dots stay darker. This gives a soft, grainy effect.
Broad scraping
Use the flat edge of a craft stick, an old gift card or a palette knife to scrape wide areas. Good for skies, water reflections or bold shapes.
Negative space
Scratch around a shape instead of inside it. The black silhouette stands out against the revealed color.
Design Ideas by Skill Level
Beginner
- Fireworks: radiating lines from several points on the page.
- Names and initials in bubble letters, with patterns inside each letter.
- Zentangle-style patterns: divide the page into sections and fill each with a different repeating pattern.
- Night sky with stars, a moon and a skyline silhouette.
Intermediate
- Animals with fur created by short directional lines: owls, foxes, cats.
- Underwater scenes with fish, coral and bubbles.
- Mandalas scratched from the center outward.
- Leaves and botanical designs with detailed veins.
Advanced
- Portraits using cross-hatching for light and shadow.
- Architectural drawings of buildings or bridges with fine linework.
- Wildlife studies in the style of scratchboard illustration, with layered textures.
Color Layer Ideas
The colors under the black change the mood of the final piece.
- Rainbow stripes: Classic, cheerful, great for kids.
- Warm sunset: Yellow, orange, red and pink for fiery designs.
- Cool ocean: Blues, teals and greens for underwater scenes.
- Metallic: Metallic crayons or pastels under black for a luxe, engraved look.
- Planned color zones: Put green where grass will be, blue where the sky goes, and yellow where a moon will appear.
Planning a Scratch Art Design
Because the black surface hides what is underneath, planning helps you put the right colors in the right places and avoid scratching marks you cannot erase.
- Sketch on scrap paper first. Draw your design at the same size as your scratch sheet. Keep it to bold outlines and areas of pattern.
- Map your colors. If you want a yellow moon or a green tree, color those areas of the base layer accordingly before painting. Lightly mark their positions on the edge of the tape so you can find them later.
- Transfer the sketch. Once the black is dry, rub white chalk on the back of your scrap sketch, place it chalk-side down on the scratch sheet, and trace over the lines with a pencil. A faint chalk outline transfers to the black surface.
- Scratch outlines first. Do the main contours with a fine point, then fill areas with pattern or hatching.
- Leave black on purpose. Black areas are part of the design. A balance of scratched and unscratched areas gives contrast and keeps the piece from looking busy.
Fixing mistakes
Scratch art is not as unforgiving as it looks. If you scratch a line in the wrong place, dab a small amount of the soapy black paint over it with a fine brush, let it dry, and scratch again. The patch may look slightly different in texture, so keep fixes small.
Scratch Art Lesson Ideas for Groups
Scratch art works well for classrooms, camps and library programs because one prep session can supply a whole group.
- Prep day: Have participants color and paint sheets in one session, then let them dry overnight.
- Pattern sampler: Divide a sheet into a grid and fill each square with a different line technique: hatching, cross-hatching, stippling, zigzags, circles. This teaches mark-making vocabulary.
- Animal texture study: Assign an animal and focus on fur, feathers or scales using line direction.
- Night city: Scratch building outlines and lit windows, then fireworks above.
- Art history link: Show examples of engraving and scratchboard illustration and talk about how artists create tone with lines alone.
Beyond Paper: Scratch Art on Other Surfaces
The same idea works on different materials.
- Scratch art ornaments: Color a card stock circle, paint over it, scratch a design, punch a hole and hang it.
- Scratch art bookmarks: Cut long strips, scratch patterns, and laminate or seal.
- Glass jars: Paint the outside of a jar in a dark acrylic, let it dry, and scratch patterns so light shines through when a candle sits inside (use an LED tea light for safety).
- Painted wood: Paint a light base color on wood, then a dark top coat, and scratch through it once dry for sgraffito-style signs.
For other textured paint techniques that pair well with scratch art, our tutorial on sponge painting crafts shows how to build colorful mottled backgrounds you can scratch into later.
Scratch Art With Kids
- Use tempera paint and washable crayons for easier cleanup.
- Prepare the scratch paper ahead of time for very young kids, since it needs drying time.
- Give kids blunt tools like wooden craft sticks sharpened in a pencil sharpener, or plastic styluses, instead of metal tools.
- Cover the table; scratched paint flakes create crumbs.
- Encourage simple designs first: rainbows, stars, hearts, names.
Troubleshooting Scratch Art
| Problem | Cause | Fix |
|---|---|---|
| Paint beads up on crayon | No soap in paint | Add a few drops of dish soap and stir |
| Paint will not scratch off | Crayon layer too thin, so paint bonds to bare paper | Press crayons harder for a thick, waxy layer |
| Color shows through black | Only one thin coat | Add a second or third coat |
| Paint flakes off everywhere | Too much soap or very thick paint | Use less soap; apply thinner coats |
| Paper tears | Paper too thin; too much pressure | Use card stock; scratch lightly |
| Black smudges onto design | Paint not fully dry | Wait longer before scratching |
Preserving Finished Scratch Art
The scratched surface can scuff easily. Store finished pieces flat with a sheet of paper on top, or frame them behind glass. A light coat of clear spray sealer can help, but test it first; some sealers can dissolve wax slightly or make black areas look patchy. Spray from a distance in thin coats.
FAQs
What paint do you use for scratch art?
Black acrylic craft paint or black tempera paint mixed with a few drops of dish soap. The soap helps the paint spread over a waxy crayon or oil pastel layer and scratch away cleanly once dry.
Why do you add dish soap to scratch art paint?
Dish soap breaks the surface tension of the paint so it spreads evenly over wax instead of beading up. It also keeps the bond weak enough that the paint scratches off easily.
Can I use crayons instead of oil pastels?
Yes. Crayons are cheaper and work well if you press hard for a thick, waxy layer. Oil pastels give brighter colors and slightly smoother scratching.
What can I use to scratch scratch art?
Wooden skewers, toothpicks, unfolded paper clips, the end of a paintbrush, an empty ballpoint pen, or a plastic stylus. Wider tools like craft sticks or old gift cards are good for scraping larger areas.
How long should scratch art paint dry?
At least an hour after the final coat, and longer in humid weather. The surface should feel dry and not tacky before scratching.
Is scratch art good for kids?
Yes. It builds fine motor control and has an exciting reveal. Use washable materials, blunt tools and adult help with sharp skewers.
Final Thoughts
Homemade scratch art comes down to a thick, waxy color layer, soapy black paint in two even coats, and patience while it dries. Start with fireworks or names, then try hatching and stippling to build texture and shading. Once you have the method, it works on bookmarks, ornaments, jars and wood.
For bright base colors and a dependable black, browse our picks for craft paint sets for DIY projects and keep a set on hand for scratch art days.