
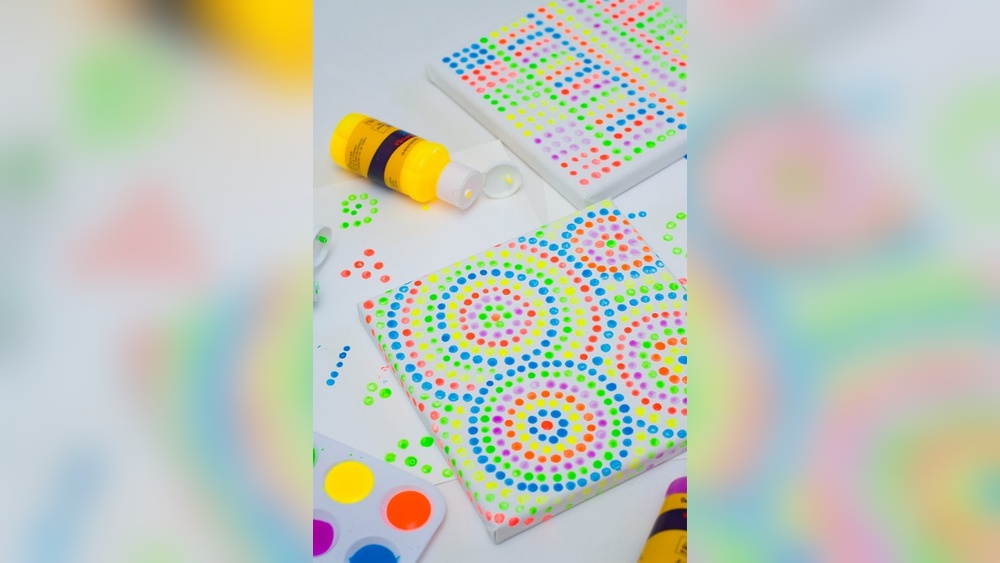
Quick answer: To do dot art painting with kids, give them a tool with a round tip (cotton swabs, pencil erasers, the back end of a paintbrush or dot markers), a few colors of washable paint on a plate, and a simple outline to fill. They dip the tool, press it straight down to make a dot, and repeat in rows, rings or patterns. Keeping dots the same size within a row, and moving from big tools to small ones, gives the cleanest results.
Dot painting is calm in a way many kids’ art activities are not. Each dot is a single, small decision: dip, press, lift. Children who find brushes frustrating often settle into a rhythm with dots, and the patterns they build can look surprisingly polished.
This guide covers how to do dot art painting for kids from the first dot to finished mandalas, animals and landscapes. You will find the best tools for each age, a sizing chart for dot tools, eight project ideas, and fixes for smudged or uneven dots. For the full range of techniques suited to young artists, start with our guide to kids’ painting techniques and activities.
What Is Dot Art Painting?
Dot art is any picture or pattern built from individual dots of paint instead of brushstrokes. Kids’ dot art usually draws on a few traditions:
- Pointillism: a 19th-century European technique using small dots of pure color that blend visually from a distance.
- Mandala dot painting: concentric rings of dots radiating from a center, popular on rocks and round canvases.
- Dot marker art: large, sponge-tipped markers that stamp a round dot, often used with preschool worksheets.
You may also see dot painting associated with Aboriginal Australian art. Those works carry cultural and spiritual meaning tied to specific communities and stories. If you introduce them to children, present them as art from a particular culture to learn about and appreciate, rather than a style to copy using sacred symbols.
Why Dot Painting Is Good for Kids
- Fine motor control: pressing straight down and lifting cleanly takes precision.
- Focus and patience: filling an area dot by dot builds attention span gradually.
- Pattern and math thinking: rings, rows, alternating colors and counting dots all involve patterns.
- Low barrier: a dot is the simplest mark there is, so even toddlers can participate.
- Calm activity: many parents find dot art quieter than other painting sessions.
Art Supplies for Kids Doing Dot Painting
Dot tools and the dots they make
| Tool | Approx. dot size | Best for |
|---|---|---|
| Dot markers (bingo daubers) | About 3/4 inch | Toddlers and preschoolers; large patterns |
| Round sponge dauber or foam pouncer | 1/2 to 1 inch | Big fill areas, backgrounds |
| Pencil eraser end | About 1/4 inch | Medium dots; flowers and animals |
| Cotton swab | 1/8 to 1/4 inch | All-round tool for ages 3 and up |
| Back end of a paintbrush | 1/16 to 1/4 inch, depending on handle | Detail dots, mandala rings |
| Toothpick or ball stylus | Under 1/16 inch | Tiny accent dots for older kids |
Paint and surfaces
- Paint: washable tempera for young kids; student-grade acrylic for older children working on canvas or rocks. Paint should be thick enough to hold a dome shape, about the consistency of toothpaste thinned slightly.
- Paper: cardstock, construction paper or mixed-media paper. Dark paper (black, navy) makes bright dots stand out.
- Canvas: small canvas panels (5 x 7 or 8 x 10 inches) are a good size. Larger canvases take many hours of dotting.
- Other surfaces: smooth rocks, wooden coasters, paper plates, terracotta pots (with acrylic).
Art supplies for beginners kids: a starter kit
A complete dot art kit for a beginner can be small: four or five paint colors including white, a pack of cotton swabs, two pencils with erasers, a few old paintbrushes for their handles, a paper plate palette and a stack of cardstock. Add dot markers for children under four.
How to Do Dot Art Painting for Kids: Step by Step
- Pick a simple design. Start with a shape that has clear edges: a heart, circle, fish, star or the first letter of the child’s name. Draw it lightly in pencil or use a printed outline.
- Set out the paint. Put small puddles of each color on a plate, no bigger than a nickel. Small puddles keep tools from being overloaded.
- Practice on scrap paper. Have your child make a row of dots with each tool. Show that pressing straight down and lifting straight up gives a round dot, while dragging makes a tail.
- Outline the shape first. Place dots along the pencil line, spaced evenly. This defines the shape before filling.
- Fill in from the outside in. Add rows of dots inside the outline, following its contour. Each new row sits just inside the last.
- Re-dip every one or two dots. Dots get smaller as paint runs out. Re-dipping often keeps sizes consistent, unless the child wants a fading effect.
- Change colors in rows. Switching colors every row or two makes the design pop. Use a separate tool for each color.
- Fill the background (optional). Use a contrasting color and a different dot size around the shape.
- Let it dry flat. Thick dots of tempera may take 1 to 2 hours to dry. Raised acrylic dots can take longer to harden fully.
The dot-on-dot technique
Once a dot is dry, a smaller dot of a different color can sit on top of it. This makes a “bullseye” or flower-like dot. Older children can stack three layers: large, medium and tiny. It is a big part of what makes mandala dot art look detailed, and it only requires patience while each layer dries.
Dot Art Painting Ideas for Kids
1. Dot mandala
Start with one large dot in the center of a circle of paper. Add a ring of smaller dots around it, then another ring, alternating colors and sizes. Kids can keep going until they reach the edge.
2. Name dot art
Write a child’s name in large bubble letters and fill each letter with dots. Use a different color for each letter.
3. Rainbow dots
Draw a rainbow arch and fill each band with dots in rainbow order. A good first project for practicing rows.
4. Dot animals
Fish scales, turtle shells, giraffe spots, owl feathers and a lion’s mane all suit dots. For a lion, a ring of orange and yellow dots around a round face creates a textured mane; our step-by-step lion painting for kids shows the basic shapes to start from.
5. Castle art for kids
Draw a simple castle outline with towers and a gate. Fill the walls with gray dots, add colored dots for flags and windows, and a dark blue dotted night sky with tiny white stars.
6. Dot flowers
A single center dot surrounded by five or six petal dots makes a flower. Fill a page with them for a dotted garden.
7. Night sky
On black paper, use the smallest tools to dot white, yellow and pale blue stars. Add a large dot moon.
8. Dot rocks
Smooth, flat rocks make good mandala surfaces. Use acrylic paint and seal with a clear varnish if they will sit outside.
Best Canvas Art for Kids: Dot Painting on Canvas
Canvas makes dot paintings feel like finished pieces worth hanging. A few tips:
- Paint a solid background color first and let it dry fully, usually 30 to 60 minutes for acrylic. Dots look stronger on a dark or colored base than on white.
- Choose a small canvas. An 8 x 10 inch mandala can take an hour or more for a school-age child.
- Use acrylic for permanence; tempera can crack on flexible canvas.
- Sign and date the back.
Do you need an art easel for kids for dot painting?
Not really. Dot painting works best flat on a table because the paint dots are thick and can run on a vertical surface. A tabletop easel at a low angle can help older kids see their work, but a flat table is the safer choice.
Simple Dot Patterns to Teach First
Before tackling a full picture, children can practice a handful of basic patterns. Each one builds a skill they will use in larger projects.
- Straight row: Dots of equal size in a line, evenly spaced. Teaches consistent pressure and re-dipping.
- Color repeat (ABAB): Alternate two colors along a row. Good early math practice for preschoolers.
- Size gradient: Large dot, medium, small, using three different tools. Shows how tools change the mark.
- Ring: Dots placed around a drawn circle. The foundation of every mandala.
- Flower cluster: One center dot with five or six touching it. A building block for gardens and borders.
- Fading dots: Dip once and keep dotting until the paint runs out. Children see dots shrink and lighten, a nice visual effect for comet tails or rain.
A practice sheet with all six patterns takes about 15 minutes and makes a useful reference to hang by the art table.
Dot Art and Early Math
Dot painting connects naturally to counting and patterns. Preschoolers can dot the number of spots a ladybug needs, or make a row of five dots in one color and five in another. School-age children can design symmetrical mandalas where each ring has the same number of dots, which involves planning and division: twelve dots in a ring means one dot every “hour” on a clock face. Older children can explore how the number of dots in each ring grows as the circles get bigger.
Dot Art by Age Group
| Age | Tools | Projects |
|---|---|---|
| 2 to 3 | Dot markers, large sponge daubers | Free dotting, filling big circles, dot-the-letter sheets |
| 4 to 5 | Cotton swabs, pencil erasers | Rainbows, flowers, names |
| 6 to 8 | Brush handles, swabs, mixed sizes | Animals, castles, simple mandalas |
| 9 and up | Styluses, toothpicks, layered dots | Detailed mandalas, dot-on-dot, canvas pieces |
Troubleshooting Dot Painting
| Problem | Cause | Fix |
|---|---|---|
| Dots have tails | Tool dragged while lifting | Lift straight up, not sideways |
| Dots are flat and faint | Paint too thin or tool not re-dipped | Use thicker paint; re-dip every dot or two |
| Dots run together | Placed too close while wet | Leave a small gap; let rows dry briefly |
| Dots have peaks | Paint too thick or lifted too slowly | Thin paint slightly; lift with a quick motion |
| Smudges across the work | Hand resting on wet dots | Work from top to bottom (or left to right for right-handers) |
Tips for a Calm Dot Art Session
- Play quiet music and set a relaxed pace. There is no rush to finish.
- Offer smaller pieces of paper so children can finish in one sitting.
- Let children choose a limited palette, such as three colors plus white.
- Break larger pieces into sessions. Thick dots need drying time anyway.
- Show finished work at eye level; children often enjoy seeing the pattern from a distance.
FAQs
What do you use for dot painting with kids?
Cotton swabs, pencil erasers, the back end of paintbrushes and dot markers are the most common tools. Each makes a different dot size, so having two or three on hand adds variety.
What art supplies are best for kids starting dot art?
Washable tempera in a few colors, cotton swabs, pencils with erasers, cardstock and a paper plate palette are enough to start. Dot markers are easiest for toddlers and preschoolers.
What age can kids start dot painting?
Toddlers around two can use dot markers or large sponge daubers. By four or five, most children can use cotton swabs and erasers to fill simple shapes.
How do I make dot painting look neat?
Outline the shape with dots first, fill in rows following the outline, re-dip often to keep dots the same size, and lift tools straight up to avoid tails.
Is acrylic or tempera better for dot art?
Washable tempera is easier for younger kids and cleans up with water. Acrylic is more permanent and suits canvas, rocks and wood, so it is better for older children with supervision.
How long does dot art take to dry?
Thin dots dry in 20 to 30 minutes, but thick, raised dots may need one to two hours or longer, especially when layered.
Next Step
Dot painting gives kids a calm, satisfying way to build patterns and pictures from the simplest possible mark. Start big with dot markers or cotton swabs, move to smaller tools as control improves, and try mandalas, animals or a dotted castle once the basics click. For more technique ideas to rotate through your child’s art time, see our full guide to painting projects for young artists.





One Comment