Have you ever wanted your digital paintings to leap off the screen with realistic depth and dimension? Mastering perspective painting in Procreate can transform your artwork from flat sketches into captivating scenes that draw viewers in.
Whether you’re a beginner or looking to sharpen your skills, learning how to use Procreate’s powerful perspective tools will give your creations a professional edge. In this guide, you’ll discover simple, step-by-step techniques that make setting up perspective grids and creating dynamic compositions easier than ever.
Ready to unlock the secret to stunning, lifelike digital art? Let’s dive in and make your next painting truly stand out.
Setting Up Perspective Guides
Setting up perspective guides is the first step to creating realistic depth in your Procreate paintings. These guides help you draw objects that shrink and vanish in the right direction. It makes your artwork look more natural and three-dimensional. Procreate offers easy tools to set these guides, so you can focus on your art without guesswork.
Accessing Drawing Guides
Open your canvas in Procreate. Tap the wrench icon to open the Actions menu. Go to the Canvas tab and select “Edit Drawing Guide.” This opens the Drawing Guides settings. You will see several guide options to choose from. This is where you start setting up your perspective lines.
Choosing Perspective Mode
At the bottom of the Drawing Guides screen, tap “Perspective.” This changes the guide lines to a perspective grid. The grid shows vanishing points and lines that help with depth. You can switch between one-point, two-point, or three-point perspective here. Pick the mode that fits your painting’s needs.
Adjusting Vanishing Points
Drag the small circles on the grid to move the vanishing points. Position them to match the angle you want for your drawing. These points control how your lines converge and create depth. You can add or remove vanishing points depending on the perspective mode. Adjusting them carefully ensures your painting looks balanced and accurate.
Credit: bardotbrush.com
Using Drawing Assist
Using Drawing Assist in Procreate makes perspective painting easier and more precise. This tool helps you draw lines that follow perspective rules automatically. It guides your strokes so they align perfectly with the perspective grid. This keeps your artwork neat and realistic.
Drawing Assist works well with the perspective guides you set up in Procreate. It reduces mistakes and speeds up your workflow. You can focus more on your creativity and less on technical details.
Enabling Drawing Assist
First, open your Procreate canvas and select a layer. Tap on the layer to open Layer Options. Turn on the “Drawing Assist” toggle. This activates the feature for that layer only. Now, any lines you draw will snap to the active guides automatically. You can enable or disable this anytime for different layers.
Snapping Lines To Guides
With Drawing Assist on, your strokes follow the guide lines exactly. This means your lines snap perfectly to the perspective grid. It helps keep edges straight and angles correct. Even curved lines will adjust subtly to match perspective. This snapping effect saves time and improves accuracy in your painting.
Switching Between Perspective Types
Procreate supports one, two, and three-point perspective grids. You can switch between these types in the Drawing Guide settings. Tap “Edit Drawing Guide” and select the “Perspective” option. Choose the perspective type that fits your artwork. Drawing Assist will adapt to the new grid automatically. This flexibility lets you create many different scenes with accurate perspective.
Creating One-point Perspective
Creating one-point perspective is a fundamental skill for adding depth to your digital paintings in Procreate. It helps objects appear realistic by showing how they get smaller as they move away. This method uses a single vanishing point on the horizon line to guide your drawing. Follow the steps below to create a strong one-point perspective in your artwork.
Positioning The Horizon Line
The horizon line represents the viewer’s eye level in the scene. Start by drawing a horizontal line across your canvas. Place it high, low, or in the middle depending on the view you want. A low horizon line gives a worm’s-eye view, while a high line gives a bird’s-eye view. Keep it simple and clear as it sets the base for your perspective.
Placing The Single Vanishing Point
Next, add the vanishing point on the horizon line. This is where all lines will converge. Usually, it sits in the center, but moving it left or right changes the angle. Tap your canvas in Procreate to mark this point. All your perspective lines will lead here to create depth.
Sketching Basic Shapes
Begin sketching simple shapes like squares or rectangles. Draw lines from their corners straight to the vanishing point. This forms the sides of your objects in perspective. Use these guides to shape buildings, roads, or other elements. Keep shapes light and easy to adjust. This helps maintain correct proportions as you build your scene.
Working With Two-point Perspective
Working with two-point perspective creates realistic, dynamic drawings. It uses two vanishing points on the horizon line. These points guide the angles of objects, adding depth and volume. Artists often use this method for buildings and corners. The technique helps to show how objects recede into space from different sides.
Setting Dual Vanishing Points
Start by drawing a horizon line across your canvas. Place two dots far apart on this line; these are your vanishing points. Make sure they are spaced wide enough for your composition. Activate Procreate’s drawing guide and select the perspective option. Then, set these two points as your guide’s vanishing points. This setup will help snap your lines to the correct angles.
Drawing Objects In Two-point Perspective
Begin by sketching the corner edge of the object between the two vanishing points. From this edge, draw lines extending toward each vanishing point. These lines form the sides of your object. Use Procreate’s assist feature to keep lines straight and aligned. Connect the ends of these lines with vertical lines to create the object’s shape. Repeat the process for more objects, keeping their corners aligned to the horizon.
Maintaining Proportions And Depth
Objects closer to the viewer appear larger, while distant objects look smaller. Use the vanishing points to scale the sides properly. Check that all lines converge correctly to the two points. Adjust the height of objects by drawing vertical lines between the angled lines. This maintains realistic proportions and depth. Layer objects carefully to enhance the sense of space and distance.
Exploring Three-point Perspective
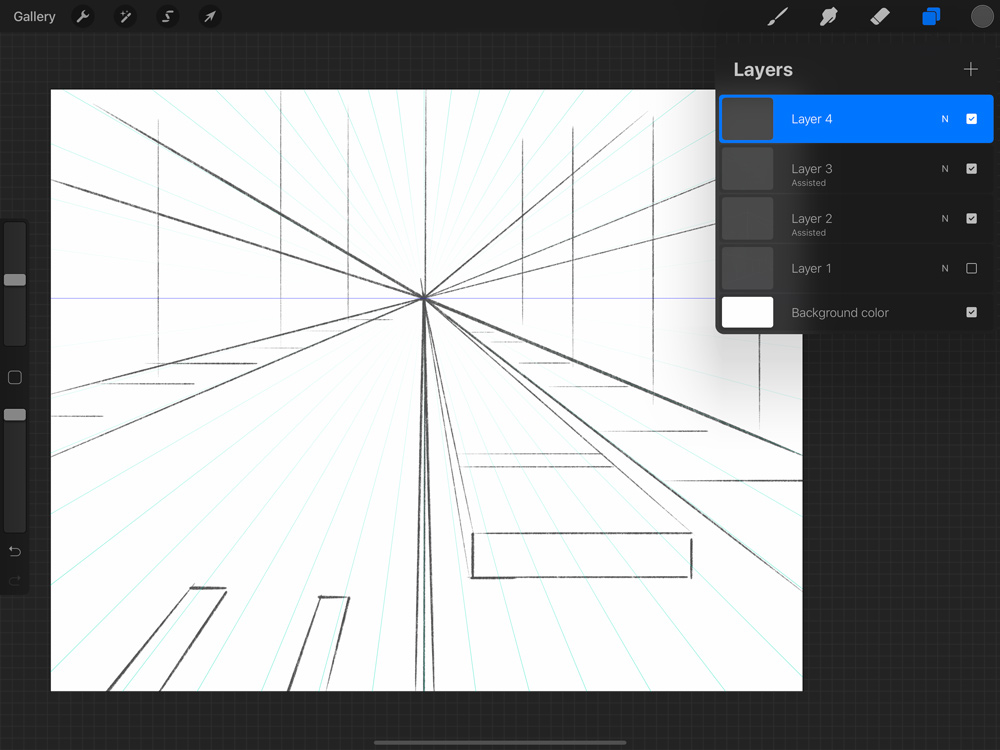
Three-point perspective adds depth and realism to your artwork. It creates a view from above or below an object. This method uses three vanishing points to guide your drawing.
It is perfect for drawing tall buildings, cityscapes, or dramatic angles. Understanding this technique helps you create more dynamic and believable scenes. Procreate offers tools to make this easier and more precise.
Adding The Third Vanishing Point
Start by setting up two vanishing points on the horizon line. Then add the third vanishing point above or below the horizon. This third point controls vertical lines in your drawing.
Use Procreate’s perspective guide to place these points accurately. The third point gives your artwork a strong sense of height or depth. It helps objects appear taller or deeper than in two-point perspective.
Rendering Complex Structures
Three-point perspective suits complex buildings and structures. Break the structure into simple shapes and apply the perspective points. Use vertical lines directed toward the third vanishing point.
Work layer by layer in Procreate to manage details. This approach keeps your drawing organized and clean. It also helps you maintain the correct proportions and angles.
Avoiding Common Mistakes
Do not place the vanishing points too close together. This can distort the image and create an unnatural look. Keep the points spread out to balance your composition.
Avoid ignoring the third vanishing point’s role in vertical lines. Forgetting it causes lines to tilt incorrectly. Always double-check your guides before you start drawing.

Credit: www.youtube.com
Painting With Perspective
Painting with perspective brings your artwork to life. It creates a sense of space and depth. Using Procreate, you can make your scenes look real and engaging. The key is to apply color, shading, and details thoughtfully. These techniques help your painting feel three-dimensional and dynamic.
Applying Color And Shading
Start by choosing colors that match the light source. Objects closer to the viewer often have brighter and warmer colors. Distant objects usually appear cooler and lighter. Use shading to show how light hits different surfaces. Shadows add volume and form to your shapes. Gradually change color and value to simulate distance. This simple step makes your painting more believable.
Using Overlapping And Size Variation
Overlap objects to show which ones are in front. This technique builds a clear sense of space. Larger objects seem closer, while smaller ones appear far away. Adjust the size of elements based on their distance. Overlapping combined with size change enhances the depth. It guides the viewer’s eye through the scene naturally.
Enhancing Depth With Details
Add more details to objects in the foreground. Keep details soft or minimal in the background. This difference mimics how we see things in real life. Sharp edges and textures draw attention to closer parts. Blurred or faded elements push the background further back. Details help create a rich, immersive perspective painting.
Tips For Refining Perspective Art
Refining perspective art in Procreate enhances the realism and appeal of your painting. Small adjustments create big differences in how the viewer perceives depth and space. Focus on correcting errors, managing layers, and adding textures to bring your scene to life.
Correcting Perspective Errors
Check lines against your perspective guide often. Straighten any lines that stray from vanishing points. Use the transform tool to adjust shapes that look off. Redraw elements that break the perspective rules. This keeps your artwork consistent and believable.
Using Layers Effectively
Separate your sketch, line art, colors, and shadows on different layers. Lock completed layers to avoid accidental changes. Use clipping masks to apply color only within shapes. Rename layers to stay organized during complex projects. This method speeds up corrections and improves workflow.
Incorporating Textures And Highlights
Add subtle textures to surfaces for a realistic touch. Use brushes that mimic real-world materials like wood or stone. Apply highlights along edges facing the light source. This adds depth and makes objects stand out. Blend softly for smooth transitions and natural effects.

Credit: www.reddit.com
Exporting And Sharing Your Artwork
Exporting and sharing your perspective paintings in Procreate is the final step to showcase your creativity. Proper export settings keep your artwork sharp and clear. Sharing on the right platforms helps reach the right audience. This section guides you through exporting and sharing your digital art effectively.
Choosing Export Settings
Open the Actions menu in Procreate and tap Share. Select the file format that fits your needs. PNG is best for high-quality images with transparency. JPEG works well for smaller file sizes and general use. TIFF offers maximum quality but creates large files. Always check the resolution; 300 DPI is great for printing. For digital use, 72 DPI is enough. Export with the color profile set to sRGB for most screens.
Saving For Different Platforms
Each platform has unique requirements for images. Instagram prefers square images of 1080×1080 pixels. Facebook supports various sizes but 1200×630 pixels is ideal. Twitter works well with 1200×675 pixels for shared images. For online portfolios, use large, high-resolution files. Save multiple copies if needed for different uses. Keep original files safe for future edits.
Showcasing Your Perspective Paintings
Post your artwork in art communities and social media. Write a short description explaining your painting’s perspective. Use relevant hashtags related to digital art and Procreate. Engage with comments to build a following. Consider making a time-lapse video of your painting process. Share your work on platforms like Behance or ArtStation. Displaying your art helps you grow and get feedback.
Frequently Asked Questions
How To Do Perspective In Procreate?
Open Actions > Canvas > Edit Drawing Guide in Procreate. Select Perspective, choose 1, 2, or 3-point perspective. Adjust vanishing points and enable Drawing Assist to draw with perspective accuracy.
Can You Do 4 Point Perspective In Procreate?
Yes, Procreate supports 4-point perspective using its Drawing Guide feature. Enable Perspective mode and adjust vanishing points accordingly.
How To Set Up A 3 Point Perspective?
Set three vanishing points: two on the horizon and one above or below. Draw lines from each point to form the perspective grid. Use this grid to sketch objects, ensuring edges align with the vanishing points for accurate 3 point perspective.
How To Add Perspective To Painting?
Add perspective by using vanishing points and horizon lines to guide object placement. Vary object size and overlap elements to create depth. Apply foreshortening to enhance realism. Use Procreate’s Perspective Drawing Guide for digital paintings to align and maintain accurate perspectives easily.
Conclusion
Practice regularly to improve your perspective painting skills in Procreate. Use the drawing guides and vanishing points to create depth. Keep your lines clean and adjust angles as needed. Experiment with size and placement to make your art realistic. Remember, patience helps you grow as an artist.
Enjoy the process and watch your paintings come alive with perspective.