
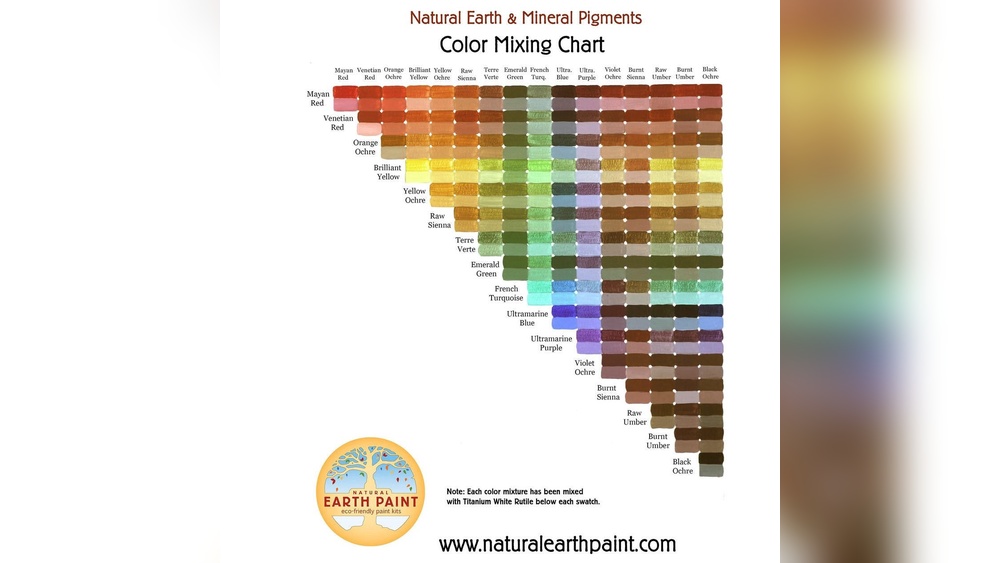
Quick answer: To mix oil paint colors, lay out a limited palette around the edge of your palette, pull a small amount of the dominant color into the center with a palette knife, and add the second color a little at a time, folding until the streaks disappear. Always add dark to light and strong to weak, never the reverse. Mixing with a knife keeps colors cleaner and saves brushes, and a simple mixing chart teaches you what each pair of tube colors can do.
Most beginners learn color mixing backwards. They squeeze out a dozen tubes, stir colors together with a brush, and wonder why the results look chalky or brown. The fix is not more colors. It is a small, well-chosen palette and a handful of mechanical habits that keep each mixture clean and predictable.
This guide explains how to mix oil paint colors from the ground up: which colors to start with, how to set up the palette, the knife technique, how to make tints, shades and neutrals, how to build a mixing chart, and how mediums fit in. Once the mechanics are second nature, the follow-up article on mixing oil colors for realistic light and shadow shows how to apply them to observed subjects.
Start With a Limited Palette
A limited palette forces you to mix, and mixing is how you learn. It also keeps paintings harmonious, because every color is related to every other. A widely used beginner setup is the split-primary palette: a warm and a cool version of each primary, plus white.
| Color | Warm option | Cool option |
|---|---|---|
| Yellow | Cadmium yellow medium or hue | Cadmium yellow lemon or lemon yellow |
| Red | Cadmium red light or hue | Alizarin crimson (permanent) or quinacridone rose |
| Blue | Ultramarine blue | Phthalo blue or cerulean blue |
| White | Titanium white (opaque, strong tinting) or a titanium-zinc blend | |
Many painters add two earth colors, yellow ochre and burnt umber or burnt sienna, because they are inexpensive, dry relatively quickly and make natural-looking neutrals. That gives you nine tubes that can mix nearly any color you will need.
Paint quality affects mixing more than people expect. Student-grade “hue” colors often contain fillers and substitute pigments, which can make mixes weaker or duller. Artist-grade colors usually carry more pigment and mix more cleanly. If you are deciding what to buy, the comparison of oil paint sets for beginners and working artists lays out the trade-offs between grades and set sizes.
How to Set Up Your Palette for Clean Mixing
Palette layout sounds trivial, but a consistent arrangement prevents a surprising number of mixing mistakes.
- Place colors around the outer edge. Leave the center open as your mixing area. Squeeze out generous mounds, about the size of a large grape for most colors and larger for white, which you will use most.
- Arrange them in the same order every time. A common sequence runs white, then yellows, reds, earths and blues, roughly following the color wheel. Your hand learns where each color is.
- Keep the white separate. Put white in a corner or at one end with plenty of space, since it gets contaminated fastest.
- Use a neutral mid-gray palette if you can. A gray surface lets you judge value and color more accurately than a bright white or dark wooden one.
- Keep a rag and a knife within reach. You will wipe your tools constantly.
How to Mix Oil Paint: The Palette Knife Method
A palette knife mixes more thoroughly than a brush, does not trap pigment in the bristles, and wipes clean in one swipe. That makes each mixture cleaner and protects your brushes from wear.
- Pull the main color into the mixing area. Take a small amount of the color that will dominate the final mix and drag it into the center.
- Add the second color in small amounts. Pick up a little of the modifying color on the tip of the knife and set it beside the first.
- Fold, press and spread. Lay the knife flat, press the colors together, spread them into a thin layer, then scrape them back into a pile. Repeat until you see no streaks.
- Check and adjust. Compare the mix with what you need. Add more of either color in small steps.
- Wipe the knife. Clean the blade before reaching into any tube mound so you do not contaminate your pure colors.
Two rules prevent most waste:
- Add dark to light, not light to dark. A tiny amount of blue darkens a lot of white. Lightening a dark mix takes far more white, so you end up with a mountain of paint.
- Add strong to weak. Phthalo blue and phthalo green are so powerful that a speck can overwhelm a mixture. Add them to other colors, never the other way round.
How Do Colors Mix? Primaries, Secondaries and Complements
The traditional painter’s color wheel uses red, yellow and blue as primaries. Mixing two primaries gives a secondary: orange from red and yellow, green from yellow and blue, violet from blue and red. Colors opposite each other on the wheel are complements: red and green, orange and blue, yellow and violet.
The useful insight is what happens when you mix complements. Small amounts reduce intensity without changing value much, giving you a more natural, muted color. Larger amounts produce grays and browns. That is the backbone of controlled color mixing, and it means you rarely need black to tone down a color.
What colors to mix for common secondaries
| Target | Cleanest pairing | Muted pairing |
|---|---|---|
| Green | Lemon yellow + phthalo blue | Yellow ochre + ultramarine blue |
| Orange | Cadmium yellow medium + cadmium red light | Yellow ochre + alizarin crimson |
| Violet | Alizarin crimson or quinacridone rose + ultramarine | Cadmium red light + phthalo blue |
The clean pairings work because both colors lean toward the target. The muted pairings each contain a trace of the third primary, which grays the result. Both are useful: bright secondaries for flowers and accents, muted ones for landscapes and backgrounds.
Tints, Shades, Tones and Neutrals
Tints (adding white)
White lightens a color but also cools it and reduces chroma. Reds become pinks, and many blues turn icy. To keep a light color warm, add a speck of yellow or yellow ochre along with the white.
Shades (darkening)
Rather than adding black, darken with a deeper color nearby on the wheel. Darken yellow with yellow ochre and a little raw umber. Darken red with alizarin crimson. Darken blue with a touch of burnt umber. This keeps darks lively.
Tones and grays
A tone is a color with gray or its complement added. Mixing ultramarine with burnt sienna, plus white, produces a range of warm-to-cool grays that look more natural than black and white. Shift the ratio toward blue for cool gray, toward sienna for warm gray.
Chromatic black
Ultramarine blue and burnt umber in roughly equal amounts give a deep, flexible dark. Alizarin crimson plus phthalo green gives another, slightly more transparent version.
How to Mix Paint Colors Chart: Build Your Own
A mixing chart is the fastest way to learn what your specific tubes can do. It takes an afternoon and becomes a reference you will use for years.
- Prepare a surface. Use a primed canvas board or heavyweight oil paper around 12 by 16 inches. Draw a grid with one row and one column for each color on your palette.
- Label the edges. Write the color names along the top and down the left side, in the same order.
- Fill each square with a 50/50 mix. Where row and column meet, paint an equal mixture of the two colors. The diagonal holds each pure tube color.
- Add a tint strip. In the lower half of each square, add white to the mix. Many colors reveal their true character only when lightened.
- Let it dry and keep it. Pin it near your easel. When you need a particular green or violet, find it on the chart and you will know which two tubes to reach for.
A more advanced version mixes each pair in steps, such as 75/25, 50/50 and 25/75, which shows how quickly a strong pigment takes over.
How to Mix Oil Painting Medium Correctly
Mediums change consistency, drying time and gloss. They do not change hue, but using them carelessly causes cracking, wrinkling and dull patches.
- Solvent (odorless mineral spirits): thins paint for lean early layers and the underpainting. Use it sparingly and ventilate the room.
- Linseed oil: increases flow and gloss and slows drying. Add only a few drops to paint for later layers.
- Alkyd mediums: speed up drying, often to touch-dry overnight in thin films, which suits layered work.
- A traditional mix: some painters combine solvent, linseed oil and sometimes damar varnish. Increase the oil proportion in later layers to keep each layer fatter than the one below.
Mix medium into paint on the palette with the knife, a drop at a time, until the paint flows the way you want. If it starts running or looks glassy, you have added too much.
Common Mixing Mistakes and Quick Fixes
| Problem | Likely cause | Fix |
|---|---|---|
| Muddy brown mixes | Too many pigments, dirty brush | Remix with two or three colors; clean tools between mixes |
| Chalky, pastel look | Too much white | Lighten with a lighter hue first, then add white |
| Greenish darks | Black mixed with yellow or warm colors | Darken with umber, alizarin or ultramarine instead |
| Running out mid-painting | Mixing too little | Mix more than you think, and keep a dab for reference |
| Phthalo taking over | Adding weak color to strong | Always add phthalos in tiny amounts to other colors |
How to Mix Paint Colors at Home on a Budget
You do not need an elaborate studio. A sheet of glass with gray paper underneath makes an excellent, easy-to-clean palette. A single flexible steel palette knife costs little and handles almost all mixing. Glass jars with tight lids work for solvent, and old cotton T-shirts make good lint-free rags. Starting with five to seven tubes keeps costs down while you learn.
Ventilation still matters at home. Use odorless mineral spirits rather than turpentine, keep lids on solvent jars, and dispose of oily rags safely, laying them flat to dry or storing them in a sealed metal container, since linseed-soaked rags can self-heat.
If you are picking colors for a room, a sign or furniture instead of a canvas, that is a different process with different paints; the guide on choosing paint colors covers that side of things.
FAQs
How do you mix oil paint colors without a brush?
Use a flexible palette knife. Press, spread and fold the colors together in the center of your palette until no streaks remain. Knife mixing is cleaner and more thorough than brush mixing and does not wear out your brushes.
What are the basic colors needed to mix all oil colors?
A warm and cool yellow, red and blue plus titanium white will mix most colors. Adding yellow ochre and burnt umber makes natural neutrals and earth tones much easier.
Can you mix acrylic and oil paint?
No, not in the same mixture, because they do not bond chemically. Oil can be painted over a fully dried acrylic underpainting, but acrylic should never go on top of oil.
Why does my mixed color look different on the canvas?
Color is judged relative to its surroundings, so a mix that looks right on the palette can look too light or dark beside other colors. Test a dab on the painting before mixing a large batch.
How much medium should I add to oil paint?
Usually very little: a few drops per mixture. Lean early layers can use more solvent, while later layers should contain slightly more oil than the ones beneath to stay flexible.
How do I keep mixed oil paint from drying out?
Cover the palette with plastic wrap or store it in an airtight palette box. Some painters keep a sealed palette in the freezer between sessions, which slows oxidation considerably.
Next Step
Clean mixing comes from a small, balanced palette, a palette knife and a few habits: dark into light, strong into weak, two or three pigments per mix. A homemade mixing chart turns those habits into knowledge of your own paints. When you are ready to choose colors with strong single pigments that mix predictably, see our breakdown of the best oil color sets for artists and beginners.





One Comment