Have you ever wanted to capture the magic of a hot air balloon floating gently in the sky with your own brush? Painting a hot air balloon with acrylics is a fun and rewarding way to bring vibrant colors and a sense of adventure to your artwork.
Whether you’re a beginner or looking to refine your skills, this guide will walk you through easy steps to create a stunning acrylic painting that you’ll be proud to display. Get ready to add a splash of color and lift your creativity to new heights! Keep reading to discover how simple techniques can transform your canvas into a bright, soaring masterpiece.
Materials Needed
Gathering the right materials is the first step to paint a hot air balloon with acrylics. Having quality supplies helps create vibrant and lasting artwork. The tools and paints you select affect your painting experience and results.
This section covers the essential items needed. It guides you through choosing paints, brushes, and preparing your surface. Each part ensures your painting process is smooth and enjoyable.
Choosing Acrylic Paints
Select acrylic paints made for artists. These offer rich colors and good coverage. Choose bright colors for the balloon’s panels, like red, yellow, and blue. Also, get white and black for shading and highlights. Avoid cheap paints that may fade or crack over time.
Brushes And Tools
Pick a variety of brushes to handle different details. Use flat brushes for large areas and round brushes for fine lines. Have a small detail brush for balloon ropes and patterns. Keep a palette for mixing colors and a cup of water for cleaning brushes. Paper towels help wipe brushes clean quickly.
Surface Preparation
Prepare your canvas or paper before painting. Use a smooth, primed surface for best results. If using canvas, apply a layer of gesso to seal it. Let the gesso dry fully. This stops paint from soaking in and makes colors pop. Clean the surface to remove dust or oils that block paint adhesion.

Credit: us.amazon.com
Setting Up Your Workspace
Setting up your workspace is the first step to a smooth painting experience. A well-prepared area helps you focus and enjoy painting your hot air balloon with acrylics. Organizing your tools and ensuring proper lighting and ventilation makes the process easier and safer.
Organizing Supplies
Gather all your paints, brushes, and canvases before starting. Arrange them within easy reach to avoid interruptions. Use containers or trays to keep brushes and tools tidy. Prepare water cups for rinsing brushes. Lay down a cloth or paper to protect your surface from spills. Keeping your workspace neat saves time and reduces stress.
Lighting And Ventilation
Good lighting shows true colors and fine details. Natural light is best, so set up near a window if possible. Use bright, white light bulbs if natural light is limited. Proper ventilation keeps the air fresh and reduces paint fumes. Open windows or use a fan to circulate air. A clean, well-lit space boosts creativity and comfort.
Sketching The Balloon
Starting with a clear sketch is essential for painting a hot air balloon in acrylics. This step lays the foundation for your artwork. A good sketch helps you place the balloon correctly and plan the colors and details. Keep your lines light and simple to allow easy changes. Use a pencil for easy erasing and adjustments. Sketching lets you see the shape and size before adding paint.
Basic Balloon Shape
Begin by drawing the basic shape of the balloon. Most hot air balloons have a rounded, teardrop form. Sketch a large oval or circle for the main part. Make sure it is smooth and even on both sides. The top should be more rounded, and the bottom tapers slightly. This simple shape acts as the balloon’s body. Avoid adding details at this stage. Focus on symmetry and size to make it look balanced.
Adding Details And Basket
Next, add details to bring your balloon to life. Draw vertical and horizontal lines on the balloon’s surface to suggest panels. These lines give the balloon texture and structure. Then, sketch the basket below the balloon. Draw a small rectangle or trapezoid shape connected with thin lines for ropes. Keep the basket simple but proportional to the balloon. Adding these elements early helps guide your painting process and keeps the composition clear.
Painting The Background
Painting the background sets the stage for your hot air balloon acrylic artwork. A well-crafted background enhances the balloon’s colors and adds depth. Keep the background simple yet lively to avoid distracting from the main subject. Focus on the sky and clouds, as they create a natural environment for the balloon. Use blending techniques to make the background smooth and realistic. These methods help connect all parts of the painting seamlessly.
Sky And Clouds
Start by painting the sky with light blue acrylic paint. Use a large flat brush for broad strokes. Apply the paint evenly from top to bottom, making the top darker and the bottom lighter. This adds a sense of distance and height.
Next, create clouds using white paint mixed with a bit of gray or blue. Use a round brush with soft edges to dab the paint gently. Shape the clouds as fluffy and random patches. Avoid hard edges to keep them natural. Add highlights by layering pure white on top of the clouds.
Blending Techniques
Blending helps smooth transitions between colors in the sky and clouds. Use a dry brush or sponge to gently blend wet paint edges. Work quickly before the paint dries. Soft circular motions blend colors smoothly.
Another technique is layering thin washes of paint. Thin the acrylic with water and apply light layers. Let each layer dry before adding the next. This builds depth and a soft glow effect. Blending creates a more realistic and inviting background for your hot air balloon.
Base Colors For The Balloon
Choosing the right base colors sets the foundation for a vibrant hot air balloon painting. Base colors create the main shapes and mood of the balloon. They help define each section clearly before adding details or highlights.
Start with clear, bright colors that match your vision. These colors will cover large areas and must blend well with later layers. Use smooth, even strokes to avoid patchy spots.
Selecting Color Palette
Pick colors that contrast yet complement each other. Bright reds, blues, yellows, and greens work well for balloons. Avoid dull or muddy shades for base layers. Consider using warm colors for a cheerful feel or cool colors for calmness.
Limit your palette to three or four main colors. This keeps the design simple and striking. Use a color wheel to find balanced combinations. Test colors on a scrap paper before painting the balloon.
Applying Base Layers
Use a flat brush for broad, smooth coverage of each balloon section. Apply thin layers of paint and let each dry before adding the next. This builds solid color without cracking.
Cover the entire balloon shape with your chosen base colors. Keep strokes consistent and avoid overworking the paint. Clean brush edges between colors to keep sections sharp.
Once the base is complete, the balloon will look bright and ready for details. The solid colors help later layers stand out clearly.

Credit: theartsherpa.com
Adding Patterns And Textures
Adding patterns and textures brings life and depth to your hot air balloon painting. These details create visual interest and make the balloon appear more realistic. Patterns break up large areas of color, giving the balloon a unique character. Textures suggest fabric folds and light variations, enhancing the overall effect.
Focus on simple, clear shapes and contrasts. Use your brush to make small, deliberate strokes that mimic the balloon’s surface. Layering different tones and textures can add richness without overwhelming the image.
Creating Balloon Sections
Divide the balloon into sections to represent fabric panels. Use light pencil lines or a thin brush to mark these areas. Each section can have a different color or pattern, like stripes or checks.
Paint one section at a time for better control. Keep edges clean and straight to show the balloon’s structure. Use contrasting colors to make the sections stand out. Patterns like dots or waves add charm and uniqueness.
Using Highlights And Shadows
Highlights and shadows give the balloon a three-dimensional look. Identify where the light source is in your painting. Add lighter tones on the parts facing the light. Use white or a lighter shade of your base color for highlights.
Shadows appear on the opposite side of the light source. Use darker shades or a mix of your base color with a bit of black or blue. Blend softly to avoid harsh lines. This contrast makes the balloon feel round and full.
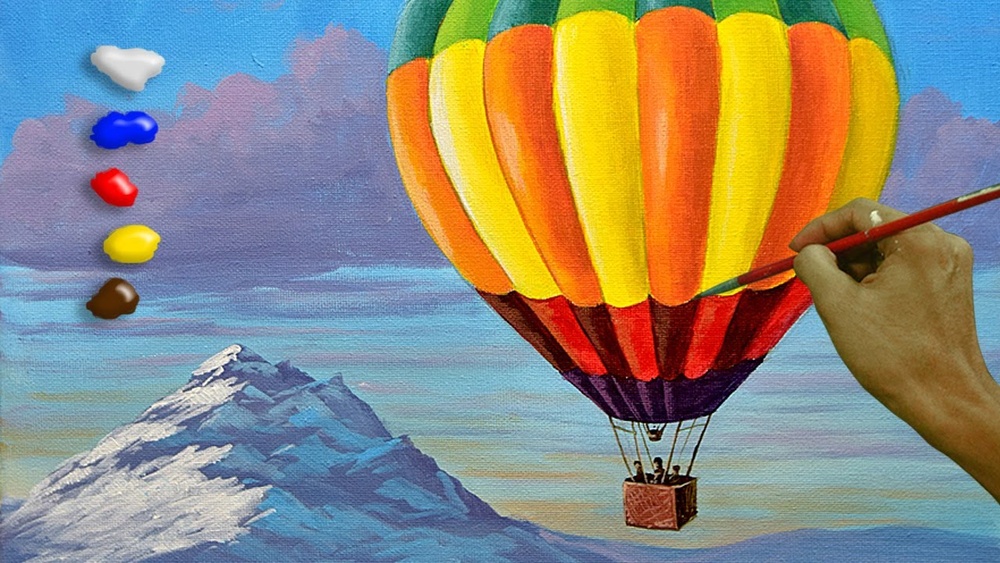
Detailing The Basket And Ropes
Adding details to the basket and ropes of a hot air balloon brings your acrylic painting to life. These parts often hold rich textures and fine lines that create realism. Careful attention here improves the entire artwork’s impact.
Texture And Depth
Start by layering colors to build the basket’s texture. Use browns, tans, and a touch of dark gray for shadows. Dab the paint gently to mimic woven wicker. Create depth by adding darker shades in corners and lighter tones on raised areas. This contrast makes the basket look three-dimensional and solid.
For the ropes, paint thin, curved lines that connect the basket to the balloon. Use a mix of beige and light brown. Add small highlights on one side of the ropes to show light reflection. Shadows on the opposite side give a rounded look. These simple steps add realism and make the ropes appear sturdy and tactile.
Fine Brush Techniques
Choose a fine-tipped brush for detailed work on the basket and ropes. Light, controlled strokes help paint the thin strands of wicker and rope fibers clearly. Avoid heavy pressure to keep lines crisp and neat.
Use a dry brush technique to add subtle texture on the basket’s surface. Lightly drag the brush over dry paint to create roughness. For the ropes, try short, flicking strokes to suggest twisting fibers. These brush methods add realism and keep your painting interesting up close.
Final Touches
Final touches bring your hot air balloon painting to life. This stage highlights details that make your artwork vibrant and complete. Small adjustments enhance the overall look and add depth. Careful finishing boosts the painting’s appeal and polish.
Enhancing Light Effects
Light creates mood and focus in your painting. Use a small brush to add highlights on balloon panels. Bright spots show where the sun hits the surface. Soft white or pale yellow works well for these highlights.
Shadows add shape and volume. Mix a little blue or purple with your base color for soft shadows. Apply shadows on balloon curves opposite the light source. This contrast makes your painting more three-dimensional.
Correcting Mistakes
Check your painting for any uneven edges or color spills. Use a clean brush and base color to fix these areas. Gently paint over mistakes without disturbing nearby details.
Let the paint dry before adding new layers. Thin layers prevent thick, clumpy spots. Take your time to ensure smooth corrections that blend well.
Drying And Sealing
After finishing your hot air balloon acrylic painting, drying and sealing are key steps. Proper drying ensures your artwork stays vibrant and crisp. Sealing protects it from dust, moisture, and fading. These steps keep your painting looking fresh and lasting longer.
Proper Drying Time
Acrylic paint dries quickly but needs time to cure fully. Wait at least 24 hours before touching the surface. Thicker paint layers may require 48 hours or more to dry completely. Avoid placing the painting in direct sunlight or humid areas while drying. A dry, well-ventilated room is best for even drying.
Protective Coating Options
Sealing your painting adds a shield against damage and dust. Use a clear acrylic varnish spray for an even coat. Choose between matte, satin, or glossy finishes based on your style. Brush-on varnishes work well for detailed control. Apply thin, even layers and let each dry before the next. This keeps colors bright and the surface smooth.
Tips For Beginners
Starting to paint a hot air balloon with acrylics can be exciting and fun. Beginners often feel unsure about where to begin. Simple tips help to build confidence and create better paintings. Understanding common difficulties and practicing regularly improves skills quickly. This section shares easy advice to guide new painters.
Common Challenges
One common challenge is mixing colors correctly. Acrylic paints dry fast, so blending takes practice. Beginners may find shading and highlighting tricky. Keeping brush strokes smooth can also be difficult. Another issue is controlling paint thickness. Too much paint can cause drips, too little makes colors weak. Learning to clean brushes often prevents muddy colors.
Improving Your Skills
Practice basic shapes like circles and ovals first. Use simple color palettes to avoid confusion. Try painting small sections of the balloon at a time. Experiment with layering paint to add depth. Watch your drying times and work quickly but carefully. Study photos of hot air balloons to understand patterns. With each painting, notice what works and what needs change.

Credit: www.youtube.com
Frequently Asked Questions
How To Draw A Beautiful Hot Air Balloon?
Start by sketching a large oval for the balloon’s envelope. Add vertical panels and a basket below. Use bright colors and shading for depth. Include ropes connecting the basket to the balloon. Finish with sky and clouds for a beautiful hot air balloon drawing.
Should I Mix Water With My Acrylic Paints Or Just Paint?
Mixing a small amount of water thins acrylic paint for smoother application. Avoid over-thinning to keep color intensity. Use water sparingly to maintain paint adhesion and texture.
What Kind Of Paint Sticks To Balloons?
Acrylic paint sticks well to balloons, especially latex and foil types. Applying a clear lacquer spray first improves adhesion and durability.
What Does Adding Rubbing Alcohol To Acrylic Paint Do?
Adding rubbing alcohol to acrylic paint creates unique textures by breaking the paint’s surface tension. It helps produce organic, marbled, or speckled effects.
Conclusion
Painting a hot air balloon with acrylics can be fun and relaxing. Use bright colors to make your artwork stand out. Remember to start with simple shapes and build details step by step. Practice blending colors smoothly for a realistic look.
Keep your brushes clean and work patiently. Each painting improves your skills and creativity. Enjoy the process and share your colorful hot air balloon art with others. Painting allows you to bring your imagination to life on canvas. Keep exploring new techniques and have fun with every stroke.