
Painting a mountain in oil paints is more than just copying a scene. It’s about creating depth, mood, and texture that feel real and alive. If you’re new to oil painting, or even if you’ve tried a few landscapes before, mountains offer the perfect subject to practice your skills.
Their strong shapes, shifting colors, and dramatic light give you a chance to learn new techniques and develop your unique style.
Many beginners struggle with mountains. Sometimes, the peaks look flat or cartoonish, or the colors don’t match the real landscape. But with the right steps and a bit of practice, you can create a mountain painting that feels three-dimensional and natural.
This guide will walk you through each stage, from choosing your materials to adding the final touches. Along the way, you’ll discover tips and insights that help you avoid common mistakes and improve your painting faster.
Choosing The Right Materials
Before you begin painting, having the correct tools and supplies is essential. Oil painting is flexible, but the quality of your materials will affect your results.
Essential Supplies
You will need:
- Oil paints: Start with a basic set of colors. For mountains, you’ll use a lot of blues, greens, browns, and whites. Brands like Winsor & Newton or Gamblin are reliable.
- Brushes: Get a mix of flat, round, and fan brushes in small and medium sizes. Synthetic bristles are easier to clean, but natural bristles hold more paint.
- Palette knives: These are great for rough textures and sharp edges.
- Canvas or canvas board: 16×20 inches is a good starting size.
- Palette: Wood, glass, or disposable paper palettes all work.
- Mediums: Linseed oil and odorless mineral spirits help thin paint and clean brushes.
- Rags or paper towels: For cleaning up and wiping brushes.
- Easel: Makes painting more comfortable and helps you see your work straight-on.
Color Choices For Mountains
Mountains can be many colors depending on the light and location. A simple palette might include:
- Titanium White
- Ultramarine Blue
- Cerulean Blue
- Burnt Sienna
- Burnt Umber
- Alizarin Crimson
- Cadmium Yellow
- Sap Green
Mixing your colors is part of the fun. Don’t rely only on colors straight from the tube.
Comparing Oil Paint Brands
Here’s a quick comparison of popular oil paint brands for beginners:
| Brand | Price Range | Quality | Color Selection |
|---|---|---|---|
| Winsor & Newton Winton | Low-Mid | Student | 45+ |
| Gamblin 1980 | Mid | Student/Artist | 48 |
| Rembrandt | High | Professional | 120+ |
While higher-end paints offer stronger pigments, student-grade oils are fine for learning.
Preparing Your Canvas
Preparation sets the tone for your painting. Start by making sure your canvas is primed. Most pre-stretched canvases come with gesso, but adding an extra layer can help oil paint stick better.
- Use a wide, soft brush to apply a thin, even layer of gesso.
- Let it dry for a few hours before starting.
- Lightly sand the surface if you want a smoother texture.
Some artists also tone their canvas with a diluted wash of burnt sienna or ultramarine blue. This removes the stark white and gives your painting a subtle warmth or coolness from the start.
Planning The Composition
A strong composition can turn a simple mountain into a dramatic scene. Think carefully about where your mountain sits on the canvas.
Tips For Good Composition
- Rule of Thirds: Divide your canvas into three equal parts, both horizontally and vertically. Place the mountain peaks along these lines or intersections.
- Foreground, Middle Ground, Background: Add trees, rocks, or water in the foreground to create depth.
- Lead the Eye: Use lines (like a river or ridge) to guide the viewer toward the mountain.
- Balance: Make sure one side isn’t too heavy with details or color.
Many beginners forget to include a foreground, which can make the mountain look like it floats in space.
Sketching The Mountain
Start with a simple sketch using a thin brush and diluted paint or a charcoal pencil. Don’t worry about details. Focus on the basic shapes:
- Outline the mountain’s silhouette.
- Mark the horizon line.
- Add rough lines for major slopes, ridges, and valleys.
Keep the sketch light so it won’t show through later layers.
Blocking In Basic Shapes And Colors
Now you’ll start adding paint. This stage is about covering the canvas and setting up the big shapes and colors.
Step-by-step Blocking
- Sky First: Paint the sky above the mountain. Start with lighter blues near the horizon and deepen the color higher up. Blend smoothly for a natural look.
- Distant Peaks: Use cool, muted colors for the farthest mountains. Add more white and a touch of blue or purple to show distance.
- Middle Ground: Paint the main mountain using mid-tones. Avoid dark or bright colors here.
- Foreground: Use warmer, richer colors for elements in front.
Don’t focus on details yet. Think in broad shapes and color zones.
Example Color Mixes
- Distant mountain: Ultramarine blue + titanium white + touch of alizarin crimson.
- Main mountain: Burnt sienna + ultramarine blue + a bit of sap green.
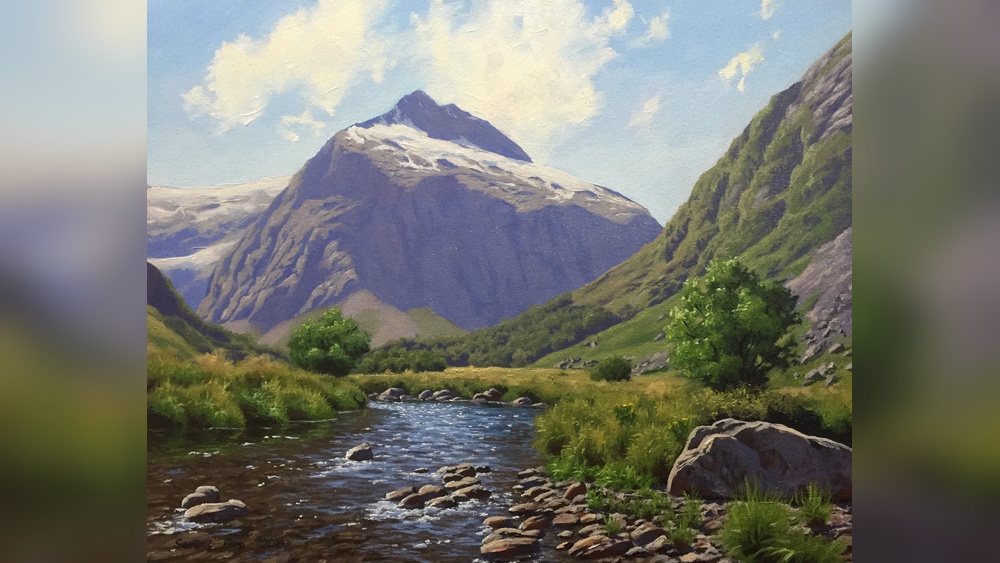
Creating Atmospheric Perspective
One trick to making mountains look real is atmospheric perspective. As objects get farther away, they look lighter, cooler, and less detailed.
- Use more white and blue for far-off peaks.
- Reduce contrast and sharp edges in the background.
- Save your darkest darks and brightest highlights for the foreground.
A common beginner mistake is using the same intensity of color everywhere, making the scene look flat.

Credit: www.youtube.com
Adding Texture And Detail
With the main shapes in place, you can start building texture and details that make your mountain come alive.
Techniques For Texture
- Dry Brush: Use a nearly dry brush to drag paint across the canvas for rough rocks.
- Palette Knife: Use the edge to add sharp lines for crags and ridges.
- Stippling: Tap the brush for dotted textures, useful for grassy patches or distant trees.
Where To Add Detail
- Add the most detail to the area you want the viewer to notice first (the focal point).
- Keep distant areas soft and vague.
Here’s a table of common mountain textures and how to paint them:
| Texture | Recommended Tool | Technique |
|---|---|---|
| Jagged Rocks | Palette Knife | Scrape paint for sharp edges |
| Snow | Flat Brush | Lightly drag white paint for soft effect |
| Tree Line | Fan Brush | Dab up and down for foliage |
Painting Light And Shadow
Mountains are full of dramatic light and shadow. Getting this right is key to realism.
Steps For Realistic Light
- Choose Your Light Source: Decide if the sun is to the left, right, or behind the mountain.
- Highlight the Sunlit Side: Use lighter, warmer colors.
- Cool Shadows: Mix blue or purple into your shadow colors.
- Sharp Edges vs Soft Edges: Sunlit ridges often have sharp, crisp edges. Shadows are softer.
A good trick is to squint at your reference photo. This helps you see the big light and dark shapes without getting distracted by details.
Adding Foreground Elements
A strong foreground makes your mountain feel part of a real place. You might add:
- Trees: Use a fan brush or small round brush for branches and leaves.
- Rocks: Use a palette knife for rough texture.
- Water: Reflect some mountain color in the water for realism.
- Wildflowers or Grass: Use small dabs or strokes for variety.
Keep the colors warmer and more saturated in the foreground. This pushes the mountain further back and adds depth.
Finishing Touches And Glazing
Once the painting is mostly dry (this can take a day or more), you can add final touches.
- Strengthen highlights on sunlit peaks with pure white.
- Deepen shadows if needed with a thin glaze of blue or purple.
- Add tiny details like birds, distant cabins, or mist for atmosphere.
Glazing is a technique where you apply a very thin, transparent layer of paint to change the color or mood. Use a soft brush and mix a little paint with a lot of medium.
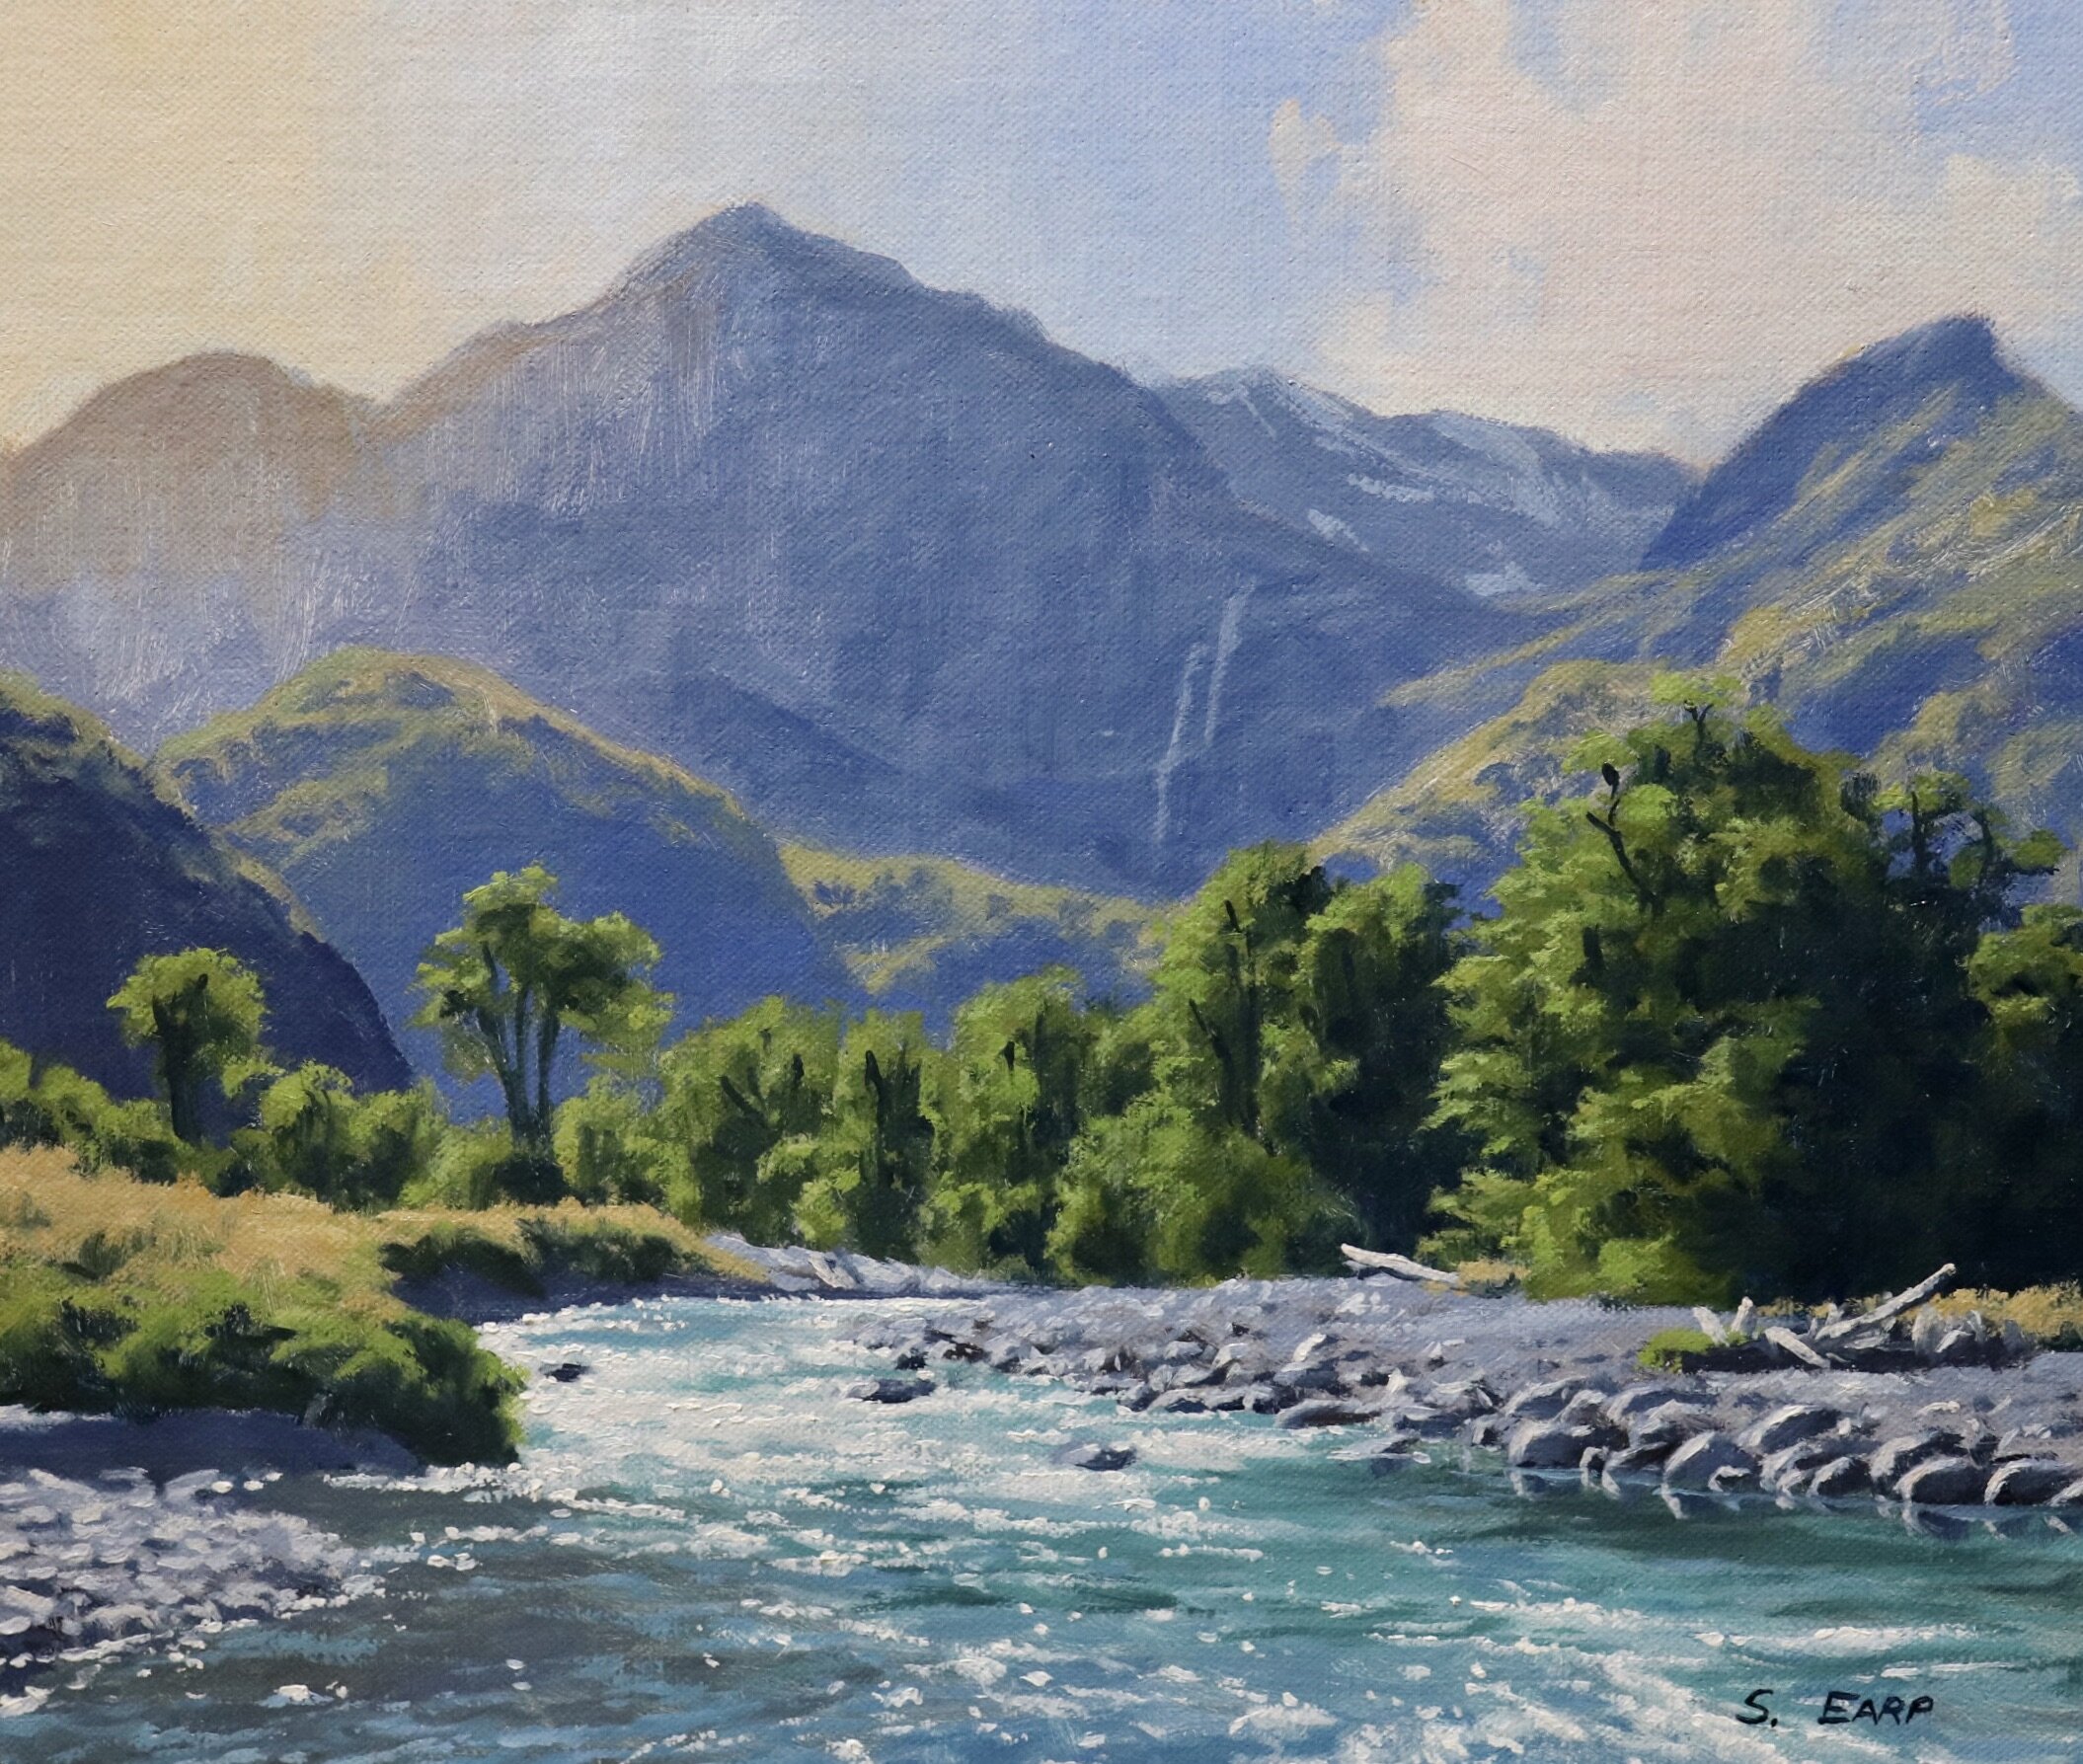
Credit: samuelearp.com
Common Mistakes To Avoid
Even experienced artists make errors. Watch out for these:
- Flat Colors: Don’t use the same color for the whole mountain.
- No Depth: Remember to use atmospheric perspective.
- Overworking: Too many details everywhere can make the painting busy and confusing.
- Ignoring Light Source: Always keep your shadows and highlights consistent.
- Too Much White: Use pure white only for the brightest highlights; mix in a little color for softer snow.
Example Mountain Painting Workflow
Here’s a basic order you can follow each time you paint a mountain:
- Prepare and tone the canvas.
- Sketch the mountain outline.
- Block in the sky and background mountains.
- Add the main mountain shapes and colors.
- Paint the foreground.
- Build up texture and details.
- Refine light and shadow.
- Finish with highlights, glazes, and final details.
As you gain confidence, you can adjust this order to fit your style.
Comparing Oil Vs. Acrylic For Mountains
Some artists wonder if acrylics are better than oils for landscape painting. Here’s a quick comparison:
| Feature | Oil Paint | Acrylic Paint |
|---|---|---|
| Drying Time | Slow (days to weeks) | Fast (minutes to hours) |
| Blending | Excellent | More difficult |
| Texture | Thick, rich | Can be built up |
| Color Shift | Minimal | Darkens as it dries |
Oil paints are ideal for slow blending and subtle transitions, which suit mountain landscapes well. For more differences, see WikiArt Landscape Paintings.
Non-obvious Insights For Beginners
- Don’t chase perfect details. From a distance, mountains are simple shapes and colors. Over-detailing every rock wastes time and can hurt the painting’s impact.
- Use broken color. Instead of mixing colors completely on your palette, try dabbing two colors side by side on the canvas. This creates lively, natural surfaces, especially for rocky slopes.
Frequently Asked Questions
What Is The Best Brush Size For Painting Mountain Details?
For fine details on mountains, use small round or liner brushes (size 0–3). For larger shapes and broad strokes, a medium flat brush (size 6–10) is ideal. Fan brushes help with tree lines and soft textures.
How Long Does An Oil Painting Of A Mountain Take To Dry?
A thin layer can dry to the touch in 2–7 days, depending on the paint thickness, humidity, and temperature. Thick impasto areas may take weeks. Using a quick-drying medium like alkyd can speed up the process.
Can I Paint A Mountain From Imagination Or Should I Use A Photo?
Both are possible, but beginners benefit from using a photo reference. This helps you see real colors, shapes, and lighting. Once you understand mountain forms better, painting from imagination becomes easier.
Why Do My Painted Mountains Look Flat?
Usually, it’s due to missing atmospheric perspective or a lack of value contrast. Make sure distant peaks are lighter and less detailed, and place strong highlights and shadows only in the foreground.
What Is The Best Way To Practice Painting Mountains?
Start by doing quick studies (small, simple paintings) of different mountain scenes. Focus on blocking in shapes and color, not details. Try copying a famous mountain painting to learn new techniques, or paint the same mountain under different lighting.
Painting mountains in oil is a rewarding way to build your skills and capture the beauty of nature. With patience and the right approach, your paintings will soon show real depth and life. Experiment often and enjoy the process—the mountains you create will be uniquely your own.

Credit: www.youtube.com


