Are you ready to give your artwork the perfect finish it deserves? Knowing how to stretch painting on canvas is a skill that can transform your art from a simple creation into a professional masterpiece.
Whether you’re working with a fresh canvas or an already painted piece, stretching it properly ensures your painting looks smooth, vibrant, and gallery-ready. In this guide, you’ll discover easy-to-follow steps and practical tips that make stretching your canvas straightforward and satisfying.
Keep reading, and you’ll gain the confidence to stretch your canvas like a pro, protecting your art and making it stand out beautifully on any wall.
Materials Needed
Stretching a painting on canvas needs specific materials. Using the right tools makes the process easier and ensures a smooth finish. This section lists the essential items for stretching canvas properly.
Stretcher Bars And Frame
Stretcher bars form the frame for your canvas. They come in different sizes and thicknesses. Choose bars that fit your painting size. The frame must be sturdy to hold the canvas tight.
Canvas Selection
Select canvas suitable for your painting style. Cotton and linen are common choices. Cotton is affordable and easy to stretch. Linen offers a stronger, smoother surface but costs more. Make sure the canvas size matches your frame.
Staple Gun And Staples
A staple gun secures the canvas to the frame. Use a reliable, easy-to-handle staple gun. Staples should be long enough to hold the canvas firmly. Make sure you have extra staples to avoid interruptions.
Canvas Pliers
Canvas pliers help stretch the fabric evenly. They grip the canvas without damage. Using pliers gives better control and tightness. This tool is important to avoid wrinkles and sagging.
Preparing The Workspace
Preparing the workspace is the first step to stretch a painting on canvas properly. A clean, organized area helps you work with ease. This setup prevents damage to your materials and ensures a smooth process. Focus on creating a comfortable space with enough room to move around.
Choosing A Flat Surface
Select a flat surface that is sturdy and wide enough for your canvas and frame. A large table or workbench works best. The surface should be clean and free from dust or debris. This keeps your canvas safe and prevents wrinkles during stretching.
Make sure the surface is at a comfortable height. This helps reduce strain on your back and arms. Good lighting is important too. It lets you see details clearly as you stretch the canvas.
Laying Out The Canvas And Frame
Place the frame flat on the chosen surface first. Check that the frame is square and secure. Then, lay the canvas on top with the painted side down. Align the edges of the canvas so it extends evenly around the frame.
Smooth out any folds or creases in the canvas. This makes stretching easier and prevents uneven tension. Keep the canvas loose enough to adjust but tight enough to stay in place. This careful arrangement sets the stage for a neat, professional finish.
Measuring And Cutting Canvas
Measuring and cutting canvas is a crucial step in stretching a painting on canvas. Accurate measurements ensure a tight, smooth surface for your artwork. Cutting the canvas properly avoids waste and makes stretching easier.
Follow simple steps to measure and cut your canvas before stretching. The right size canvas helps maintain the painting’s appearance and durability.
Determining Canvas Size
Start by measuring the stretcher bars or frame you will use. Measure both length and width carefully. Use a tape measure for precise results. Write down these measurements to avoid mistakes. Your canvas must be larger than the frame for proper stretching. Check twice before cutting to save materials.
Allowing Extra Material For Stretching
Add extra canvas around the frame edges for wrapping and stapling. A good rule is to add 3 to 4 inches on each side. This extra fabric is needed to pull the canvas tight. Without enough material, the canvas will sag or tear. Cut with scissors or a rotary cutter on a flat surface. Smooth, straight cuts help in neat stretching and framing.

Credit: www.instructables.com
Starting The Stretch
Starting the stretch is the first step in preparing your canvas for painting. It sets the foundation for a smooth and tight surface. Proper tension ensures the canvas stays flat and durable. Begin by attaching the canvas firmly to the stretcher bars. This avoids wrinkles and sags later on.
Focus on securing the canvas evenly from the center outwards. This method keeps the tension balanced across the entire surface. Use tools like canvas pliers to help pull the fabric tight without damaging it. Careful attention here saves time and effort in the final stages.
Center Stapling Technique
Start by placing the canvas over the stretcher bars. Find the center point on one side. Pull the canvas tightly and staple it at the center. Then move to the opposite side, pull tight again, and staple the center. Repeat this for the remaining two sides.
This technique keeps the canvas stretched evenly. It prevents wrinkles and loose spots. Work slowly and check the tension with your hands. Adjust the pull before stapling if needed. This method works well for beginners and pros alike.
Using Canvas Pliers For Tension
Canvas pliers are essential for stretching tight fabric. Grip the canvas edge firmly with the pliers. Pull the fabric outward and upward to create tension. This helps achieve a smooth, flat surface without damage.
Use the pliers before stapling each section. Pull the canvas a little at a time. Staple immediately after pulling to hold the tension. Avoid overstretching, which can tear the canvas. Canvas pliers make the job easier and more precise.
Stretching Sides Evenly
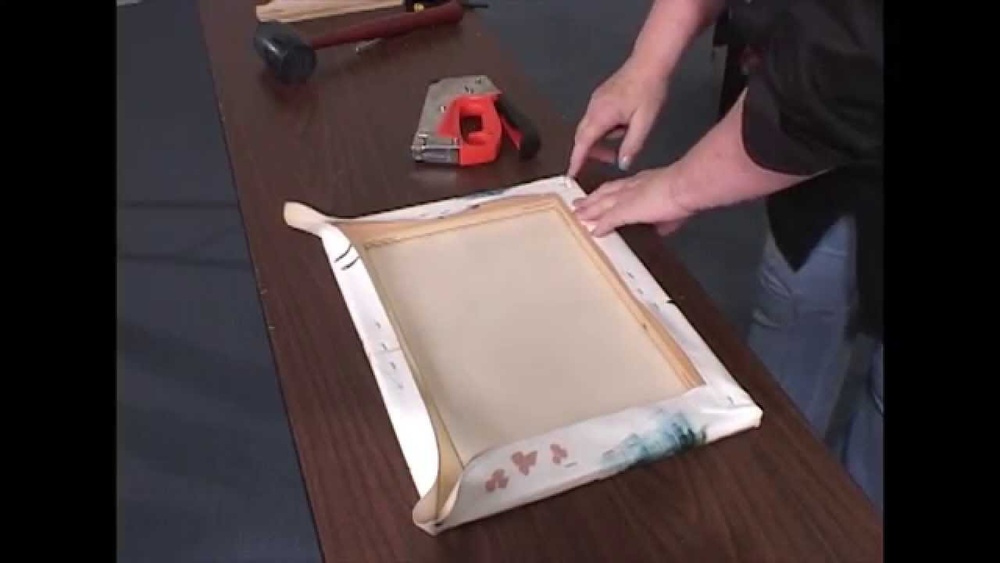
Stretching a painted canvas requires extra care compared to a blank one. The paint surface is fragile and can crack or peel if handled roughly. Proper techniques protect the artwork while tightening the canvas on the frame. This process helps preserve the painting’s quality and appearance over time.
Knowing how to handle the canvas based on its condition is important. The difference between stretching a dry canvas and a wet one affects the steps you take. Careful handling reduces the risk of damage and ensures a smooth, even stretch.
Handling Dry Vs. Wet Canvas
A dry painted canvas is firm and less flexible. Stretch it slowly and gently to avoid cracking the paint. Use canvas pliers to grip and pull the edges evenly. Work from the center outwards on each side for balanced tension.
Wet canvas is softer and more delicate. It can stretch more easily but also risks paint running or smudging. Let the paint dry completely before stretching for best results. If you must stretch a wet canvas, use extreme caution and minimal force.
Avoiding Paint Damage
Protect the painted surface by working on a clean, flat area. Place the canvas face down on soft cloth or foam. Avoid sharp tools near the paint to prevent scratches.
Staple or tack the canvas only on the wooden frame edges. Pull the canvas tight but stop if you feel resistance. Overstretching can crack or peel the paint layer.
Check the tension frequently and adjust carefully. Use gentle pressure and even strokes to keep the paint intact. Patience and precision are key to a well-stretched painted canvas.
Credit: www.frametoday.com.au
Securing Corners
Sealing and finishing are crucial steps in stretching a painting on canvas. These steps protect your artwork from dust, moisture, and damage. A proper seal preserves colors and enhances the canvas’s durability. Finishing touches give your painting a professional look. Take time to complete these steps carefully for the best results.
Protecting Canvas Edges
Canvas edges are prone to wear and tear over time. Use acid-free tape or gesso to seal the edges. This prevents fraying and keeps the canvas tight on the frame. Apply a thin layer of clear varnish to shield the edges from dirt and moisture. Protecting edges helps maintain the painting’s structure and appearance.
Final Inspection
Inspect your stretched canvas carefully before displaying or framing. Check for loose spots or wrinkles in the fabric. Make sure all staples or tacks are secure and hidden. Look for any areas that need an extra coat of sealant or touch-up. A thorough final inspection ensures your painting stays beautiful for years.

Credit: www.instructables.com
Frequently Asked Questions
How To Stretch A Painted Canvas For Beginners?
Place the painted canvas face down. Center the stretcher bars underneath. Use canvas pliers to pull taut. Staple the canvas at the center of each side, then work toward the corners. Fold corners neatly and staple securely. Avoid overstretching to prevent paint cracking.
Should You Stretch Canvas Wet Or Dry?
Stretch canvas dry for best control and tension. Lightly dampen the back only if tightening a painted canvas, avoiding paint damage.
How To Stretch A Picture On Canvas?
Place the canvas face down on the stretcher bars. Pull one side tightly and staple in the center. Repeat opposite side. Stretch and staple remaining sides from center to corners. Fold corners neatly and secure. Use canvas pliers for better tension and a smooth, tight surface.
Can I Stretch An Already Painted Canvas?
Stretching an already painted canvas is possible but risky. It may cause paint cracking or damage. Stretch gently to avoid harm.
Conclusion
Stretching a painting on canvas takes patience and care. Use the right tools and follow each step slowly. Keep the canvas tight but not too tight to avoid damage. Practice helps improve your technique over time. A well-stretched canvas gives your artwork a clean, professional look.
Now, you can confidently prepare canvases for painting or display. Enjoy bringing your art to life on a perfectly stretched surface.