Painting a snowman is a classic winter activity for kids, perfect for both classrooms and family time at home. It brings together art, creativity, and the joy of the season—all in one simple project. But if you’ve ever struggled to keep instructions easy for children or worried about mess, you’re not alone. The good news is that painting a snowman can be fun, stress-free, and accessible for kids of all ages with the right approach.
Let’s walk through everything you need to know to help kids paint a cheerful snowman, even if you’re not an art expert. You’ll discover step-by-step guidance, smart tips for beginners, and common mistakes to avoid. This guide also includes ideas to spark creativity, ways to adjust for different age groups, and answers to common questions.
By the end, you’ll feel confident to lead an enjoyable and successful snowman painting session.
Why Painting A Snowman Is A Great Kids’ Activity
Painting a snowman offers much more than a cute picture for the fridge. It supports fine motor skills, helps children express themselves, and boosts confidence as they complete their artwork. For younger kids, it’s a fun way to practice holding brushes and learning shapes. Older children can explore color mixing, shading, and creative backgrounds.
Working on a snowman painting also encourages patience and focus. Kids learn to follow steps in order, wait for paint to dry, and make choices about colors and decorations. And when you display their finished snowman, it’s a big motivation boost!
Materials You’ll Need
Before you start, gather all the supplies. Using the right materials makes the painting easier and less messy.
| Material | Purpose | Notes |
|---|---|---|
| Thick white paper or canvas | Painting surface | Paper should be at least 9″x12″ |
| Washable paints (tempera or acrylic) | Color for snowman and background | Choose non-toxic, child-safe brands |
| Paintbrushes (small and medium) | For details and larger areas | Have a few sizes ready |
| Palette or paper plate | Mixing colors | Disposable plates work well |
| Cup of water | Cleaning brushes | Change water if it gets dirty |
| Paper towels or rag | Wiping brushes | For quick clean-up |
| Pencil | Sketching circles | Optional for younger kids |
| Black marker | Outlining details | Sharpie or similar type |
Extra Options for Creativity:
- Glitter or sequins for sparkle
- Googly eyes
- Cotton balls for a 3D effect
Kids love adding their own touches, so having a few fun extras can make the project even more exciting.
Step-by-step Guide: How To Paint A Snowman For Kids
Let’s break down the process into easy-to-follow steps. You can adjust each step depending on the child’s age or skill level.
1. Set Up The Workspace
Pick a spot with good light and cover the table with newspaper or a plastic tablecloth. Kids should wear an apron or old shirt to protect their clothes. Place all materials within easy reach.
2. Draw The Snowman’s Body
Start by drawing three stacked circles for the snowman. For younger kids, it helps to show them how to draw one big circle at the bottom, a medium one in the middle, and a small one on top. You can let them draw freehand or use a cup or lid as a guide.
- Tip: Don’t worry about perfect circles—wobbly lines add charm!
3. Paint The Snowman
Using a medium brush, have kids fill in the circles with white paint. Remind them to rinse their brush if it picks up other colors. It’s okay if the paint isn’t completely smooth; the texture can look like real snow.
- Insider tip: For a brighter white on colored paper, let the first layer dry and add a second coat.
4. Add A Background
While the snowman dries, paint the background. Classic choices include blue skies, light purple, or even a snowy night with dark blue or black. Encourage kids to paint around the snowman carefully.
Some kids like to add falling snow. For this, dip a brush in white paint and tap it gently over the picture to create snowflakes.
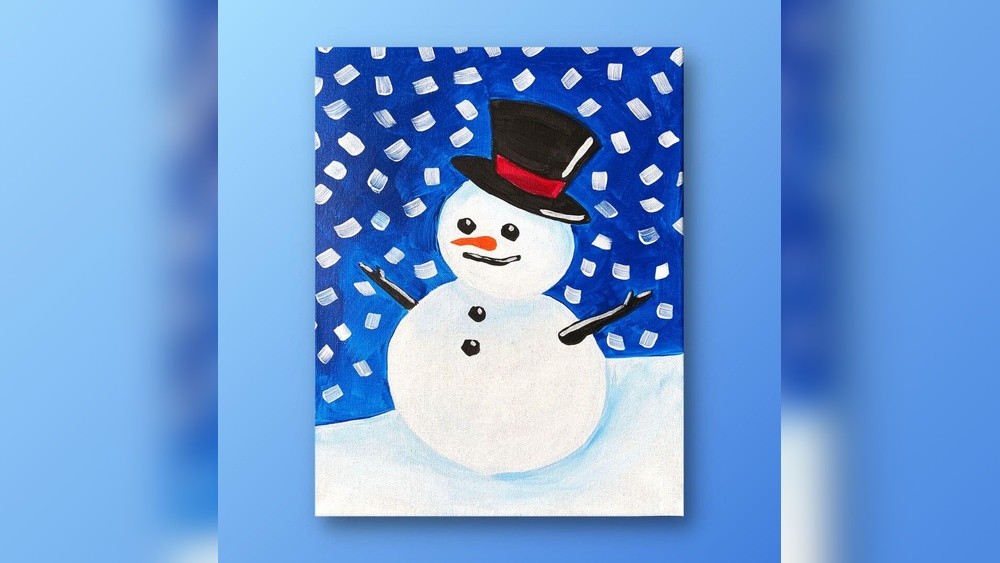
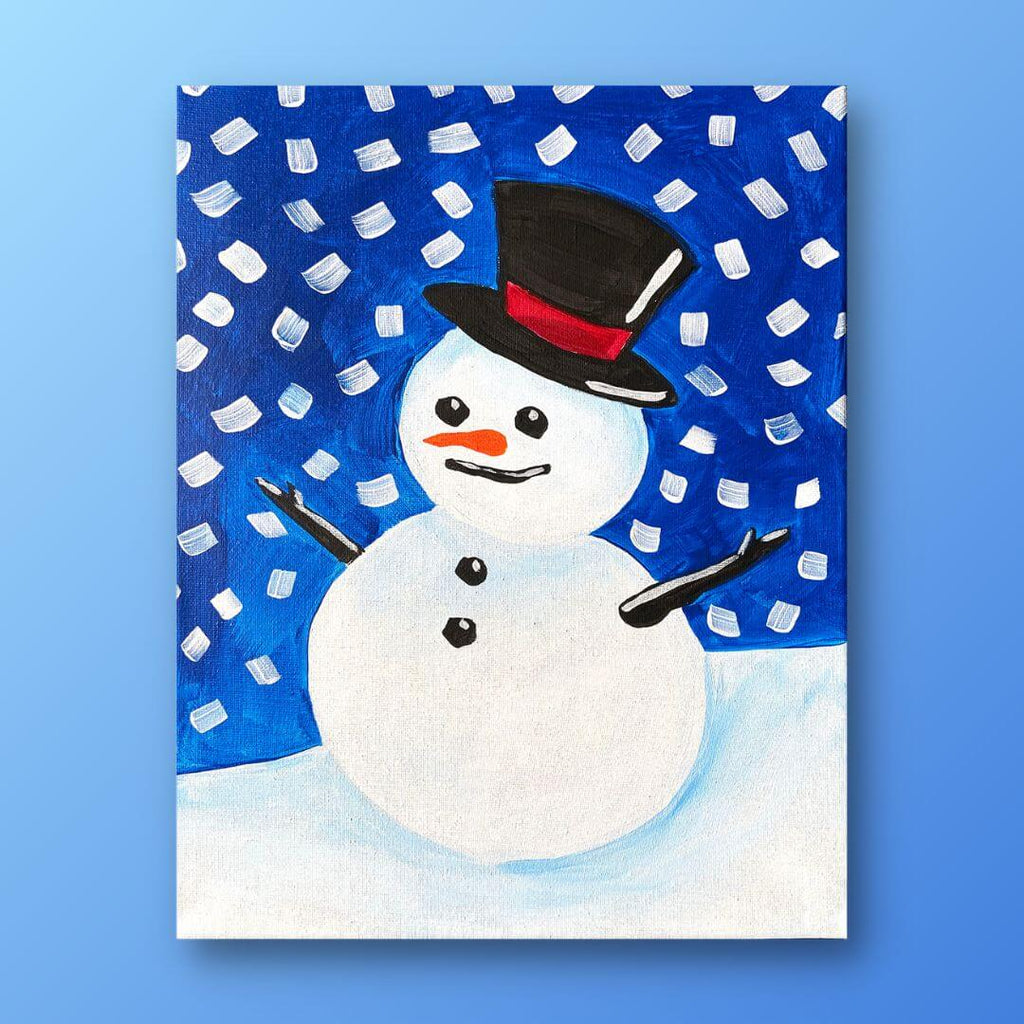
5. Paint The Snowman’s Face And Buttons
Once the body is dry, use a small brush or marker to add a face:
- Eyes: Black dots
- Mouth: Small black dots in a smile
- Carrot nose: Orange triangle or oval
For buttons, paint or draw 2-3 black dots down the middle circle.
6. Dress Up The Snowman
Let kids decorate their snowman with fun accessories:
- Scarf: Paint stripes or patterns across the neck
- Hat: Top hat or beanie using favorite colors
- Arms: Brown paint or marker for stick arms reaching out
You can show sample pictures or let them invent their own styles.
7. Add Extra Details
Encourage children to make their snowman unique:
- Paint a broom in one hand
- Add a bird perched on the hat
- Draw mittens or earmuffs
- Sprinkle glitter on the snow for sparkle
Kids feel proud when their snowman has its own personality.
8. Outline And Finishing Touches
Once everything is dry, outline the snowman and features with a black marker. This step makes the painting “pop” and hides any wobbly paint edges. Remind kids to sign their name at the bottom.
- Pro tip: If you use a marker, wait until the paint is fully dry to avoid smudging.
9. Let Dry And Display
Allow the painting to dry completely before moving or hanging it up. Display the snowman in a window, on the fridge, or as part of a holiday gallery.
Age-by-age Adjustments
Younger and older kids need different levels of help. Here’s how you can adapt the project:
| Age Group | What Works Best | Extra Tips |
|---|---|---|
| 3-5 years | Large brushes, simple steps, pre-drawn circles | Let them focus on painting, not details |
| 6-8 years | Mixing colors, adding simple accessories | Encourage creative backgrounds |
| 9+ years | Shading, unique themes, more details | Challenge them to invent a story for their snowman |
Common Mistakes And How To Fix Them
Even with careful planning, some problems can happen. Here’s how to handle them:
- Paint Bleeds: If colors mix or run, wait for each layer to dry before adding the next one.
- Smudged Marker: Always let paint dry fully before outlining.
- Paper Warps: Use thicker paper or tape the edges down to keep it flat.
- Messy Clothes: Remind kids about aprons, and have wipes handy for quick clean-up.
- Frustrated Kids: If a child is unhappy, help them add a fun detail or remind them that every snowman is different.
Creative Snowman Painting Ideas
Sometimes, kids want to try something new. Here are a few ideas to add excitement:
- Rainbow Snowman: Use bright, non-traditional colors for the body and details.
- Family of Snowmen: Paint several snowmen together holding hands.
- Snowman with Pets: Add a painted cat, dog, or favorite animal.
- Nighttime Scene: Use dark colors for the background, then add stars and a moon.
- Textured Snow: Dab paint with a sponge or cotton ball for a fluffy snow effect.
Let kids choose their favorite idea or invent their own. The more personal, the better!

Credit: www.youtube.com
Comparing Paint Types For Kids
Choosing the right paint can make a big difference, especially for beginners. Here’s a quick look at the most common types:
| Paint Type | Pros | Cons |
|---|---|---|
| Tempera | Washes off easily, non-toxic, dries fast | Not as bright on dark paper, can crack if thick |
| Acrylic | Vivid colors, works on many surfaces | Can stain clothes, dries quickly |
| Watercolor | Soft, blended look, easy to mix | Can be too light, paper may wrinkle |
For most kids, washable tempera is the safest and easiest choice. If you want stronger colors, try acrylic but use old clothes and clean up quickly.
Two Important Tips Most Beginners Miss
- Layering Paint: Many kids paint everything at once, which leads to smudging and dull colors. Teach them to let one part dry before starting the next. It’s a simple trick but makes the final picture much cleaner.
- Mixing White with Blue or Purple: Snow isn’t always pure white. Adding a little blue or purple around the snowman’s edge gives it a round look and makes it stand out from the background.
Credit: www.paintingtogogh.com
Real-world Example: Classroom Snowman Day
A group of 20 first graders painted snowmen together. Each child had their own style—some made tall snowmen, others added pets or funny hats. The teacher used pre-drawn circles for the youngest students but let the older ones sketch their own.
After drying, everyone displayed their art in the hallway.
The teacher noticed that:
- Kids were most engaged when they could choose colors and decorations
- Outlining at the end made all the snowmen look bold and finished
- Displaying the snowmen boosted class pride and teamwork
If you’re running a group session, set up drying racks and help with clean-up. Take a group photo to remember the fun!
Where To Find More Ideas
If you want more snowman painting inspiration, check out Crayola’s official craft ideas for additional tips and creative twists.

Credit: www.youtube.com
Frequently Asked Questions
What Kind Of Paint Is Safest For Kids?
Washable tempera paint is usually the safest and easiest to clean. Look for non-toxic labels and brands made for children. Always supervise young kids when using any paint.
Can I Use Regular Printer Paper For Snowman Painting?
Printer paper is often too thin. It can wrinkle or tear when wet. Try using thicker drawing paper (at least 80 lb/130 gsm) or a small canvas for best results.
How Can I Help My Child Draw Even Circles?
Use a cup, lid, or round object as a guide. Trace around it with a pencil. For younger children, you can lightly sketch the circles for them before painting.
What If We Don’t Have A Paint Palette?
You can use a paper plate, plastic lid, or even a clean tray as a palette for mixing colors. Just make sure it’s flat and large enough for the paints.
How Do I Remove Paint From Clothes?
Washable paints should come out with soap and water if cleaned quickly. For tougher stains, soak in cold water and use stain remover. Always check the paint label for specific instructions.
Painting a snowman is a rewarding project that brings smiles and creativity to any winter day. With the right steps and a little patience, kids can make artwork they’ll be proud of—no art degree required. Enjoy the process, celebrate their unique designs, and don’t forget to take a picture of their finished snowman masterpiece!