If you’ve ever wondered how to give your acrylic paintings a professional, polished finish, varnishing is the key. Varnishing not only protects your artwork from dust, dirt, and fading but also enhances the colors and depth, making your painting truly stand out.
In this guide, you’ll learn simple, step-by-step techniques to varnish your acrylic painting like a pro—whether you’re a beginner or looking to improve your skills. Keep reading, and soon your artwork will have that perfect shine and lasting beauty you’ve been aiming for.

Credit: www.youtube.com
Choosing The Right Varnish
Choosing the right varnish is key to finishing your acrylic painting well. It protects the colors and surface from dust, dirt, and damage. The varnish also changes how your painting looks. Picking the right type helps your art stay beautiful for years.
Glossy Vs Matte Finishes
Glossy varnish makes colors look bright and shiny. It reflects light and gives a wet look. This finish works well for vibrant paintings. Matte varnish cuts down shine. It offers a soft, smooth look. This suits paintings with fine details or soft colors. Your choice depends on the mood you want.
Spray Vs Brush-on Options
Spray varnish is quick and easy to use. It covers evenly without brush marks. This is good for large paintings. Brush-on varnish takes more time. You can control the thickness better. Brush varnish works best for small or textured paintings. Both types protect well but apply differently.
Archival And Uv Protection
Choose varnish with archival quality to keep your painting safe. It stops yellowing and cracking over time. UV protection blocks sunlight damage. Sunlight can fade colors fast. Varnishes with UV filters help your artwork last longer. This is important for paintings shown in bright places.
Preparing Your Painting
Preparing your acrylic painting before varnishing is very important. It helps protect your artwork and makes the finish smooth. Taking the right steps ensures the varnish sticks well and lasts a long time.
Start by checking the surface carefully. Any dust or dirt can spoil the final look. Then, make sure the painting is completely dry. Wet paint can cause the varnish to cloud or peel. Finally, work in a clean, dust-free area to avoid particles settling on the varnish.
Cleaning The Surface
Use a soft, dry brush or cloth to remove dust from the painting. Avoid using water or cleaning liquids. They can damage the paint. Gently sweep the surface to get rid of loose dirt. This step helps the varnish stick evenly.
Ensuring Complete Dryness
Check that the paint is fully dry before varnishing. Acrylic paint usually takes one to two weeks to dry deeply. Touch the surface lightly to feel if it is hard. Any wet or sticky parts must dry longer. Applying varnish too soon can ruin your work.
Working In A Dust-free Environment
Find a clean, quiet space to varnish your painting. Close windows and doors to stop dust from entering. Turn off fans or air conditioners that blow air around. Dust settling on wet varnish creates bumps and marks. A clean place helps get a smooth finish.
Tools And Materials Needed
Varnishing an acrylic painting protects your artwork and enhances its colors. Using the right tools and materials ensures a smooth, even finish. Prepare your workspace and gather everything before you start. This saves time and avoids mistakes.
Varnish Types And Brands
Choose between gloss, satin, or matte varnish. Gloss varnish gives a shiny finish. Satin offers a soft shine. Matte creates a flat, non-reflective look.
Select a varnish made specifically for acrylic paintings. Popular brands include Liquitex, Golden, and Winsor & Newton. These brands provide quality and durability.
Brush Selection Tips
Use a wide, flat brush for even coverage. Synthetic brushes work best with acrylic varnish. Avoid natural hair brushes; they may leave streaks.
Choose a brush size that fits your painting. A 2 to 4-inch brush is ideal for most canvases. Clean your brush well after each use.
Safety Equipment
Wear gloves to protect your skin from chemicals. Use a mask to avoid inhaling fumes. Work in a well-ventilated area or outdoors.
Keep your workspace clean and free from dust. Proper safety prevents health problems and keeps your art safe.
Applying The Varnish
Applying varnish to an acrylic painting protects the surface and enhances the colors. It creates a smooth finish that lasts for years. Knowing how to apply varnish correctly avoids damage and uneven coating.
The method you choose depends on your tools and the effect you want. Brush application offers control and precision. Spray varnish gives an even coat without brush marks. Both need care and patience for best results.
Step-by-step Brush Method
Start with a clean, dry painting. Use a soft, wide brush made for varnish. Dip the brush lightly into the varnish. Remove excess varnish on the jar’s edge.
Apply the varnish in thin, even strokes. Work from one side to the other. Avoid pressing hard or over-brushing. Let the first layer dry completely before adding more.
Apply a second or third layer for better protection. Keep your brush clean to avoid lumps. Drying times vary, so check the varnish label.
Spray Application Techniques
Choose a well-ventilated area for spraying. Shake the spray can well before use. Hold the can about 12 inches from the painting.
Spray in light, even passes. Move your hand steadily across the surface. Avoid spraying too much in one spot. Let each coat dry before applying another.
Use multiple thin layers for smooth, even coverage. Protect surrounding areas from overspray with paper or cloth. Store spray cans safely after use.
Avoiding Common Mistakes
Do not varnish wet or sticky paint. This causes cloudiness and damage. Avoid thick layers; they can crack or peel later. Always use clean brushes or spray nozzles.
Work in a dust-free space to prevent particles on the surface. Do not rush drying times. Patience ensures a strong, clear finish. Test varnish on a small area if unsure.
Drying And Curing Process
The drying and curing process is key to protecting your acrylic painting. It helps the varnish form a strong, clear layer. This layer protects colors and adds shine. Patience during this process ensures the best finish. Rushing can cause streaks or cloudiness. Understanding how to dry and cure varnish helps you get a smooth, durable surface.
Optimal Drying Conditions
Keep your painting in a clean, dust-free area. The temperature should be between 65°F and 75°F (18°C to 24°C). Avoid direct sunlight or heat sources. Good air circulation helps the varnish dry evenly. Too much humidity slows drying and can cause a cloudy finish. A dry, cool room is best for drying.
Handling Multiple Coats
Applying more than one coat improves protection and shine. Let each coat dry fully before adding the next. Use thin layers to avoid drips and uneven texture. Lightly sanding between coats can help adhesion. Be gentle to avoid damaging the painting surface. Multiple thin coats give a smoother, stronger finish than one thick coat.
Timing Between Layers
Wait at least 24 hours between varnish coats. This gives the varnish time to cure properly. Rushing the next layer can trap moisture and cause problems. In humid environments, wait longer to ensure dryness. Follow the varnish manufacturer’s instructions for best timing. Proper timing prevents tacky or cloudy varnish layers.
Credit: www.art-is-fun.com
Maintaining Your Varnished Painting
Maintaining your varnished acrylic painting helps keep its beauty and protection. Proper care extends the life of the varnish and the artwork underneath. Small daily habits can prevent damage and preserve the shine.
Cleaning Tips
Dust your painting gently using a soft, dry cloth. Avoid using water or cleaning sprays directly on the surface. Use a soft brush for hard-to-reach areas. Clean only when necessary to avoid wearing down the varnish. Handle the painting with clean hands to prevent oils from transferring.
Storage Recommendations
Store paintings away from direct sunlight to prevent fading. Keep them in a cool, dry place with stable temperature. Avoid damp or humid areas, as moisture can damage the varnish. Use acid-free materials for wrapping if you must cover the painting. Store paintings upright to avoid pressure on the surface.
Touch-up Advice
Check your painting regularly for scratches or dull spots. Use a matching varnish to touch up small damaged areas. Apply thin layers and let each one dry fully. Avoid over-varnishing to keep the original texture visible. Consult a professional for large or complex repairs.

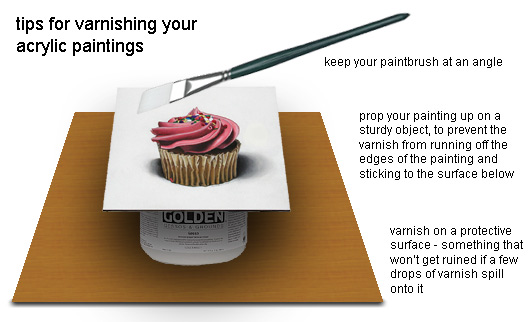
Credit: painting4real.com
Frequently Asked Questions
What Is The Best Varnish For Acrylic Paintings?
The best varnish for acrylic paintings is a clear acrylic varnish. It protects the surface, enhances colors, and prevents dust or UV damage. Choose between matte, gloss, or satin finishes depending on your desired look and drying time.
When Should I Varnish My Acrylic Painting?
Varnish your acrylic painting only after it is fully dry. This usually takes 2 to 4 weeks. Varnishing too soon can trap moisture and cause cloudiness or damage to the artwork.
How Do I Apply Varnish To An Acrylic Painting?
Use a clean, soft brush or spray to apply varnish evenly. Apply thin coats and allow each to dry before adding more. Avoid over-brushing to prevent streaks or bubbles on the painting surface.
Can I Remove Or Replace Varnish On Acrylic Paintings?
Yes, varnish can be removed with a gentle solvent or varnish remover. This allows you to re-varnish if needed. Always test on a small area first to avoid damaging the painting underneath.
Conclusion
Varnishing your acrylic painting protects it from dust and sunlight. It also makes colors look brighter and sharper. Use the right varnish type for the best results. Apply thin, even coats and let each dry well. Take your time and work in a clean space.
This small step keeps your artwork beautiful for years. You now have the basics to finish your painting well. Keep practicing, and you will improve with each piece. Enjoy the process and the shine it adds!