Have you ever wanted to bring a bird to life on your canvas but didn’t know where to start? Painting a bird with acrylic paint can seem tricky, but it’s easier than you think.
Whether you’re a beginner or looking to improve your skills, this guide will walk you through simple steps to create a beautiful, vibrant bird painting. By the end, you’ll have the confidence and techniques to make your artwork truly stand out.
Ready to turn your blank canvas into a colorful masterpiece? Let’s get started!

Credit: www.reddit.com
Choosing The Right Materials
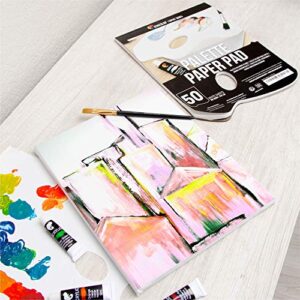
Choosing the right materials is the first step to paint a beautiful bird with acrylics. Good materials make painting easier and more enjoyable. They help you get the colors and details just right. This section explains how to pick the best paints, brushes, and canvas for your artwork.
Selecting Acrylic Paints
Choose high-quality acrylic paints with bright, rich colors. Look for paints that dry fast and have good coverage. Start with basic colors like red, blue, yellow, white, and black. You can mix these to create many shades. Avoid cheap paints that may fade or crack over time.
Picking Suitable Brushes
Use brushes made for acrylic painting. They hold paint well and keep their shape. Pick different sizes for detail and broad strokes. Small round brushes work well for bird feathers. Flat brushes help cover large areas smoothly. Clean brushes right after use to keep them in good condition.
Preparing Your Canvas
Choose a canvas size that fits your painting space. Stretch canvas or canvas board works fine. Make sure the surface is clean and dry. Apply a thin layer of gesso to prime the canvas. Gesso helps paint stick better and prevents soaking. Let it dry before you start painting.
Sketching The Bird
Sketching the bird is the first step in creating a beautiful acrylic painting. It helps you plan the shapes and details before applying paint. A good sketch creates a strong foundation for your artwork. Take your time and keep the lines light. This way, you can easily erase or change parts as you go.
Basic Bird Shapes
Start by drawing simple shapes to form the bird’s body. Use an oval for the main body and a circle for the head. Add a small triangle for the beak and thin lines for the legs. These shapes help you set the bird’s pose and size. Focus on the overall form, not details yet. Keep the shapes soft and easy to adjust.
Adding Details To The Sketch
Once the basic shapes are in place, add details like eyes, feathers, and wing outlines. Sketch the eyes as small circles in the head area. Draw feather lines lightly on the wings and tail. Pay attention to the bird’s posture and direction. Use short, gentle strokes to show texture. Avoid heavy lines that can be hard to cover with paint.
Applying The Base Colors
Applying the base colors is a key step in painting a bird with acrylic paint. It sets the foundation for your artwork. This stage helps define the main shapes and overall tone. Use broad strokes to cover large areas quickly. Avoid focusing on small details now. Save those for later layers.
Blocking In Main Colors
Start by choosing the main colors of the bird. Pick colors for the body, wings, and beak. Use a medium-sized brush to fill in these areas. Paint with simple shapes to capture the bird’s form. Do not mix too many colors yet. Keep the colors flat and even. This helps you see the bird’s overall color pattern clearly.
Creating Smooth Backgrounds
Next, work on the background behind the bird. Use soft, blended colors to make the bird stand out. Choose colors that contrast with the bird’s colors. Use a large brush and paint in gentle, circular motions. Blend the colors while the paint is still wet. This creates a smooth, natural look. Avoid harsh lines or sudden color changes in the background.

Credit: www.youtube.com
Building Layers And Textures
Building layers and textures is key to painting a bird with acrylics. This step brings life and realism to your artwork. It helps create the illusion of feathers and depth. Layers add richness and make the bird look more natural. Textures show the softness and details of feathers. Patience during this phase pays off with a stunning result.
Layering Paint For Depth
Start with a thin base layer of paint. Use light colors first to outline shapes. Let this layer dry before adding more paint. Add darker shades on top to create shadows. This builds depth and makes the bird appear three-dimensional. Thin layers work best to avoid clumps. Repeat layering until you reach the desired richness. Each layer should be dry to prevent mixing colors.
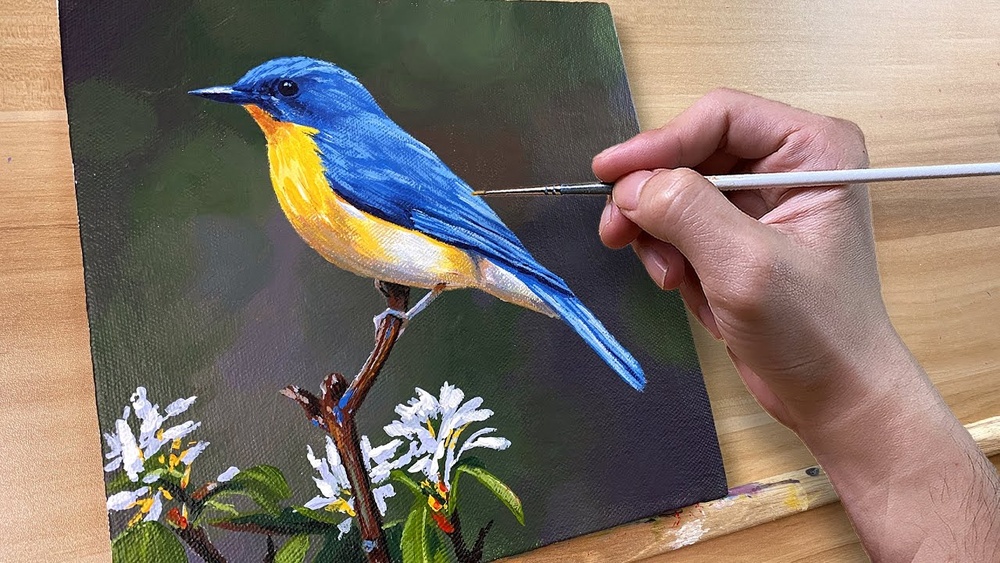
Using Brush Techniques For Feathers
Choose brushes with fine tips for detailed feather work. Use short, quick strokes to mimic feather shapes. Change brush direction to follow natural feather flow. Dry brushing adds a soft texture to feathers. Dab the brush lightly for a fluffy look. Mix colors on your palette for varied feather tones. Use a fan brush to create fine lines and soft edges.
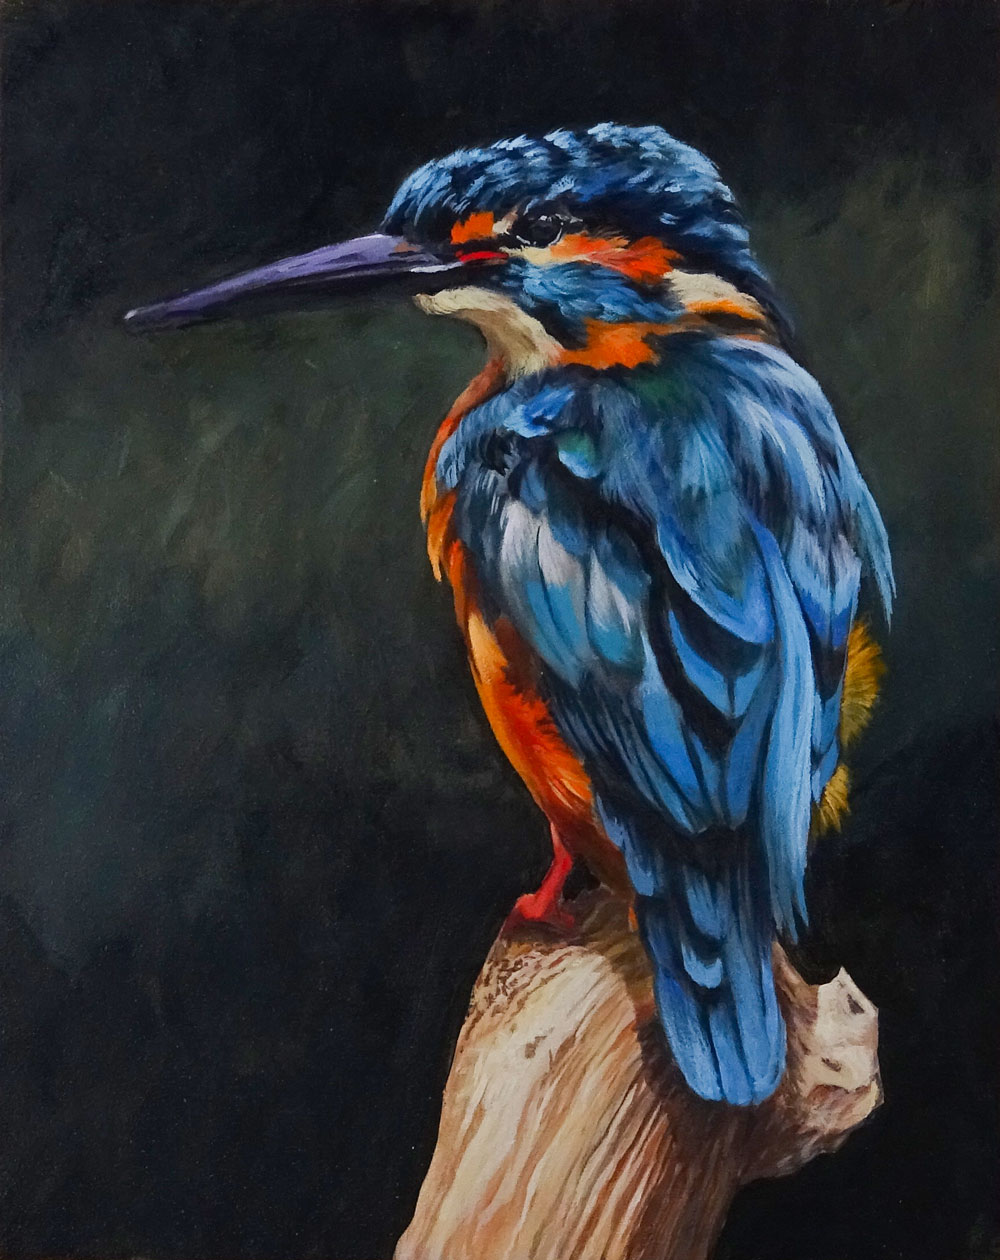
Adding Highlights And Shadows
Adding highlights and shadows brings your bird painting to life. These details create depth and shape. They make the bird look more real and three-dimensional. Careful use of light and dark colors can show the bird’s feathers, curves, and posture clearly.
Use highlights to show where light hits the bird’s body. Shadows show parts hidden from light. This contrast helps the painting pop. It also guides the viewer’s eye to important parts of the bird.
Enhancing Light Effects
Start with a light color slightly brighter than your base paint. Use a small brush for fine details on feathers and eyes. Apply highlights on curved surfaces like the bird’s head and wings. Focus on areas where light naturally falls.
Use thin, gentle strokes to blend highlights smoothly. Avoid harsh lines to keep a soft look. Bright spots on the beak or around the eyes add sparkle. This makes the bird appear lively and alert.
Defining Shadows For Realism
Pick a darker shade of your base color for shadows. Add shadows under the wings and belly. These areas usually get less light. Use gentle strokes to build shadow layers gradually.
Pay attention to the bird’s shape and feathers. Shadows create volume and texture. Darken small areas behind feathers to show separation. This helps the bird look natural and detailed.
Credit: thevirtualinstructor.com
Finishing Touches
Finishing touches bring your bird painting to life. This stage adds depth and sharpness. Small details make a big difference. The right finish protects your artwork for years.
Refining Details
Look closely at your bird painting. Use a fine brush to add small lines or highlights. Add tiny feathers or bright spots in the eyes. These details make your painting more realistic. Take your time and work carefully. Less is more here; avoid overdoing it.
Sealing Your Painting
Sealing protects your acrylic painting from dust and damage. Use a clear acrylic varnish made for paintings. Apply thin, even coats with a clean brush. Let each coat dry before adding the next. This step keeps colors bright and prevents fading. Your bird painting will stay beautiful for a long time.
Frequently Asked Questions
What Materials Do I Need To Paint A Bird With Acrylics?
You need acrylic paints, brushes, a palette, canvas or paper, water, and a pencil for sketching. Quality materials improve your painting’s outcome and make the process easier.
How Do I Create Realistic Bird Feathers In Acrylic Painting?
Use thin brush strokes and layer colors from dark to light. Blend carefully and add fine details with a small brush for a realistic feather effect.
What Are The Best Techniques For Painting Bird Eyes?
Start with a dark base color, add highlights using white or lighter tones, and use fine brushes for detail. This gives the eyes depth and life.
How Long Does Acrylic Paint Take To Dry On Canvas?
Acrylic paint typically dries in 15-30 minutes. Drying time depends on paint thickness, humidity, and temperature. Thin layers dry faster than thick ones.
Conclusion
Painting a bird with acrylic paint can be fun and relaxing. Start with light colors and build layers slowly. Use small brushes for details like feathers and eyes. Don’t rush; take your time to enjoy the process. Practice often to improve your skills.
Each painting will look better than the last. Keep experimenting with colors and shapes. Soon, you will create beautiful bird art easily. Remember, patience and practice bring great results. Happy painting!