
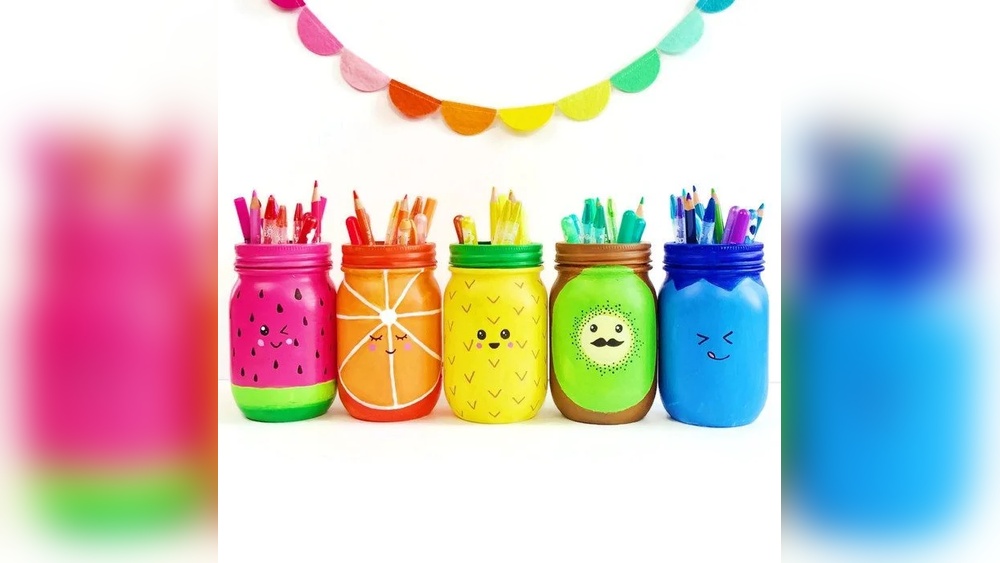
Quick answer: To paint mason jars, wash them in hot soapy water, wipe the glass with rubbing alcohol, and paint the outside with glass-specific paint, multi-surface acrylic or spray paint in thin coats. For a frosted or chalky look, paint the inside instead. Let the paint dry, then either oven-cure it if the paint label allows or seal it with a clear coat, and hand-wash the jars only.
Glass is one of the least paint-friendly surfaces in crafting. It is smooth, non-porous and slightly oily from handling, so ordinary acrylic often peels off in a single strip. Knowing how to paint mason jars well comes down to cleaning the glass properly and picking a paint and finishing method that matches how the jar will be used.
This guide covers prep, paint types, inside versus outside painting, distressed and frosted finishes, curing, and practical project ideas. If you want specific paint recommendations, see our guide to the paints that stick best to mason jar glass.
Supplies for Painting Mason Jars
- Clean mason jars (labels and glue removed)
- Dish soap and hot water
- Rubbing alcohol (70 percent or higher) and lint-free cloths or cotton pads
- Paint: glass and tile paint, enamel-style glass paint, multi-surface acrylic, chalk-style paint, or spray paint
- Brushes: soft synthetic flats and rounds; foam pouncers for even coverage
- Painter’s tape, rubber bands or vinyl stickers for masking
- Fine sandpaper (150 to 220 grit) for distressing
- Clear sealer: brush-on or spray, matte or gloss
- Optional: oven for curing (only with paints labeled for baking)
Choosing Paint for Glass Jars
Each paint type behaves differently on glass. This overview explains where each fits.
| Paint type | Adhesion on glass | Finish | Washability | Best for |
|---|---|---|---|---|
| Glass and tile paint (bakeable) | Very good after curing | Opaque or translucent, glossy | Often top-rack dishwasher safe per label | Jars that will be washed or handled often |
| Multi-surface acrylic | Good on clean glass | Satin | Hand-wash; better when sealed | Decor jars, vases, holders |
| Chalk-style paint | Good | Ultra-matte, easy to distress | Must be sealed | Farmhouse and distressed looks |
| Spray paint (multi-surface) | Good with primer | Very even, many sheens | Hand-wash | Fast, smooth base coats on many jars |
| Standard craft acrylic | Weak on bare glass | Satin or matte | Poor without primer and sealer | Painting inside jars or over primer |
| Translucent glass stain | Good | See-through color | Varies | Tinted, stained-glass effects |
How to Paint Glass Jars for Crafts: Step-by-Step
Step 1: Remove labels and adhesive
Soak jars in hot soapy water for 15 to 30 minutes, then peel the labels. Rub stubborn glue with a little cooking oil or a citrus-based adhesive remover, then wash again to remove the oil.
Step 2: Degrease with alcohol
Wipe every surface you plan to paint with rubbing alcohol. This removes fingerprints, soap film and oils that cause paint to bead or peel. From here on, hold the jar by the inside or wear gloves so you do not leave new fingerprints.
Step 3: Mask any design areas
For see-through windows, hearts, stripes or letters, apply painter’s tape, vinyl stickers or rubber bands now. Burnish edges firmly with a fingernail or a credit card so paint does not creep underneath.
Step 4: Apply the first coat thinly
Brush or pounce on a light coat. On glass, the first coat will look streaky and uneven. Resist the urge to fix it with more paint, which only causes drips and sags. A foam pouncer used with an up-and-down dabbing motion gives the most uniform coverage on curved glass and avoids brush lines.
If you are spray painting, hold the can about 10 to 12 inches away and use sweeping passes, starting and ending past the jar. Set the jar upside down on a can or a dowel so you can coat the whole outside.
Step 5: Build up two or three coats
Wait until each coat is dry to the touch, usually 20 minutes to an hour, before adding the next. Two or three light coats typically give full opacity.
Step 6: Remove masking
Pull tape or stickers while the last coat is still slightly soft. Pulling after the paint fully hardens can lift the edges.
Step 7: Distress or decorate (optional)
For a worn farmhouse look, wait until the paint is dry and lightly sand raised areas such as the embossed lettering, the rim threads and the edges of the base. The glass shows through and catches light.
Step 8: Cure or seal
Follow the instructions for your specific paint. Bakeable glass paints usually need to air-dry first (often 24 hours or more), then go into a cold oven that is heated to the stated temperature, held for the stated time, and cooled with the jar inside to prevent thermal shock. Non-bakeable paints should be sealed with two thin coats of clear sealer once dry.
Painting the Inside vs the Outside of a Jar
Both work, and each gives a different effect.
Outside painting gives you texture and allows distressing, stenciling and fine details. It is more exposed to scratches and handling.
Inside painting gives a glossy, glass-fronted color because you see the paint through the glass. It is protected from handling and needs no sealer on the outside. Pour a small amount of thinned acrylic into the jar, swirl it around to coat the walls, turn the jar upside down on paper towels to drain, and let it dry for a day or two. The downside: painted interiors cannot hold water, food or live flowers, and very thick pours can take a long time to dry.
Popular Mason Jar Paint Finishes
Frosted glass look
Use frosted glass spray, or mix a small amount of white paint with clear glass medium and apply a thin coat. Light passes through, which suits candle holders.
Tinted translucent jars
Translucent glass stains or a mixture of glass medium and a small amount of acrylic give a sea-glass tint. Apply in thin, even coats with a soft brush, then bake if the product allows.
Chalky distressed farmhouse
Two coats of chalk-style paint, light sanding on the embossed details and rim, and a clear matte sealer. Twine around the neck finishes the look.
Ombre and dip-dye
Spray the bottom third in a darker shade, the middle in a mix, and the top in a lighter shade, overlapping each band while still wet so they blend.
Reverse stencil reveal
Apply a vinyl sticker shape, paint the whole jar, and peel the sticker to reveal clear glass in that shape. With a tea light inside, the shape glows.
Mason Jar Craft Ideas
- Brush and pencil holders for an art desk. A tall pint or quart jar holds long-handled brushes upright.
- Tea light lanterns with frosted or reverse-stenciled finishes. Use battery tea lights if the paint is not heat-rated.
- Bud vases painted on the outside only, so they can hold water.
- Bathroom storage for cotton balls and swabs, sealed to resist humidity.
- Gift jars for cookies or candy, painted outside only and away from the rim.
- Seasonal decor like pumpkin-orange jars with painted faces or snowman jars in white with black dots.
DIY Craft Paint Storage Ideas Using Mason Jars
Painted jars make useful studio storage, which is a nice way to put leftover jars to work.
- Color-coded supply jars: paint each lid or band in the color family of what it holds so you find tools quickly.
- Brush washing jar: keep one jar plain inside for water, and paint only a band around the outside so you can see the water level.
- Mixed-paint saver: small 4-ounce jars with tight lids keep custom mixed acrylic colors usable for days. Label the lid with the mix recipe.
- Bottle rack alternative: stand squeeze bottles of craft paint upside down in wide-mouth jars so paint stays near the nozzle.
- Lazy Susan jar station: group six to eight painted jars on a turntable for markers, pens and brushes.
Painting Mason Jar Lids and Bands
Metal lids and screw bands often get overlooked, but painting them pulls the whole jar together. They need different prep than the glass.
- Remove the lid from the jar and paint it separately so paint does not seal the threads.
- Scuff and degrease. Lightly sand the band with fine sandpaper, then wipe with rubbing alcohol.
- Use a metal primer or a spray paint that bonds to metal. Acrylic over bare metal tends to chip off the edges.
- Keep the threads clean. Paint on the inner threads makes the band bind or flake every time you open it. Mask them with tape or wipe paint away while wet.
- Seal the outside only. A clear coat on the top and sides protects against scratches.
Two-piece canning lids can be replaced with one-piece decorative lids, or you can punch holes in the flat lid with a nail and hammer before painting for a lantern or a straw lid.
How Many Coats and How Long: Quick Reference
| Paint type | Typical coats | Touch-dry between coats | Finishing |
|---|---|---|---|
| Bakeable glass paint | 2 | About 1 hour | Air-dry, then oven cure per label |
| Multi-surface acrylic | 2 to 3 | 30 to 60 minutes | Cure, then clear sealer |
| Chalk-style paint | 2 | 30 to 60 minutes | Distress, then wax or sealer |
| Spray paint | 2 to 3 light passes | 10 to 30 minutes | Clear spray sealer |
| Poured interior acrylic | 1 swirl coat | 24 to 48 hours | No outside sealer needed |
These times are general guidelines. Humidity and temperature can double them, so always defer to the instructions on your paint.
Common Mistakes When Painting Mason Jars
- Skipping the alcohol wipe. Invisible oils are the top cause of peeling.
- Heavy first coats. They drip down curved glass and pool at the base.
- Painting near the rim of jars used for drinking. Keep food and lip-contact areas paint-free; many craft paints are not food-safe.
- Putting painted jars in the dishwasher. Unless the paint label specifically says dishwasher safe after curing, hand-wash only.
- Heating jars too fast. Placing a jar into a hot oven or taking it out hot can crack the glass.
- Using real candles in jars with non-heat-rated paint. Use battery tea lights instead.
Troubleshooting Painted Glass
Paint peels off in strips
The glass was not fully degreased, or the paint was not designed for glass. Strip the jar with hot water and a scraper, clean with alcohol, and repaint with a glass-friendly paint.
Streaky, uneven coverage
Use a foam pouncer instead of a brush, and add one more thin coat rather than one thick coat.
Bubbles in the paint
Bubbles often come from shaking a bottle right before use or overworking the paint. Stir gently instead, and pop small bubbles with a pin while wet.
Paint scratches off easily
The paint may not be fully cured. Air-dry for longer, bake if the product allows, or add a clear sealer.
FAQs
What paint works best on mason jars?
Glass and tile paints that can be oven-cured give the most durable results on jars that will be handled or washed. Multi-surface acrylics, chalk-style paints and spray paints work well for decorative jars, especially when sealed.
Can you use acrylic paint on glass jars?
Yes, but standard craft acrylic grips poorly on bare glass. Clean the glass with rubbing alcohol, use a multi-surface acrylic or add a glass medium, and seal the finished jar. Painting the inside of the jar with acrylic also works well for decorative pieces.
How do you make painted mason jars waterproof?
Use a bakeable glass paint and cure it as directed, or apply two coats of clear waterproof sealer over the dried paint. Even then, hand-wash gently instead of soaking.
Should I paint the inside or outside of the jar?
Paint the outside for texture, distressing and jars that will hold water or flowers. Paint the inside for a glossy, protected color on purely decorative jars.
Are painted mason jars food safe?
Most craft paints and sealers are not rated food safe. Keep paint on the outside and away from the rim, and do not paint the inside of any jar that will hold food or drinks.
How long does paint take to dry on mason jars?
Most paints are touch-dry in about 20 minutes to an hour, but curing takes longer, often 24 hours to several days, or a baking step for oven-cure glass paints. Follow the paint label for the full cure time.
Final Thoughts
Mason jars paint beautifully once you treat glass on its own terms: clean it with alcohol, keep coats thin, and cure or seal according to the paint you chose. Decide early whether the jar will hold water or be washed, because that decision determines both the paint and the finishing method.
Ready to pick supplies? Our guide to the best paint for DIY mason jar crafts compares glass paints, multi-surface acrylics and spray options so you can match one to your project.




