Are you ready to unlock the full potential of your artwork in Procreate? Mastering the Selection Tool is your key to precision and creativity.
Whether you want to isolate a specific area, move parts of your drawing, or make quick edits without affecting the rest, the Selection Tool gives you powerful control over your canvas. In this guide, you’ll learn simple steps and insider tips to use all the selection modes effectively—no complicated jargon, just clear instructions you can follow right now.
Keep reading, and soon you’ll be selecting, adjusting, and transforming your art like a true Procreate pro. Your creative freedom is just a few taps away!
Selection Tool Basics
The Selection Tool in Procreate is essential for editing specific parts of your artwork. It lets you pick areas to move, resize, or change colors. Learning the basics helps you work faster and create cleaner designs.
This tool is easy to use and offers different ways to select parts of your canvas. Understanding how to access it and the modes available will improve your workflow.
Accessing The Selection Tool
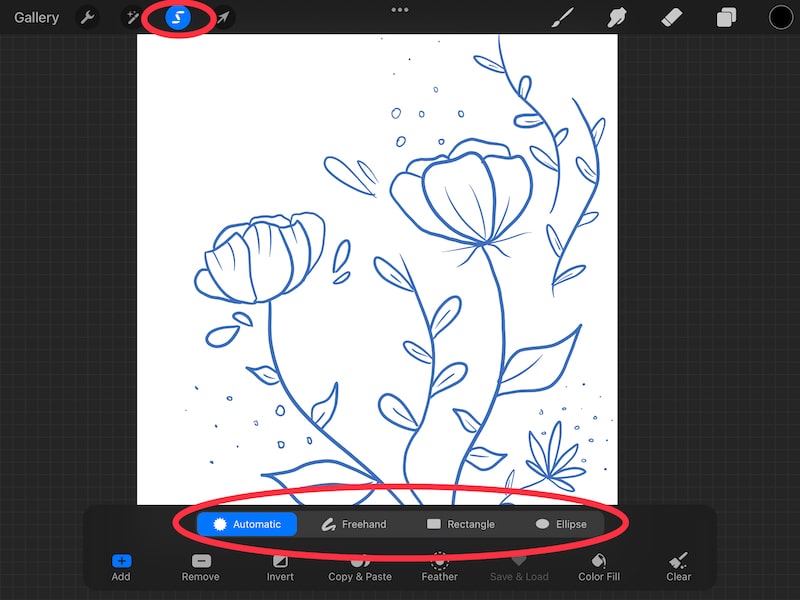
To access the Selection Tool, tap the ‘S’ icon on the top menu. This opens the selection options for your current layer. You can also use gestures to quickly enter selection mode. Once active, you can start choosing parts of your drawing.
Selection Modes Overview
Procreate offers four main selection modes: Freehand, Rectangle, Ellipse, and Polygon. Freehand lets you draw any shape around the area. Rectangle and Ellipse create geometric selections. Polygon allows you to tap points to form a custom shape. Each mode fits different editing needs.
Freehand Selection
The Freehand Selection tool in Procreate allows you to select any area on your canvas by drawing custom shapes. This tool gives you full control over what you want to isolate, edit, or move. It is perfect for creating irregular or complex selections that other tools might miss.
Using Freehand Selection helps you work more precisely. You can outline parts of your artwork exactly as you need. This method is simple and effective for detailed editing tasks.
Drawing Freeform Selections
To draw a freeform selection, choose the selection tool from the menu. Then, tap on the freehand option. Use your finger or stylus to draw around the area you want to select. Follow the shape carefully to include all parts you need. You can adjust your drawing speed for better accuracy. Take your time to get the shape right.
Closing The Selection Loop
Once you finish drawing the selection, connect the end of your line back to the starting point. Procreate automatically closes the loop and highlights the selected area. If the loop is not closed, the selection will not activate. Make sure the end touches the beginning to complete the selection. This step ensures the tool knows which part to isolate.
Automatic Selection
Automatic Selection in Procreate lets you quickly select areas by color. This tool finds and highlights parts of your artwork that share similar colors. It saves time compared to manual selection. You can easily pick large or small sections with just a tap. Adjusting the selection helps refine the area to fit your needs perfectly.
Tapping To Select Colors
Tap on the area you want to select. Procreate will highlight all connected pixels with similar colors. This method works best on flat color areas or simple gradients. It helps you isolate parts of your drawing without tracing. You can select multiple areas by tapping different spots.
Adjusting Selection Threshold
After tapping, hold your finger on the screen. Drag left or right to change the selection size. Moving right increases the threshold, selecting more colors. Moving left reduces it, making the selection tighter. This lets you control how much of the color range is included. Adjust until the selection fits your needs exactly.

Credit: folio.procreate.com
Shape Selections
Shape selections in Procreate help you pick exact areas fast. They let you select simple shapes like rectangles and ellipses easily. This tool saves time and adds precision to your artwork. You can also create perfect squares and circles with a simple gesture.
Using Rectangle Mode
Rectangle mode selects areas in a box shape. Tap the selection tool and choose Rectangle mode. Drag your finger or stylus to draw the box around your target area. The selection edges snap to a perfect rectangle. Adjust the size by dragging corners. This mode works well for cropping or isolating rectangular parts.
Using Ellipse Mode
Ellipse mode lets you select oval or circular areas. Pick the Ellipse option in the selection tool. Drag to form an ellipse around your subject. You can move or resize it by dragging the shape’s edges. This mode is perfect for selecting round objects or soft shapes quickly.
Creating Perfect Squares And Circles
Hold one finger on the screen while drawing a rectangle or ellipse. This action locks the shape’s proportions. The rectangle becomes a perfect square. The ellipse turns into a perfect circle. This tip helps you make exact geometric selections. Use it to keep your shapes balanced and neat.
Refining Selections
Refining selections in Procreate helps you perfect the chosen area before editing. It allows precise control over your artwork. You can add or remove parts of the selection easily. This process saves time and improves accuracy.
Adding Areas To Selection
To add more areas, tap the selection tool again. Choose the “Add” mode from the options. Draw or tap the new area you want included. The added parts join the original selection seamlessly. This helps include details missed in the first selection.
Removing Areas From Selection
Select the “Remove” mode in the selection options. Draw around the parts you want to exclude from the selection. These areas will be cut out from the current selection. Removing unwanted parts keeps your selection clean and precise.
Inverting Selections
Inverting switches the selected and unselected areas. Use the invert option in the selection menu. This is useful when you want to work outside the current selection. It saves time by reversing the focus of your selection.
Credit: adventureswithart.com
Working With Selections
Working with selections in Procreate lets you control specific parts of your artwork. You can isolate, edit, and adjust areas without affecting the rest. This makes your workflow faster and more precise. Understanding how to use selections helps you create detailed and clean designs.
Below are key actions you can perform with selections in Procreate. Each step enhances your ability to edit small areas effectively.
Moving And Transforming Selections
After selecting an area, tap the Transform tool. Drag the selection to move it anywhere on the canvas. You can resize, rotate, or flip the selection using handles. This allows you to adjust parts without redrawing. Confirm changes by tapping outside the selection or hitting the Transform button again.
Painting And Erasing Within Selections
Selections act as masks. Paint or erase only inside the selected area. This keeps the rest of your artwork untouched. Use brushes or erasers normally, but changes stay limited to the selection. It’s perfect for adding details or cleaning edges without risk.
Cutting, Copying, And Pasting Selections
Once an area is selected, use the actions menu to cut, copy, or paste it. Cutting removes the selected part from the original layer. Copying duplicates it without deleting. Pasting places the copied content as a new layer. This helps rearrange or duplicate elements quickly and easily.
Advanced Selection Tips
Advanced selection tips in Procreate help you work faster and with more precision. They allow you to handle complex tasks easily. These tips improve your workflow and save time.
Knowing how to select an entire layer or use gestures speeds up your design process. Quick cancellation methods prevent mistakes and keep your work smooth. Use these tips to get better results with the selection tool.
Selecting Entire Layer Content
To select everything on a layer, tap the layer thumbnail. Hold your finger on it for a moment. This action selects all visible pixels on that layer instantly. It helps when you want to move or edit the entire layer content. No need to trace or guess areas.
This method works well for quick adjustments. It also makes copying or masking parts simple. Try it to save time on large projects.
Using Gestures For Selection Actions
Procreate supports handy gestures that speed up selection tasks. Use two fingers to tap the canvas and undo the last selection. Pinch with two fingers to zoom in or out while selecting. This keeps your focus sharp on details.
Swipe three fingers down to bring up the copy, cut, and paste menu. Gestures reduce taps and keep you in the creative flow. Practice them to become more efficient.
Quick Ways To Cancel Selections
Canceling a selection is simple and fast in Procreate. Tap the selection icon again to clear the current selection. Alternatively, tap outside the selection area to deselect. These quick methods avoid accidental edits.
Use the undo gesture with two fingers to reverse any unwanted selection. Fast cancellation keeps your workflow clean and error-free. Always clear selections before starting a new action.

Credit: www.shutterstock.com
Frequently Asked Questions
How Do I Select A Certain Area In Procreate?
Tap the Selection tool (S icon), choose a mode: Automatic, Freehand, Rectangle, or Ellipse. Draw or tap to select the area. Adjust threshold by dragging left or right. Use Add/Remove to refine. Then, move or edit within the selected area.
How Do I Select And Move A Part Of A Drawing In Procreate?
Tap the Selection tool (S icon), choose a mode, then select the drawing part. Tap the Transform tool, drag the selection, and release to move it.
How Do I Select A Portion Of An Image In Procreate?
Tap the ‘S’ icon for Selection tool in Procreate. Choose Freehand, Automatic, Rectangle, or Ellipse mode. Draw or tap to select the area. Adjust selection with Add or Remove. Use Transform to move or edit the selected portion.
How To Isolate Parts Of An Image In Procreate?
Open your image and tap the Selection tool (S). Choose Freehand or Automatic mode. Trace or tap the area to isolate. Adjust the selection threshold if needed. Use the Transform tool to move or edit the isolated part. Save your edited image.
Conclusion
Using the selection tool in Procreate helps refine your artwork easily. You can choose areas to edit, move, or erase with simple taps. Try different selection modes like automatic or freehand for best results. Practice selecting shapes to improve your drawing speed.
With these steps, your Procreate projects become more precise and creative. Keep exploring and enjoy making art!