
Have you ever looked at a digital painting and been amazed by the sky’s depth and atmosphere? Creating a believable sky and atmosphere in your digital art can transform a simple scene into something truly captivating.
But how do you achieve that perfect blend of colors, light, and mood that makes the sky feel alive? In this guide, you’ll discover straightforward techniques to paint stunning digital skies and atmospheric effects that draw viewers in. Whether you’re just starting out or want to enhance your skills, these tips will help you bring your digital landscapes to life and make your art stand out.
Ready to unlock the secrets behind painting mesmerizing skies? Let’s dive in.

Credit: www.dreamstime.com
Color Selection
Painting a digital sky that feels real depends heavily on gradient techniques. These techniques help create smooth color shifts that mimic natural light. Gradients bring life and depth to skies, making them more believable. Understanding how to use gradients well is key to a successful digital sky painting.
Creating Smooth Transitions
Start by choosing colors that blend well together. Use soft brushes or gradient tools to merge colors gently. Avoid harsh lines to keep the sky natural. Work slowly and build transitions step by step. Check your gradient from different angles for smoothness. This method helps the sky look seamless and realistic.
Layering Colors For Depth
Apply multiple layers of colors to add depth. Begin with a base color and add shades above it. Each layer should have slight color changes to create richness. Use cooler colors near the horizon and warmer colors higher up. This layering gives the sky a three-dimensional feel. It also adds mood and atmosphere to your scene.
Applying Opacity And Blending Modes
Adjust opacity to control the visibility of each layer. Lower opacity allows colors to softly mix together. Experiment with blending modes like Multiply or Overlay for better effects. These modes enhance light and shadow in your sky. They create vibrant color interactions that look natural. Use these tools to refine your sky’s appearance.

Credit: www.vecteezy.com
Sky Gradient Techniques
Atmospheric effects bring digital skies to life. They add depth and mood to your artwork. These effects mimic nature’s subtle light and weather changes. Painting them well creates a believable and immersive sky.
Focus on how light interacts with particles in the air. Use layers to build haze, mist, and weather elements. These details make your sky feel alive and dynamic.
Simulating Haze And Mist
Haze softens distant objects and colors. Use low-opacity brushes with light gray or blue tones. Apply gently over faraway parts of your sky. This shows moisture or dust in the air.
Mist works similarly but appears thicker and closer. Use soft, blurred edges to create a smooth, foggy look. Place mist near the horizon or above water to add mystery.
Incorporating Light Scattering
Light scattering changes sky colors based on sun position. Use warm oranges and pinks at sunrise or sunset. Cooler blues dominate midday skies. Blend colors softly for smooth transitions.
Add subtle glow around the sun or bright areas. Use radial gradients or soft brushes. This simulates sunlight scattering through the atmosphere and enhances realism.
Adding Rain And Weather Elements
Rain adds movement and drama to your sky. Paint thin, diagonal lines with reduced opacity. Add small splashes or droplets for detail. Use darker clouds to hint at storms.
Include lightning flashes or wind streaks to enrich weather scenes. These elements give energy and story to your digital skies. Adjust opacity and blur to keep effects natural.
Painting Clouds
Lighting and mood shape the soul of any digital sky painting. They guide the viewer’s eye and evoke feelings. Careful use of light can transform a flat image into a lively scene full of depth and emotion. Mood sets the tone, making the sky feel calm, dramatic, or mysterious. Understanding these elements helps create skies that tell stories and draw viewers in.
Using Light To Enhance Atmosphere
Light defines the atmosphere in digital sky art. Soft light creates a gentle, peaceful sky. Harsh light adds drama and intensity. Directional light shows the sun’s position and time of day. Glowing edges on clouds highlight their form and volume. Shadows add depth and contrast, making the sky feel three-dimensional. Playing with light intensity and color brings the atmosphere to life.
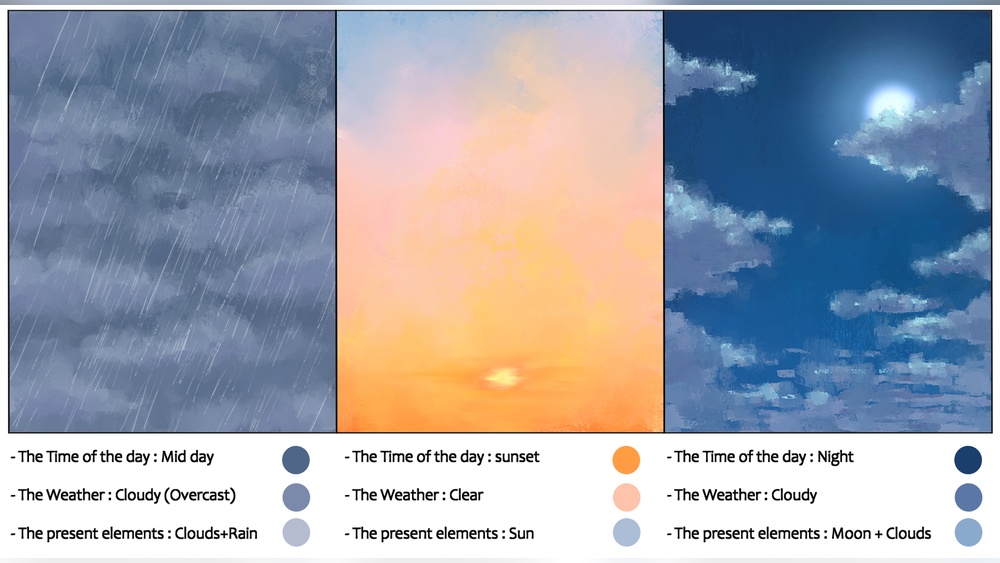
Capturing Different Times Of Day
Each time of day has unique lighting and colors. Morning skies often show cool blues and soft pinks. Midday light is bright and clear with strong contrasts. Evening skies glow with warm oranges, reds, and purples. Night skies are deep blue or black with subtle moonlight and stars. Painting these shifts helps create realistic and believable skies. Observing real skies helps capture their changing moods.
Setting Emotional Tone With Color
Colors express emotions in a sky painting. Warm colors like red and orange evoke warmth and passion. Cool colors like blue and purple bring calm and sadness. Bright, saturated colors feel energetic and lively. Muted tones create quiet, peaceful moods. Color choices shape how viewers feel about the scene. Using color thoughtfully sets the right emotional tone in your sky and atmosphere.

Credit: pngtree.com
Atmospheric Effects
Composition is a key factor in creating a stunning digital sky and atmosphere. It guides the viewer’s eye and sets the mood of the artwork. Proper composition helps in balancing colors, shapes, and light. It makes the sky feel natural and harmonious with the landscape below. Careful planning of sky placement, balancing with landscape elements, and using horizon lines will improve your digital painting greatly.
Planning Sky Placement
Decide where the sky will take up space in your painting. A large sky can create openness and freedom. A smaller sky focuses attention on the land or objects. Consider the mood you want to create. A high sky line often shows vastness. A low sky line can feel cozy or dramatic. Place clouds or light sources thoughtfully to guide the eye. Keep in mind the rule of thirds for a balanced layout.
Balancing Sky With Landscape Elements
Balance the sky’s brightness and color with the land below. Dark landscapes need brighter skies to avoid a heavy feel. Bright landscapes often work well with softer or muted skies. Use shapes in the sky to echo or contrast the forms in the land. Trees, mountains, or buildings can frame the sky. This creates depth and connection between sky and earth. Avoid letting one part overpower the other.
Using Horizon Lines Effectively
The horizon line anchors your painting and separates sky from land. Its placement changes the feeling of space and perspective. A low horizon line shows more sky and can feel vast. A high horizon line reveals more land and suggests closeness. Align clouds or atmospheric effects along the horizon to add depth. Softening the horizon with mist or light creates distance. This small detail makes your sky more believable.
Lighting And Mood
Painting digital skies and atmospheres requires the right tools to create depth and mood. Choosing the correct brushes and techniques helps capture natural light and soft cloud textures. Digital art programs offer many brushes designed for different effects. Understanding how to customize these brushes and use layers improves control over your artwork.
Recommended Digital Brushes
Soft round brushes work well for smooth sky gradients. Cloud brushes add texture with irregular shapes and edges. Airbrushes help blend colors gently to mimic real atmospheric effects. Some artists prefer textured brushes for a painterly look. Experiment with brushes from popular software like Photoshop, Procreate, or Clip Studio Paint. Select brushes that mimic natural media for more organic results.
Customizing Brush Settings
Adjust brush opacity for subtle color shifts in the sky. Control flow to manage paint buildup and smooth blending. Change brush size dynamically for details or broad strokes. Use pressure sensitivity on tablets to vary stroke strength. Modify scatter and spacing to create random, natural effects. Custom settings let you paint clouds and light softly or with sharp edges.
Using Layers And Masks
Layers separate sky elements for easy editing. Paint clouds on one layer and color gradients on another. Masks help erase parts without affecting the whole layer. Use clipping masks to apply lighting or color effects precisely. Layer blending modes add glow or haze to skies. Organizing layers keeps your work flexible and neat.
Composition Tips
Advanced techniques bring depth and realism to your digital sky and atmosphere paintings. These methods simulate natural light and air behavior. They help create more immersive and believable scenes. Use these techniques to enhance your artwork beyond basic colors and shapes.
Subsurface Scattering Effects
Subsurface scattering adds a soft glow to clouds and fog. Light penetrates the surface and scatters inside. This effect makes clouds look fluffy and semi-transparent. Use a low-opacity brush with light colors to paint this glow. Blend edges gently to avoid harsh lines. This technique gives volume and life to your sky elements.
Adding Glow And Light Bloom
Glow and light bloom create a radiant effect around light sources. Bright areas like the sun or bright clouds appear to emit light. Use a soft brush with warm colors to paint glow around these spots. Increase the brush size for a subtle bloom effect. Layer the glow softly to keep it natural. This technique adds energy and warmth to your sky.
Integrating Atmospheric Perspective
Atmospheric perspective shows depth by fading distant objects. Colors become lighter and less saturated with distance. Use cooler and paler colors for faraway clouds and sky. Add a slight blur to distant elements to mimic air particles. This technique creates a sense of space and distance. It makes your digital sky feel vast and realistic.
Tools And Brushes
Painting a digital sky and atmosphere can transform your artwork, but certain mistakes can weaken its impact. Avoiding these common errors helps create a natural, believable sky. Careful attention to color, light, and depth enhances your scene’s mood and realism.
Focus on avoiding these pitfalls to improve your digital sky paintings.
Overusing Saturation
Many artists add too much color saturation in the sky. Bright, intense colors may look unnatural and harsh. The sky usually has soft, subtle hues. Use muted tones and gentle color transitions. This approach keeps the sky balanced and pleasing to the eye.
Ignoring Light Direction
Light direction controls shadows and highlights in the atmosphere. Forgetting this makes the sky feel flat or confusing. Decide where the sun or light source is before painting. Apply light and shadow consistently to clouds and sky colors. This technique adds realism and depth.
Neglecting Atmospheric Depth
Atmospheric depth creates a sense of distance in your sky. Many beginners paint the entire sky with the same sharpness and detail. Distant clouds and sky should appear softer and lighter. Use gradients and blur effects to show depth. This makes your sky look vast and three-dimensional.
Frequently Asked Questions
How To Paint Atmospheric Skies?
Start with a gradient base using blues and whites. Blend softly for smooth transitions. Add subtle highlights and shadows to clouds. Use layers and varying opacity for depth. Incorporate warm tones near the horizon to enhance atmosphere.
What Is The 80/20 Rule In Painting?
The 80/20 rule in painting means focusing 80% of effort on key areas and 20% on details, enhancing overall impact efficiently.
What Is The 70 30 Rule In Art?
The 70 30 rule in art means 70% of the composition uses dominant colors and 30% uses contrasting colors to create balance.
How To Create An Atmosphere In Painting?
Create atmosphere in painting by layering colors from dark to light. Use soft edges, gradients, and muted tones for depth and mood. Add light effects and haze to enhance realism and evoke emotion.
Conclusion
Painting digital skies and atmosphere takes patience and practice. Start with simple shapes and soft colors. Gradually add details like clouds and light effects. Observe real skies to understand color changes. Use layers to build depth and mood. Keep experimenting with brushes and blending modes.
This process helps create natural, vibrant skies in your art. With time, your digital skies will look more alive and atmospheric. Enjoy the journey and keep painting!


