
Are you ready to bring the wild beauty of a wolf to life on your canvas? Painting a wolf with acrylics might sound challenging, but with the right approach, you can create a stunning piece that captures its strength and spirit.
In this guide, you’ll discover simple steps and practical tips to help you paint realistic fur, striking eyes, and the powerful presence wolves are known for. Whether you’re a beginner or looking to sharpen your skills, this article will walk you through everything you need to know to make your wolf painting stand out.
Let’s dive in and unleash your creativity!
Gather Supplies
Before starting your wolf painting with acrylics, gather all necessary supplies. Having the right materials ready helps you paint smoothly. It also ensures your artwork looks professional and vibrant. This section covers the key supplies you need to prepare.
Essential Acrylic Paints
Choose quality acrylic paints for rich colors and easy blending. Pick basic colors like white, black, grey, and brown. These shades create the wolf’s natural fur tones. Add blue or yellow to mix subtle highlights and shadows. Avoid cheap paints that may fade or crack over time.
Brush Types And Sizes
Select brushes that suit different painting details. Use flat brushes for broad strokes and background areas. Round brushes work well for finer details like fur texture. A small liner brush helps with sharp lines and delicate features. Keep a variety of sizes for flexibility.
Canvas And Palette Choices
Choose a smooth canvas or acrylic paper as your painting base. Medium-sized canvases work best for wolf portraits. Use a palette with enough space to mix colors freely. A plastic or glass palette cleans easily and keeps colors fresh. Prepare water and cloths for quick brush cleaning.
Sketch The Wolf
Sketching the wolf is the first step to a great acrylic painting. A clear sketch guides your brush and helps capture the wolf’s natural form. Take time to plan the basic shapes and details before adding color. This stage builds the foundation of your artwork and ensures correct proportions.
Start with light pencil strokes. You can erase and adjust as you go. The goal is to create a simple but accurate outline that shows the wolf’s pose and key features.
Basic Shapes And Proportions
Begin by drawing simple shapes like circles and ovals. These shapes represent the head, body, and joints. Use a large oval for the body and a smaller circle for the head. Add lines to mark the spine and limbs.
Check the size of each shape. The head should be smaller than the body. Keep the proportions realistic by comparing the size of the head to the body and legs. This makes the wolf look natural and balanced.
Outlining Features
Next, sketch the wolf’s main features. Draw the ears as pointed triangles on top of the head. Outline the snout by extending a curved line from the head circle. Mark the eyes, nose, and mouth with small shapes or dots.
Keep your lines soft and light. This helps you correct mistakes and adjust the shape. Focus on the wolf’s characteristic sharp eyes and strong jaw. These details give your painting personality and life.
Refining The Sketch
Now, add details to the basic outline. Shape the fur by drawing short, quick strokes along the neck and body. Refine the paws with small ovals for toes. Adjust the legs to show muscle and movement.
Erase unnecessary lines and darken the final sketch. Make sure the wolf’s posture looks balanced and natural. A clean, detailed sketch makes painting easier and more enjoyable.
Mix Base Colors
Mixing base colors sets the foundation for your wolf painting. It helps create natural-looking fur and adds depth. Start by selecting the right colors. Then blend them carefully for realistic tones. Proper preparation of paint mixtures saves time and improves your final artwork.
Choosing Wolf Color Palette
Select colors that reflect a wolf’s natural shades. Common choices include gray, brown, white, and black. Use Ultramarine Blue for cool grays. Burnt Sienna adds warm brown shades. Yellow Ochre works well for soft undercoats. Keep colors muted and earthy for realism.
Creating Fur Tones
Mix base colors to mimic wolf fur variations. Combine gray with hints of brown for mid-tones. Add white to lighten some areas. Use Payne’s Grey to darken shadows. Blend colors gently to avoid harsh lines. This technique gives fur texture and volume.
Preparing Paint Mixtures
Squeeze small amounts of each color onto your palette. Start mixing with a brush or palette knife. Test colors on a scrap paper or canvas. Adjust by adding more white or brown until you find the right shade. Keep paint consistency smooth and not too thick.
Block In Background
Blocking in the background sets the stage for your wolf painting. It creates depth and mood. This step helps the wolf stand out clearly. The background should be simple but effective.
Start by choosing colors that match the scene you want. Then lay down base layers with broad strokes. Finally, blend the colors to create a smooth transition. These steps prepare your canvas for detailed work.
Selecting Background Colors
Pick colors that complement the wolf’s fur tones. Earthy colors like browns and greens work well for forest scenes. Cool blues or greys suit snowy or moonlit settings. Use muted shades to keep the focus on the wolf.
Applying Base Layers
Use a large brush for fast coverage. Apply paint evenly across the canvas. Cover the entire background area with base colors. Keep strokes loose to avoid hard edges. Let each layer dry before adding the next.
Blending Techniques
Blend colors while the paint is still wet. Use a clean, dry brush or a soft sponge. Move in gentle circular motions to soften edges. Blend from dark to light tones for depth. Avoid over-blending to keep some texture.
Paint Wolf Base Layer
Painting the base layer of a wolf is a key step in acrylic painting. It sets the foundation for all details and textures. Start with broad strokes and simple colors to cover the canvas. This layer creates the shape and tone of the wolf before adding finer elements. Take your time to ensure smooth coverage and clear form.
The base layer guides the next painting stages. It helps in visualizing the final look of the wolf. Use colors that match the wolf’s natural fur tones. Avoid heavy details at this point. Focus on blocking in the main areas of light and dark.
Applying Base Fur Colors
Choose a mix of earth tones like browns, grays, and creams. Use a wide, flat brush to cover large areas quickly. Paint in the direction of the fur growth. This method gives the base a natural flow. Avoid using pure black or white here. Instead, blend colors to create soft transitions.
Establishing Light And Shadow
Identify the light source in your painting. Add lighter colors where the light hits the fur. Use darker shades for shadowed areas. This contrast brings depth to the base layer. Keep shadows soft and gradual. This helps the wolf appear three-dimensional later.
Maintaining Brush Control
Hold your brush lightly for better movement. Use gentle, steady strokes to avoid harsh lines. Clean your brush often to prevent muddy colors. Layer your paint thinly to keep the texture smooth. Controlled brushwork ensures a strong base for details.
Add Fur Texture
Adding fur texture brings your wolf painting to life. It makes the fur look soft and natural. Use simple techniques to mimic the look of real fur. This step requires patience and careful brushwork.
Focus on small details to create a realistic effect. Think about the direction of the fur and how light hits it. These tips will help you paint fur that feels alive and textured.
Using Brush Strokes For Fur
Use a small, round brush for fine fur lines. Lightly drag the brush to create thin, hair-like strokes. Follow the fur’s natural direction on the wolf’s body. Short, quick strokes work best for dense fur.
Vary stroke length to add realism. Avoid making all strokes identical. This technique gives the fur a dynamic, natural look.
Layering Highlights And Shadows
Start with a base color for the fur. Add darker shades in shadow areas to create depth. Use lighter colors on raised fur where light hits. Build layers slowly, letting each dry before the next.
This layering adds contrast and makes the fur appear three-dimensional. Blend edges softly to avoid harsh lines.
Creating Depth And Volume
Mix mid-tone colors between highlights and shadows. Paint fur in thin layers to build volume. Overlap brush strokes to simulate thick fur.
Use a dry brush lightly over layers for a soft texture. This method enhances the fur’s fullness and depth.
Detail Facial Features
Detailing the facial features brings your wolf painting to life. The face shows the wolf’s character and mood. Small touches create a realistic and expressive look. Focus on the eyes, nose, mouth, and ears. Use fine brushes and steady strokes for precision.
Take your time to build up layers of color. Blend shades carefully to add depth. Each feature needs attention to shape and highlight. This step makes your acrylic wolf painting stand out.
Painting Eyes And Nose
Start with the eyes to capture the wolf’s gaze. Use dark colors for the pupils and lighter tones for reflections. Add a small white dot to mimic light reflection. This adds life to the eyes. For the nose, use shades of black and gray. Paint the nostrils clearly. Add highlights on the nose tip for a wet look.
Shaping Mouth And Ears
Define the mouth with subtle lines. Use dark tones inside the mouth to show depth. Paint the lips carefully to shape the wolf’s expression. The ears need sharp edges and soft fur texture. Use light colors on the inner ear. Darker shades outline the outer part. Add small strokes to suggest fur.
Adding Fine Details
Use a fine brush to add tiny fur strokes around the face. Paint short lines to show fur direction. Add whiskers with very thin, light strokes. Use soft blending to smooth harsh lines. Highlight areas around the eyes and nose. These details give your wolf a natural look. Patience is key in this step.

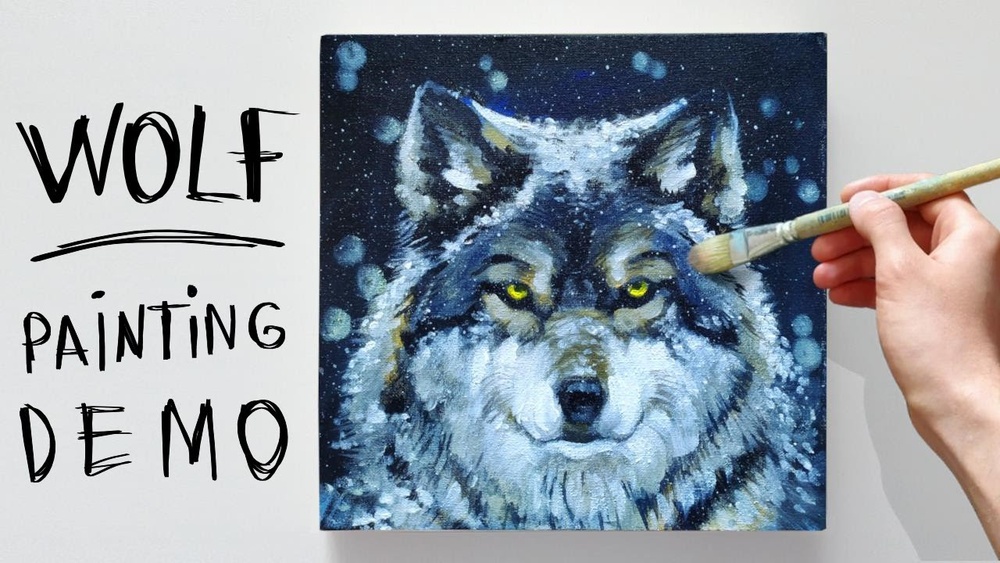
Credit: www.youtube.com
Enhance Contrast And Highlights
Enhancing contrast and highlights brings your wolf painting to life. It creates depth and makes the fur look realistic. Proper contrast guides the viewer’s eye across the artwork. Highlights add a natural shine to the wolf’s coat. These techniques make your acrylic painting stand out.
Strengthening Dark Areas
Start by deepening shadows around the eyes, nose, and ears. Use darker tones like Payne’s grey or burnt umber. Apply these colors with a fine brush for detail. Dark areas provide structure and shape to the wolf’s face. Avoid over-darkening; keep natural softness where needed.
Brightening Fur Highlights
Add light colors such as white, cream, or pale yellow on top of raised fur sections. Use a dry brush technique for soft edges. Focus on areas where light hits directly, like the forehead and cheeks. Highlights create texture and a sense of movement in the fur. Layer highlights gradually for a smooth transition.
Balancing Color Temperature
Mix warm and cool tones to keep the painting lively. Use warm colors like burnt sienna for sunny spots. Apply cool colors such as ultramarine blue in shaded parts. This balance prevents the painting from looking flat. It also reflects the natural environment of a wolf.
Finish Background Details
Finishing the background details brings life to your wolf painting. It creates a mood that fits the wild nature of the animal. Carefully working on these details makes the whole artwork more realistic and complete.
Focus on how the environment interacts with the wolf. This adds depth and a sense of place. Use soft strokes and gentle blends to keep the wolf as the main focus.
Adding Environmental Elements
Start by painting simple shapes that represent trees, rocks, or grass. Use muted colors so these elements do not overpower the wolf. Layer these shapes lightly to suggest distance and space. Small touches like fallen leaves or distant mountains add interest. Keep the strokes loose and natural for a realistic effect.
Softening Background Edges
Use a dry brush or soft sponge to blend the edges of the background. This technique helps the background fade gently behind the wolf. Avoid harsh lines or sharp contrasts near the wolf’s outline. Soft edges create a smooth transition and prevent distraction. This step enhances the focus on the wolf’s features.
Final Touches
Look over your painting for any rough spots or empty areas. Add small highlights or shadows to balance the background. Use a thin brush for delicate details like twigs or distant light spots. Step back often to see the whole picture clearly. These final touches polish your painting and make it visually pleasing.
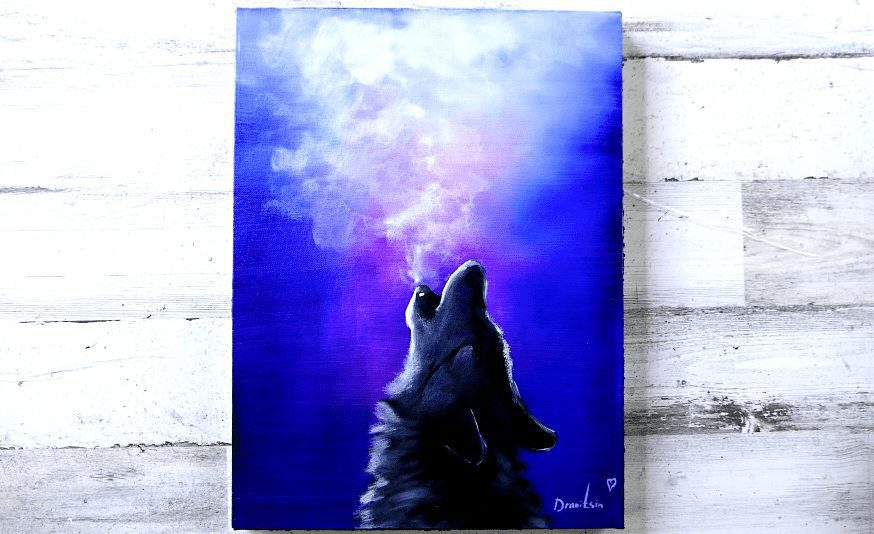
Credit: urartstudio.com
Seal The Painting
Sealing your acrylic wolf painting is a key step to protect your artwork. It keeps colors bright and guards against dust and scratches. A good sealant extends the life of your painting and makes it easier to clean.
Choose the right varnish and apply it carefully. Let the painting dry fully before starting. Follow the drying and care tips to keep your wolf looking great for years.
Choosing A Varnish
Select a varnish made for acrylic paints. Gloss varnish adds shine and depth. Matte varnish reduces glare and gives a soft finish. Satin varnish offers a balance between gloss and matte. Pick one based on your style and where the painting will hang.
Applying Protective Coating
Use a clean, soft brush or spray varnish for even coverage. Apply thin layers to avoid drips. Let each layer dry before adding another. Cover the entire surface, including edges. Avoid heavy coats that can crack or cloud the paint.
Drying And Care Tips
Allow the varnish to dry in a dust-free space. It usually takes 24 hours to dry completely. Keep the painting out of direct sunlight and away from moisture. Clean gently with a soft cloth to avoid scratches. Proper care preserves your wolf painting’s beauty.

Credit: stepbysteppainting.net
Frequently Asked Questions
What Colors To Paint A Wolf?
Use ultramarine blue for cool grays, burnt sienna for warm browns, yellow ochre for a tawny undercoat, and Payne’s grey for deep charcoal details. These colors create a realistic wolf palette with balanced cool and warm tones.
How To Make A Wolf In An Easy Way?
Draw a basic wolf shape using simple lines for the head and body. Add ears, eyes, and a snout. Sketch fur texture with short strokes. Use grey and brown shades for coloring. Finish by refining details like the nose and eyes for a realistic look.
How To Make Paint Look Like Fur With Acrylic Paint?
Use a fine brush to create short, quick strokes mimicking fur direction. Layer colors from dark to light. Add highlights with a dry brush for texture. Blend edges softly to enhance realism. Repeat layering until desired depth and softness appear.
How To Draw A Beautiful Wolf?
Start with basic wolf shapes, sketch the head and body outlines. Add facial features like eyes and nose carefully. Draw fur using short, layered strokes for texture. Shade to create depth and highlight key areas. Finish with details to enhance realism and beauty.
Conclusion
Painting a wolf with acrylics can be a fun and rewarding experience. Start with simple shapes and build up details slowly. Use the right colors to bring your wolf to life. Practice brush strokes to create realistic fur texture. Remember, patience and practice improve your skills.
Enjoy the process and express your creativity freely. Your unique wolf painting will show your effort and style. Keep exploring different techniques to make each artwork better. Painting teaches focus and joy, so keep your brushes moving!


